Recipes are meant to be shared! On this blog can be found classic Italian and Italian-American recipes that can be made at home, courtesy of the Italian-American Society of Peoria cooking classes. We’ve already tried out each and every one of these recipes. And not in a restaurant or chef’s kitchen – in our own homes! They’ve worked for us so we know they will work for you, too!
Food is a big part of any culture, and that said, especially of Italian culture. Italians take great pride in the food they prepare and serve at home and in the many family run restaurants that dot the Italian landscape. Wonderful chef-driven restaurants abound in Italy as well.
That is why the Conversational Italian for Travelers Phrase Book contains a special section on Restaurant Vocabulary! Take this pocket book of phrases along on your visits to Italy and read descriptions of the food you will be eating while in the restaurant, before you order!
You may want to use our pocket reference book or our Conversational Italian for Travelers textbook even before leaving for your trip to Italy to learn how to read those restaurant menus ahead of time!
But, for now, experience some Italian cuisine at home by sampling our recipes!
Learn how to make classic Italian desserts, like Tiramisù:
Recipe: FamousTiramisù
Learn how to make wonderful Italian main courses:
Recipe: Bolognese Meat Sauce
Recipe: Shrimp Scampi
And classic, hearty Italian soups:
Recipe: Italian Lentil Soup
Follow our blog for a new recipe you will surely want to try about once a month! And visit our website at Learn Travel Italian for cultural notes and interactive audio dialogues to really feel a part of Italian life and culture!
Lentil Soup brings a Buon Anno Nuovo! is a partial reprint from a blog originally posted on February 16, 2016, titled: “Italian Recipe: Lentil Soup (Zuppa di Lenticchie).”
In this updated version, I’ve added a note about what type of pasta is traditionally used for this soup and how to chop the vegetables so they are small enough and uniform shape to cook through evenly.
Also…
I’ve since added Instagram to my social media, and have added a video from Instagram to this post so you can see me cooking in real-time! I hope you like it!
For more recipes like these, as well as French recipes, follow me on my Instagram posts at Conversationalitalian.french.
Lentil soup is said to bring to luck to the family on New Year’s Day. I am not sure if anyone really knows exactly why lentils are supposed to be good luck. Maybe it is because they are shaped like small coins?
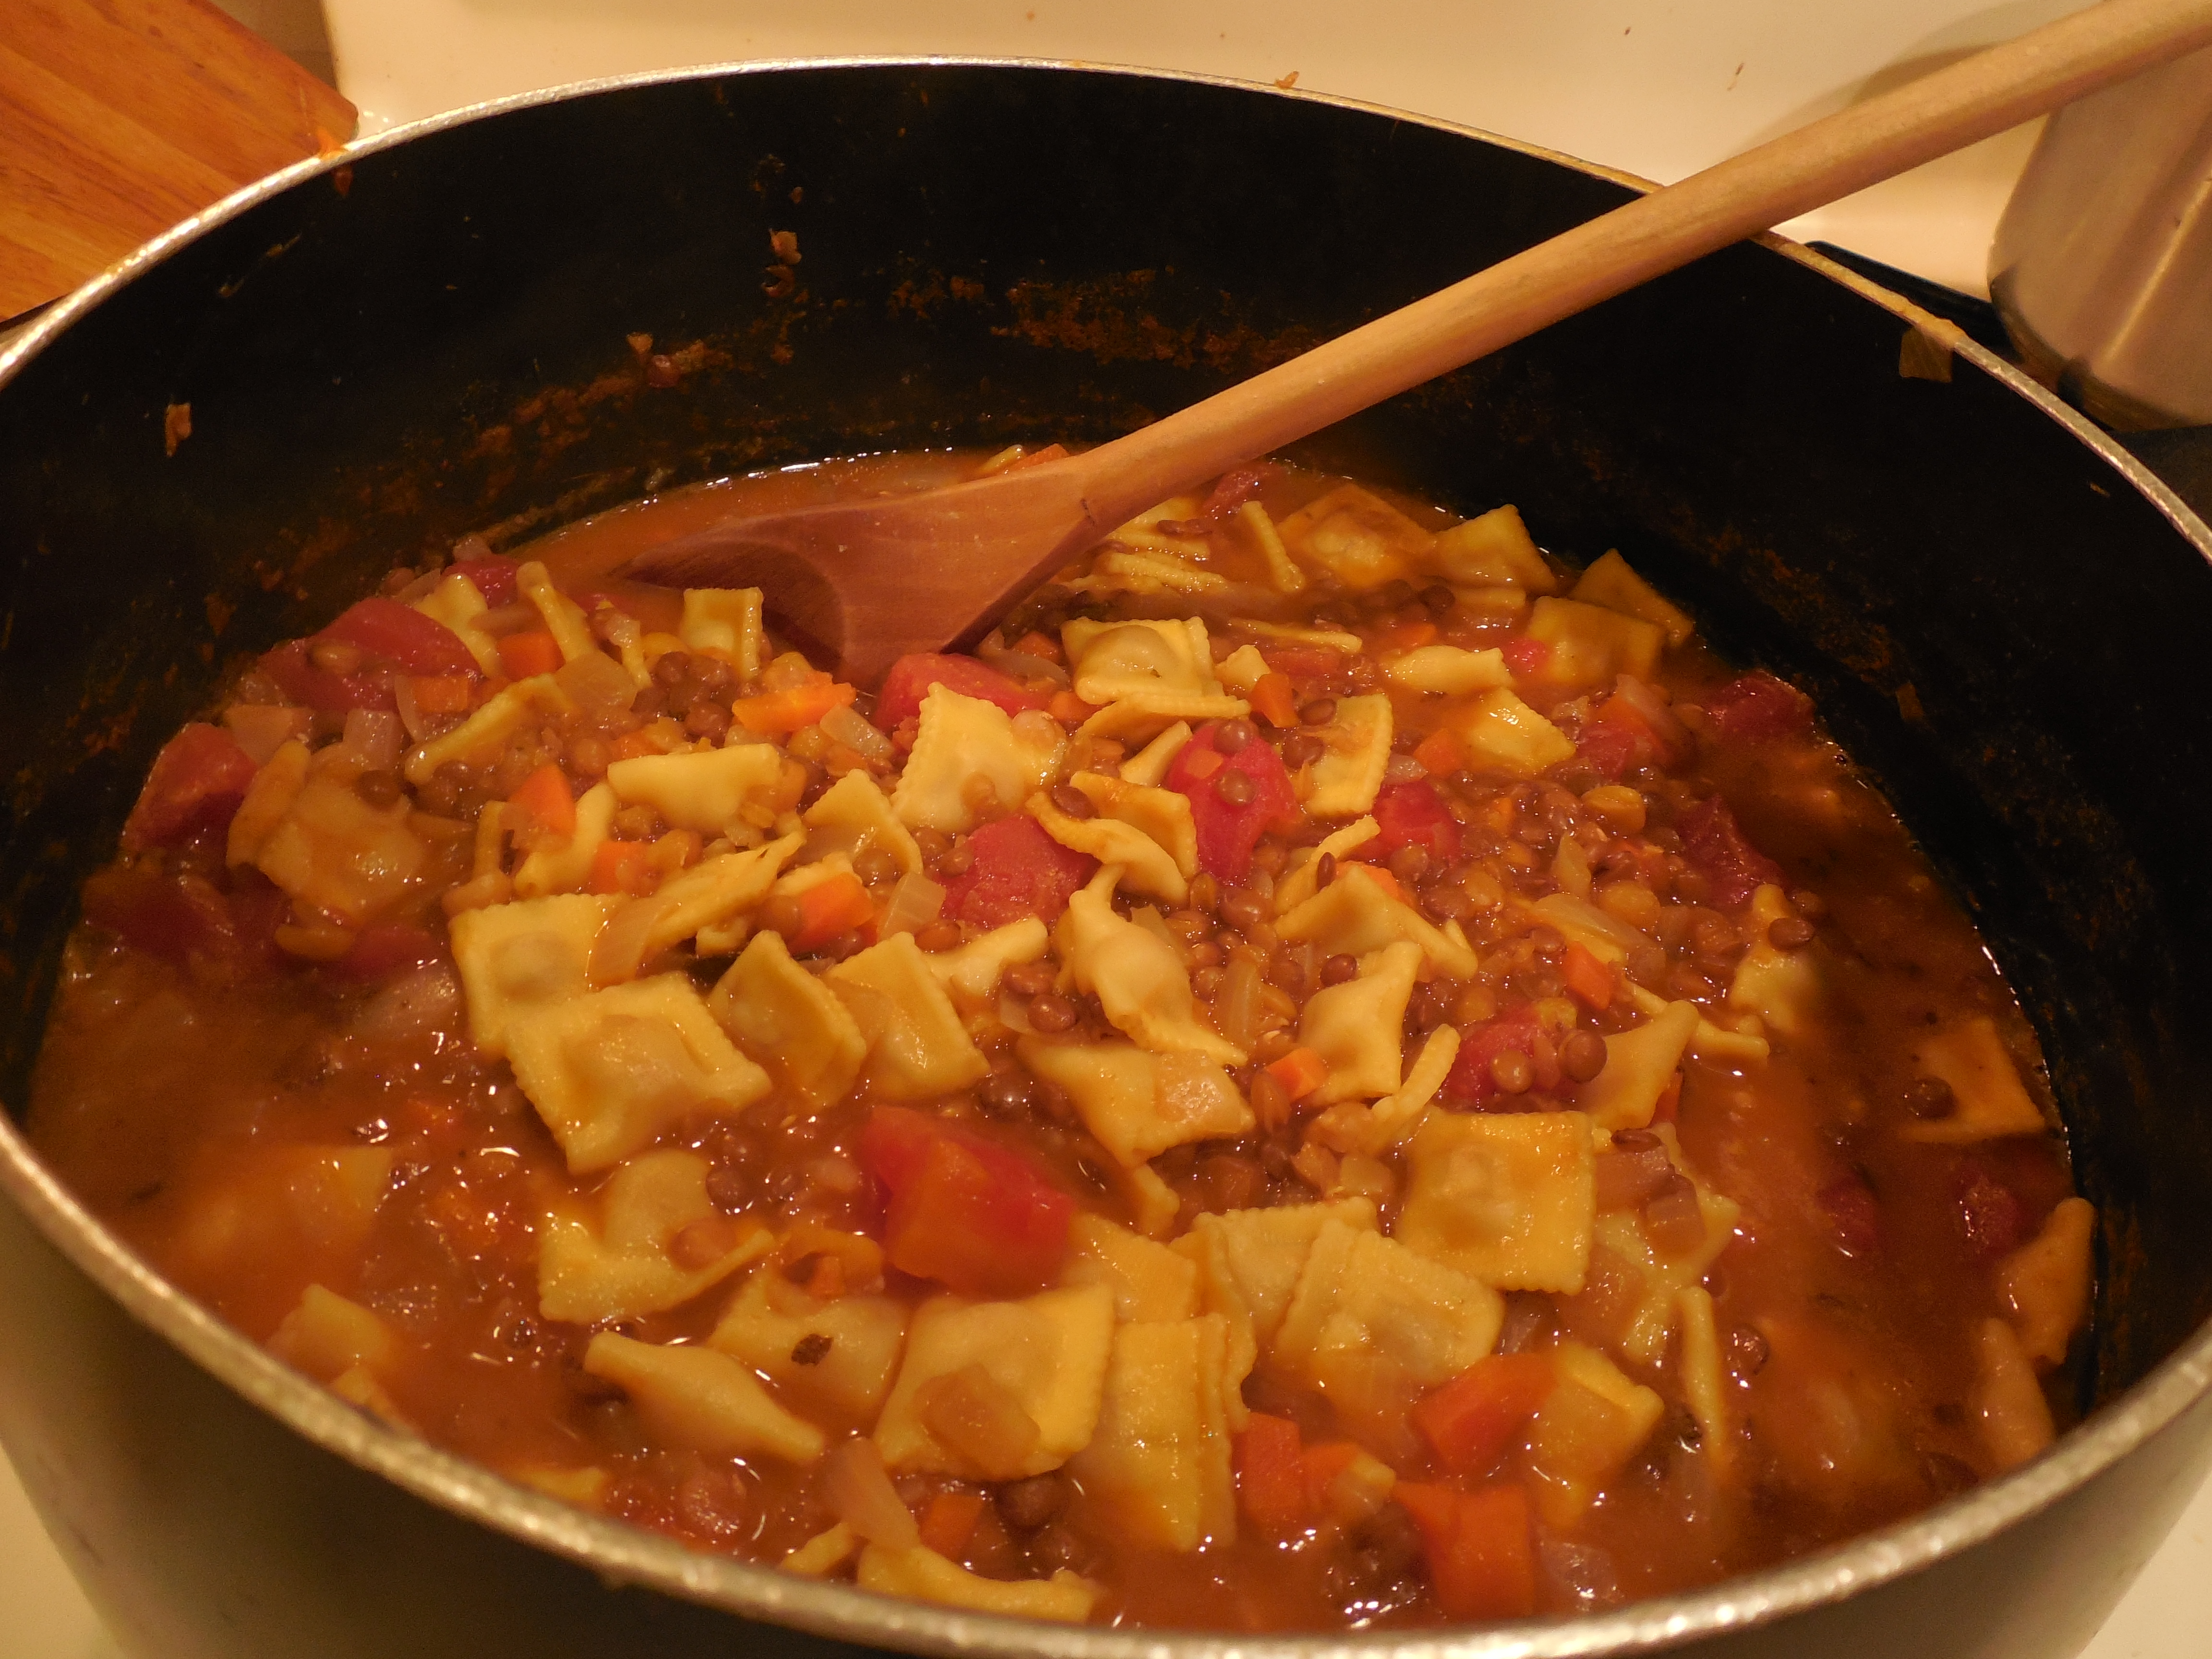
Whatever the reason lentils are a preferred dish for the new year, lentils are loved by Italians year round, and make a wonderful, hot, nourishing soup for everyone. Try this recipe, and I think you will agree, even if you’ve never eaten lentils before. Any kind of miniature pasta can be used in this soup. My mother usually breaks regular spaghetti into shorter pieces for her version, although miniature ravioli are fun if you can find them in your local grocery store. For a vegetarian dish, dried ravioli with squash filling, which are pictured in this blog, are a wonderful complement to the lentils.
Warm wishes for a Buon Anno 2022 a tutti! —Kathryn Occhipinti
3 Tablespoons olive oil
1 onion (chopped finely)
2 carrots (chopped finely)
1 stick of celery (chopped finely)
1 package (12 oz.) dried lentils (sorted and rinsed once but not soaked)
1 tsp crushed, dried sage
1 bay leaf
optional: meat stock or broth*
1 can (14.5 oz.) chopped tomatoes
about 6 oz. capellini pasta or dried miniature squash ravioli**
Use a large, wide-bottom pot to make this soup.
Heat the olive oil over medium heat and then add the chopped onion, celery, and carrot and cook, stirring, until both have softened a bit.
Add the lentils and cook the vegetables a bit longer, stirring, but do not let the onions brown. (This initial cooking of the lentils is said to harden the skin, so they will not become too mushy. If you like more mushy lentils, skip the sauté and just add the lentils after the rest of the vegetables have become soft . This will also decrease the overall cooking time.)
Add enough water (or meat stock if you have it and do not want a vegetarian dish) to cover the vegetables—about 6–8 cups—the dried sage, and the bay leaf.
Cover and bring to a boil; uncover, reduce heat, and simmer 45 minutes.
After the vegetables have cooked a bit, taste the soup. See how much the lentils have softened, and if they are still hard, cook longer. If they are about soft enough for your liking, proceed as follows:
Add about 1 Tablespoon of salt (to taste; less can be used) and an additional 2–4 cups of water for the pasta that you will soon be adding. Cover and bring soup back to a rolling boil.
When the soup is at a rolling boil, add the chopped tomatoes and the tomato juice from the can and the pasta. Dried, miniature ravioli with squash filling were used for this blog originally, as pictured above the recipe. Traditional pasta for this dish is capellini pasta, cut into short pieces, as shown in the Instagram video. Any small pasta will do, though, such as ditalini pasta or even miniature ravioli or tortellini.
Cook until the pasta is “al dente” or “to the tooth.”
Remember to remove the bay leaf before serving!
Enjoy with crusty Italian bread on a cold winter’s day!
*Italian “meat stock or broth” is often composed of whatever bones and small pieces of meat are left over from the night before—chicken and pork bones can be combined, for instance, or just one or the other used. When I make this soup for my family, it is usually with pork chop bones and meat left over from Monday night’s dinner. Adding homemade meat broth gives the soup a nice added complexity.
Italian dried squash ravioli used in the Lentil soup pictured above the recipe.
How to Chop Vegetables Carrots: Cut lengthwise to half, and then lengthwise again to get quarters. Line them up side by side and then cut crosswise from the tips to the base of the carrot to get small, even pieces that look like quarters of a circle. Celery: Cut lengthwise through each celery stalk as many times as needed to give pieces the same thickness as the carrot pieces. (You will need more lengthwise cuts at the thicker part of the celery near the base.) Then cut crosswise from the tip to the base to get small, rectangular pieces of celery about the same size as the carrot pieces. Onions: Cut lengthwise through the onion. Turn one of the halves flat side down. Holding the onion together with one hand, cut lengthwise along the green lines through the onion, except for the root holding the onion together at the base. Turn and cut horizontally, from the side away from the stem toward the stem. Just before reaching the stem, flip the onion flat again and make the final cuts. Discard the piece that contains the stem.
—Kathryn Occhipinti
Conversational Italian for Travelers Just the Important Phrases (with Restaurant Vocabulary and Idiomatic Expressions) is YOUR traveling companion in Italy! All the Italian phrases you need to know to enjoy your trip to Italy are right here and fit right into your pocket or purse.
Kathryn Occhipinti, MD, is the author of the Conversational Italian for Travelersseries of books and a teacher of Italian for travelers to Italy in the Peoria and Chicago area. “Everything you need to know to enjoy your visit to Italy!”
Visitlearntravelitalian.com/download.html to purchase/download Conversational Italian for Travelers and find more interesting facts and helpful hints about getting around Italy!Learn how to buy train tickets online, how to make international and local telephone calls, and how to decipher Italian coffee names and restaurant menus, all while gaining the basic understanding of Italian that you will need to know to communicate easily and effectively while in Italy. —From the staff at Stella Lucente, LLC
Capresi and Panzanella Salads with Tomatoes and Cucumbers from Your Garden is a partial reprint from a blog originally posted on July 28, 2019, titled: “Caprese and Panzanella Salads with Fresh Tomatoes and Basil.”
Need I mention that as an Italian-American tomatoes are always the focus of my Italian summer vegetable garden? And of course, at harvest time I love to make traditional Italian Caprese and Panzanella salads!
I plant several heirloom tomato varieties every spring from the family-run nursery I’ve found where I live now in Chicagoland. Late in the summer, when all the varieties have ripened, I love mixing the the deep red tomatoes with golden yellow tomatoes to make a traditional Carpese salad. You can read all about the best method to make this salad in the reprinted blog below.
You can also read about a method to make Panzanella salad in my original blog on Italian tomato and basil salads, although my family did not make Panzanella salad when I was growing up. As an adult, I had tried this salad in in restaurants and thought it a nice change from the usual Caprese salad, so I added it to my post. Caprese and Panzanella salads, I thought, were the two important Italian tomato dishes. Recently, I learned from a blog by Emiko Davies titled “Bronzino’s Panzanella,” that Panzanella salad is indeed a popular and traditional Italian salad in Tuscany, mentioned by the great Italian writer of the Decameron, Giovanni Bronzino in a poem, prior to the appearance of tomatoes in Italy.
We can assume that Panzanella salad started out as a way to use up old bread, as stale Tuscan bread lends itself well to being softened with a sprinkle of water. A little red onion, perhaps some basil, and olive oil and red wine vinegar might have been all an Italian housewife had available to lend some flavor her bread salad. According to the recipe provided by Bronzino, cucumbers and even some arugula could be added to magically turn the bounty of summer into a crunchy and refreshing summer treat.
Serendipitously, I had been growing Armenian cucumbers in my garden for the very first time this year, when I came across Davies’ blog. When I read about Bronzino’s version of Panzanella salad, I made it myself and posted the result on Instagram on Conversationalitalian.french.
Panzanella salad made Bronzino’s way, with cucumbers, was truly a revelation. The seeds of the Armenian cucumber were easy to remove from the center of the vegetable, and without the skin this variety of cucumber was light, crunchy, and flavorful. There are no real proportions to this salad; use as much reconstituted bread as you like and as much cucumber and other ingredients as you have on hand. Now THAT’s Italian!
Read the reprinted blog below for the best methods to make Caprese and Panzanella Salad with tomatoes!
Also…
I’ve posted below the image with the method for Panzanella Salad with cucumbers!
For more recipes like these, as well as French recipes, follow me on my Instagram posts at Conversationalitalian.french.
Making Caprese and Panzanella salads entails following a couple of simple methods, using whatever you have on hand, rather than following a strict recipe step by step. However, it is best to come as close as possible to the recommended ingredients, as the ingredients themselves will be the stars of each dish.
For the most mouth-watering Caprese salad imaginable, use fresh, vine-ripened tomatoes and soft, fresh buffalo mozzarella. In fact, do not make this salad if you do not have a soft, buffalo mozzarella, as this is the mozzarella that is used in the island of Capri, just outside Naples, where the salad originated. The hard mozzarella is for cooking, as it melts easily; it is too rubbery to be eaten with the soft, vine-ripened tomatoes and will not meld with the tomato juices and olive oil properly.
Coarse sea salt adds extra flavor to the tomatoes and will draw out their juices to meld with the olive oil for the dressing. Top all with a generous drizzle of your favorite pungent or fruity, extra-virgin olive oil from Italy, rather than the a more bland olive oil that you would use for cooking on the stove top.
A note about extra-virgin olive oils: A truly fresh extra-virgin olive oil will have a bit of a peppery flavor. Most olive oils sold in the US are old enough to have lost this peppery overtone, but will retain varying degrees of fruitiness and grassiness. Taste a few first press, 100% extra-virgin olive oils from different regions of Italy and you will be surprised at the nuances in flavor each brings!
For Panzanella salad, which probably originated as a clever way to use up day-old, stale bread with red onion for flavor, be sure to use a crusty loaf of good* Italian bread that is at least two days old and has dried out and hardened. Bread that has become stale naturally will need to be sprinkled with water to soften a bit prior to making this salad. Place the bread in a small bowl and sprinkle it with water the morning before you are planning to make the salad. The end result should not leave the bread mushy; the bread should spring back to life after the water is added if you are truly working with real Italian bread. If the crust is still too hard, it can be removed. Remember that the bread will continue to soften when it is combined with the vinegar and tomato juice when you make the salad.
If you want to make Panzanella salad with fresh Italian bread, you can always cut it into slices and dry it out in the oven just enough to be crunchy, or even add a bit of olive oil and brown it a bit to make croutons.
Panzanella salad originally did not contain mozzarella, but I like to include buffalo mozzerella in small pieces (bocconcini are nice), even though this is not traditional.
And, of course, large, sweet, fresh basil leaves from the garden are an essential ingredient for both Caprese and Panzanella salads!
But, whatever ingredients you have on hand, I’m sure you will enjoy these simple and refreshing tomato and basil salads on a hot summer day! -Kathyn Occhipinti
*Good Italian bread means Italian bread made in a bakery with the correct flour and cooked so that it has the proper, crunchy crust and soft but chewy texture. Only bread that has a good texture to begin with will “spring back” to life when you sprinkle it with water! Do not attempt Panzanella salad with cheap, grocery store bread labeled “Italian bread,” which will usually have a very soft grain and often even a soft crust and turn to mush when moistened again with water. And of course, no American “white bread” please! -Kathryn Occhipinti
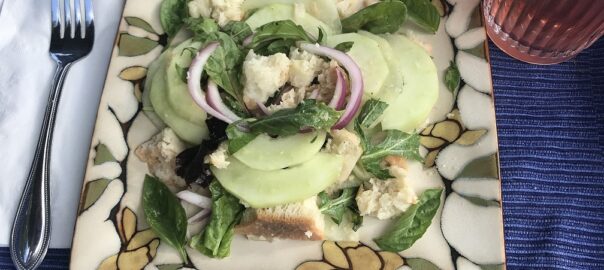
Panzanella Salad
Italian Panzanella salad with halved cherry tomatoes, mozzarella, fresh torn basil and bread
Ingredients
(Serves 1-4)
Dry Italian bread, cubed, or large croutons
Sprinkle the dried Italian bread with water to soften
(see comments about the proper bread to use above)
1-2 large, vine-ripened tomato, cut into small wedges
or several cherry tomatoes, halved
sprinkle lightly with sea salt
1/2 red onion, sliced thinly into crescents
Extra-virgin Italian olive oil
Italian red wine vinegar
Mozzarella, preferably soft, cubed or small bocconcini (optional)
Large, freshly picked basil leaves, hand torn
Method
In a large dish, combine small wedges of fresh tomatoes or halved cherry tomatoes and dry Italian bread (as pre-processed as above) and red onions.
Drizzle on extra virgin Italian olive oil and red wine vinegar and combine. Make sure the bread has softened enough to be edible. If not, you may want to let the ingredients sit for a bit before finishing the salad.
Then add the optional mozzarella and torn basil leaves.
Mix gently.
Taste and drizzle with extra olive oil and vinegar if needed.
In an individual or large dish, create colorful layers of tomato slices (sprinkled with sea salt), mozzarella slices, and basil leaves.
If making in a large plate of Caprese salad for a crowd, have the tomato and mozzarella slices lengthwise once they are assembled and place a piece of mozzarella in the center to create a “flower” pattern, as in the picture above. Decorate with extra basil.
Let sit for about 15 minutes for the tomato juices to develop. Drizzle with extra-virgin olive oil.
Serve with Italian bread to mop up the tomato juices and enjoy!
Check out my Instagram post if you’d like to see me actively making a Caprese salad that can be shared by two people. Remember, the correct choice of ingredients is the key to this simple “salad. A touch of sea-salt to bring the juices out of the tomatoes that provide the acid for the “vinaigrette” and a drizzle of your favorite extra-virgin olive oil makes an exquisite summertime treat!
— by Kathryn Occhipinti
Kathryn Occhipinti, MD, is the author of the Conversational Italian for Travelersseries of books and a teacher of Italian for travelers to Italy in the Peoria and Chicago area. “Everything you need to know to enjoy your visit to Italy!”
Visitlearntravelitalian.com/download.html to purchase/download Conversational Italian for Travelers and find more interesting facts and helpful hints about getting around Italy!Learn how to buy train tickets online, how to make international and local telephone calls, and how to decipher Italian coffee names and restaurant menus, all while gaining the basic understanding of Italian that you will need to know to communicate easily and effectively while in Italy. —From the staff at Stella Lucente, LLC
Capresi and Panzanella Salads with Tomatoes and Cucumbers from Your Garden
Pesto alla Genovese with Gnocchi: Everything You Always Wanted to Know about Making Pesto! is a partial reprint from a blog originally posted on October 11, 2017, titled: “Pesto alla Genovese Meets American Aquaponic Farming in Chicago.”
This summer I have had the usual bumper crop of fresh basil leaves from the basil plants in large pots that I keep in a sunny position in my garden and provide with an abundance of water. The plants started to go to seed — make the green and white column of flowers at the end of each stalk — by mid June. So, I dutifully cut back my basil: at first just the flowers, then the stalks with the flowers, and then in mid July did a hard ct-back, taking both stalks and leaves, leaving about 50% of each plant. This will enable the basil plants in the pots to keep growing new stalks with new basil leaves, hopefully into August. (For more information about how to grow basil, visit my Instagram, Conversationalitalian.french.)
This procedure left me with an abundance of basil stalks and leaves, which luckily love to create new roots in a vase of water and will last a few weeks or even a month. I also love to make pesto at least 2-3 times a summer when I have an abundance of fresh basil leaves.
There is truly nothing like the fresh aroma of newly crushed basil over a warm bowl of pasta. And best of all, my children love it!
Read the reprinted blog below to learn “everything you always wanted to know” about making pesto. I give a short history about my experiences trying to make basil, the best (Genovese) basil plant to use and the theory behind the method. I have included a video in the original blog about how to use a marble mortar and wooden pestle — essential equipment — no food processors, please!
Finally, at the end of this blog I have reprinted the recipe with the proportion of basil, garlic and cheeses that I like. Try my method and modify the ratio of ingredients for your family!
Also…
I’ve since added Instagram to my social media, and have added a video from Instagram to this post so you can see me creating pesto in real-time! I hope you like it!
For more recipes like these, as well as French recipes, follow me on my Instagram posts at Conversationalitalian.french.
Pesto alla Genovese is the famous bright green “pasta sauce” from the northern Italian region of Liguria, whose capital is the city of Genoa. My introduction to pesto, which was not a part of my southern Italian upbringing, was from one of those little glass jars I found in a grocery store in Peoria, Illinois. The jar had been labeled “pesto” by an Italian company. Back then, I was trying to learn to cook true Italian “regional” cooking and specifically to expand my sauce-making techniques beyond the ubiquitous and well-loved southern Italian red tomato sauce. Read the full post here: Pasta alla Genovese. —Kathryn Occhipinti
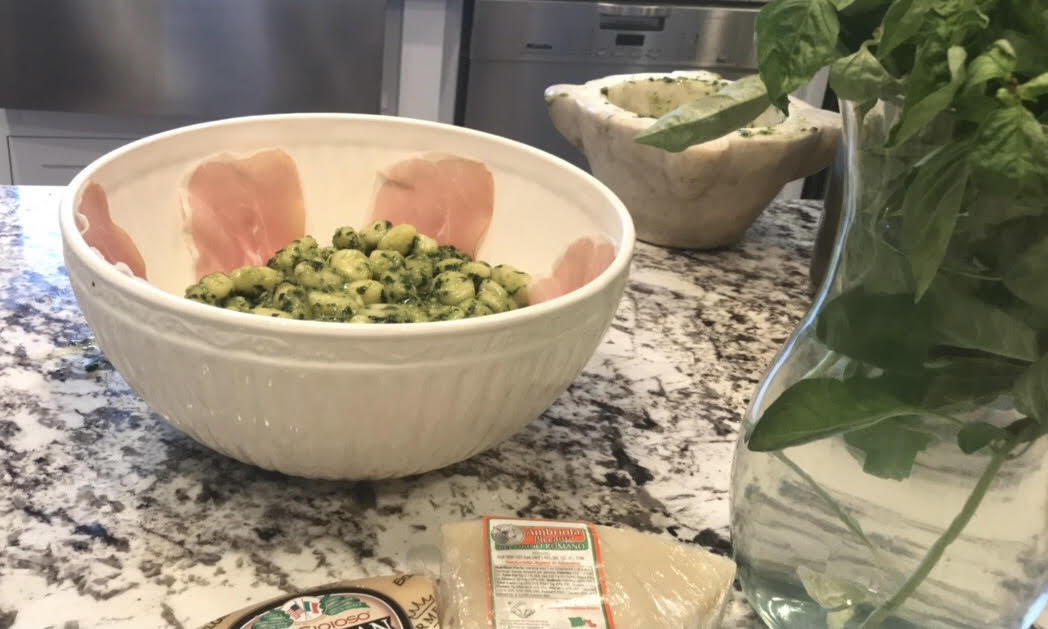
Pesto alla Genovese: Ingredients needed are shown as they are slowly ground together in a marble mortar with a wooden pestle.
Ingredients for Italian Recipe
Kathryn’s Pesto alla Genovese (Serves 4)
Small leaves from 1 small sweet basil plant (Genovese basil is best!)
(about 3 cups of lightly packed leaves, rinsed, patted dry, stems removed)
1 to 2 small garlic cloves, peeled, halved lengthwise
(and bitter green center removed if present)
2 tablespoons Italian pine nuts
2/3 cup freshly grated Parmesan cheese
1/3 cup freshly grated Romano cheese
1/4 tsp salt
3/4 cups of extra virgin olive oil, from Liguria, if possible
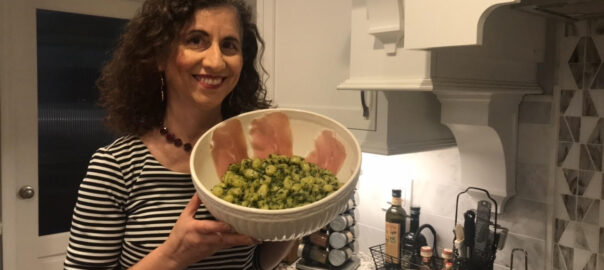
If desired: Prosciutto to line the bowl of gnocchi and pesto dressing for serving.
Method for the Pesto
Note: Before starting, set a large pot of well-salted water on the stove to boil, and cook your pasta or gnocchi to “al dente” tenderness (“to the tooth). Time the pasta so it finishes cooking just before the pesto is complete. Keep in mind that fresh pasta and gnocchi will take far less time to cook than dried pasta.
Put the garlic cloves into the mortar with a few grains of salt and begin to crush. Add the pine nuts and continue to crush into a smooth paste.
Remove the garlic/pine nut mixture from the mortar to a small bowl.
Put a few of the basil leaves and a few grains of salt into the mortar and begin to crush, using the method shown in the link to the video in this blog post.
As the basil leaves become crushed and release their essential oils, add a few more. Continue to crush the leaves, adding a few at a time, until all are crushed fairly uniformly.
Add whatever salt is left to the crushed basil leaves, the garlic/pine nut mixture, and then drizzle in a bit of olive oil. Combine.
Add the cheeses and a bit more olive oil. Combine.
Drizzle in the rest of the olive oil while continuously stirring the garlic/pine nut/ crushed basil/cheese mixture until a creamy dressing has formed.
Reserve 1 to 2 tablespoons of pasta water and mix into the pesto to warm.
Quickly drain the pasta and put the warm pasta into a large serving bowl.
Dress with your pesto, mix to coat, and serve immediately!
If desired, as in the Instagram video above, line a large bowl with prosciutto and carefully added your pesto dressed gnocchi. Allow gnocchi to warm the prosciutto a bit, and then serve. This idea from John Coletta’, chef of Quartino Restaurant in Chicago, in his cook book titled: “250 True Italian Pasta Dishes.”
A large bowl lined with prosciutto slices and filled with gnocchi that have been tossed to coat with pesto dressing. This presentation is courtesy of John Coletta, chef of Quartino Restaurant in Chicago.
If you would like to preserve your pesto rather than use it right away, it can be frozen in small plastic containers. Top off with a small amount of olive oil. Leave a small amount of room in the container for the liquid to expand and then cover.
Kathryn Occhipinti, MD, is the author of the Conversational Italian for Travelersseries of books and a teacher of Italian for travelers to Italy in the Peoria and Chicago area. “Everything you need to know to enjoy your visit to Italy!”
Visitlearntravelitalian.com/download.html to purchase/download Conversational Italian for Travelers and find more interesting facts and helpful hints about getting around Italy!Learn how to buy train tickets online, how to make international and local telephone calls, and how to decipher Italian coffee names and restaurant menus, all while gaining the basic understanding of Italian that you will need to know to communicate easily and effectively while in Italy. —From the staff at Stella Lucente, LLC
Pesto alla Genovese with Gnocchi: Everything You’ve Always Wanted to Know about Making Pesto!
Today, I’m told, Italians celebrate the Halloween that we in America have popularized around the world with costumes, candy for the children, and parties for the adults. Of course, this is all great fun and my children always celebrate Halloween on October 31st. But, I’ve also been told that the Italian traditions for the days after Halloween, All Saints Day and All Souls Day on November 1st and 2nd are still followed in Italy, and the food traditions have remained intact.
Since my father passed away almost 5 years ago, I have come to realize the importance of a day like All Souls Day. I want my children to remember the times they shared with their grandfather and other relatives who are no longer with us. Setting aside a special day to get together and reminisce about the past is one way to make sure we remember the times we cherished together as a family. After all, our connections to the past help to shape our future as well.
I was especially happy when I recently came across a blog by Cinzia from Instant Italy about All Souls Day. I discovered that in Liguria Italians celebrate All Souls Day with a special chick pea soup that uses ribs to flavor the broth, called ceci con le costine. I’ve made my own version of this soup to for my Sunday “remembrance” dinner in November this year. Given the circumstances (i.e. given that it is still 2020), this soup will be a warming treat I can present in decorative jars and drop on a few doorsteps.
Why not try to make this soup for your family? My version is like a simple minestrone soup, but without the pasta and the cooking time can be split up into two days. It’s a great way to start off the fall season!
If you’d like to read Cinzia’s blog to learn more about how Italians celebrate the Halloween season, just click on this link: All Saints’ Day in Italy.
-Kathryn Occhipinti
Recipe is listed below. Check out my latest Instagram video from Conversationalitalian.french and watch me make the dish if you like!
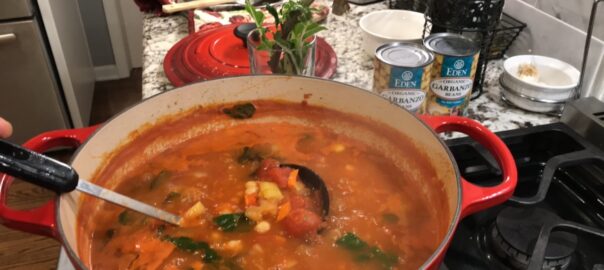
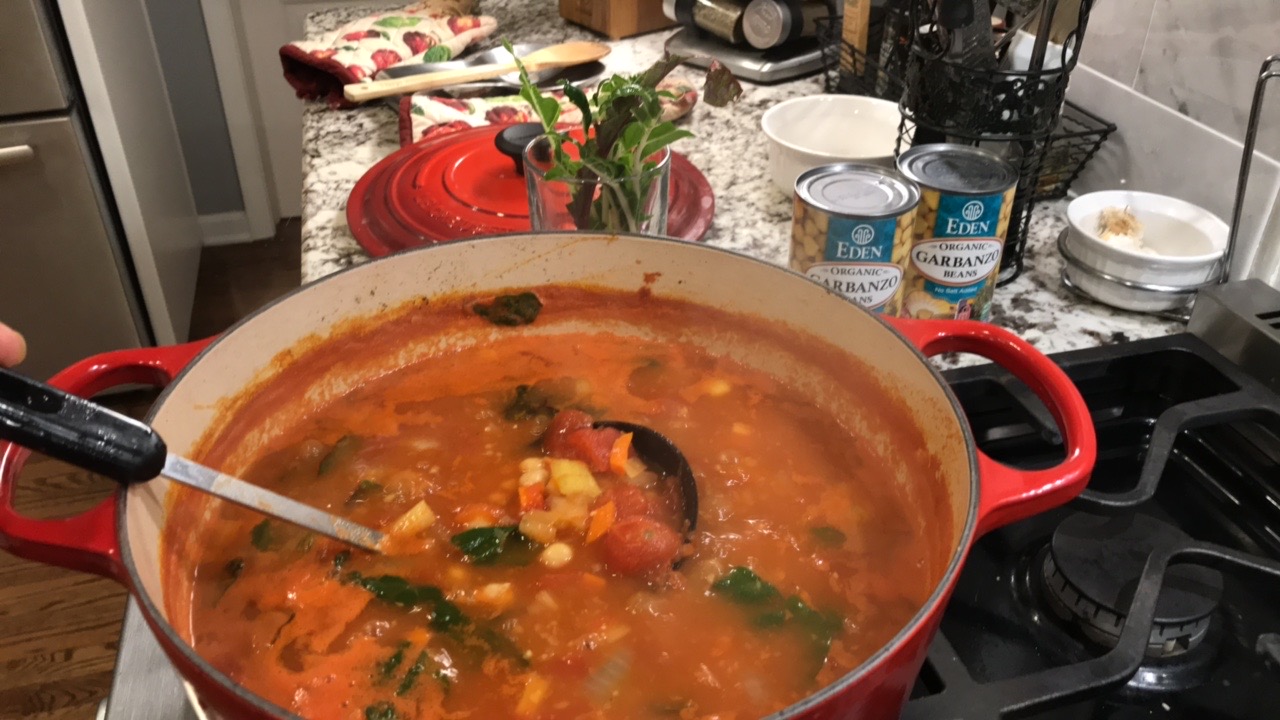
Chick pea and rib soup for All Souls Day in Italy (Cece con le Costine)
Ingredients
For the Broth
(Best if made a day ahead)
1 lb. pork ribs or veal soup bones
Olive oil
2 cloves of garlic, papery skin removed
1 medium onion, skin removed and quartered
2 stalks of celery, chopped coarsely
3-4 carrots, chopped coarsely
1 bunch fresh parsley tied with cooking twine
1 lb. bag of dried chick peas, soaked in water overnight to soften -or- 2 cans (16 oz.) chick peas, drained
Ingredients
For the Soup (To be added to the broth)
1 onion, finely chopped
3 carrots, finely chopped
2 stalks of celery, finely chopped
chick peas, either dried/soaked or canned (as above)
1 can (28 oz.) Italian plum tomatoes, chopped
Fresh or frozen Swiss Chard or Spinach
Procedure
Make the Broth
(Day 1)
Use a large soup pot or stock pot for this recipe.
Pour 2 Tbsp. of olive oil into the stock pot. Add the pork ribs or veal bones and 2 cloves of garlic, intact but flattened with the back of a knife. Salt and pepper the ribs. Brown the ribs on all sides over medium heat, turning while they cook.
Add 16 cups of water and the coarsely chopped onion, celery, carrots and the bunch of parsley. Stir.
Cook the broth uncovered as follows: Bring to a boil over high heat and then lower to medium low heat to keep the broth at a simmer until the meat has cooked and is falling off the bone, about 2 -3 hours. Skim off any foam that forms on the top of the soup periodically, but do not stir the soup while the broth is cooking.
After the broth has cooked long enough to gain flavor from the ribs and vegetables, remove the ribs and vegetables and parsley.
Put the pot of broth into the refrigerator if you have two days to make the soup. This will allow any fat to float to the surface and harden so it can be skimmed off the next day. Otherwise, proceed to make the soup.
Make the Soup
(Day 2)
The next day, take the broth out of the refrigerator and skim the fat off the top.
Put the pot on the stove. Add the soaked chickpeas and cook until they have softened, about 1 hour. (If you have a bag of old chick peas have been sitting in the cupboard for awhile, they may take longer to soften.)
Remove 1 cup of the pre-cooked chick peas and puree. Add back to the soup.
If using canned chick peas instead of dried, add the canned chick peas, with one cup pureed, at this time into the soup.
Add the finely chopped onion, celery, carrot and chopped plumb tomatoes with their juices from the can. Add salt and pepper to taste.
Cook until all vegetables have softened.
Add Swiss chard leaves or spinach leaves. Cook until the greens have wilted.
Serve the soup hot, with grated Parmesan cheese and a loaf of crusty Italian bread.
Conversational Italian for Travelers Just the Important Phrases (with Restaurant Vocabulary and Idiomatic Expressions) is YOUR traveling companion in Italy! All the Italian phrases you need to know to enjoy your trip to Italy are right here and fit right into your pocket or purse.
Kathryn Occhipinti, MD, is the author of the Conversational Italian for Travelersseries of books and a teacher of Italian for travelers to Italy in the Peoria and Chicago area. “Everything you need to know to enjoy your visit to Italy!”
Visitlearntravelitalian.com/download.html to purchase/download Conversational Italian for Travelers and find more interesting facts and helpful hints about getting around Italy!Learn how to buy train tickets online, how to make international and local telephone calls, and how to decipher Italian coffee names and restaurant menus, all while gaining the basic understanding of Italian that you will need to know to communicate easily and effectively while in Italy. —From the staff at Stella Lucente, LLC
Chick Pea Soup with Ribs (Ceci con le Costine) for All Souls Day
“Tartufo — Gelato but Even Better” is a reprint from a blog originally posted on July 31, 2016 entitled, “Tartufo: Summertime Gelato Treat.” I’ve since added Instagram to my social media, and have added a video from Instagram to this post so you can see me cooking in real-time! I hope you like it!
For more recipes like these, as well as French recipes, follow me on my Instagram posts at Conversationalitalian.french.
The word Italian word “tartufo” refers to the round, brown-and-white truffles found in the densely forested Apennine Mountains that run down the spine of Italy. These slightly irregularly shaped round balls are found nestled between the roots of old beech, birch, and pine trees by specially trained dogs. A similarly shaped sweet French candy made from chocolate and cream, known as “ganache,” is also referred to as a truffle.
We present here a method for a round, chocolate-coated ice cream treat made from vanilla and chocolate Italian gelato ice cream that is also called “tartufo.” In the version that follows, there is a surprise in the center—a real Italian marinated Amarena cherry.* Try our recipe as is, or make your own version with any of your favorite Italian gelato flavors. Enjoy a cold, refreshing treat this summer with our simple method! —Kathryn Occhipinti
Recipe is listed below. Check out my latest Instagram video from Conversationalitalilan.french and watch me make the dish if you like!
Let the vanilla and chocolate ice cream soften slightly in the ice cream cartons so it is easy to scoop out. (If it is too soft and watery, it will not make good ice cream balls.)
Using an ice cream scoop, scoop out 4 balls of vanilla ice cream and place each ball on a piece of plastic wrap. Pull the plastic wrap above the ball and twist to seal.
Quickly put the balls into a freezer-safe container and back into the freezer. (Plastic tray containers from Chinese take-out food work well because they are just the right size for four balls and have a cover.)
The same way, make 4 ice cream balls from the chocolate ice cream, wrap each ball in plastic wrap, and place the wrapped balls into a second freezer-safe container. Quickly return the container to the freezer.
Freeze overnight. If you want, after the ice cream balls have refrozen, form them into a more rounded shape with the plastic still on and return them to the freezer.
The next day, or when the ice cream balls have frozen through completely and are hard, remove one vanilla and one chocolate ball from the freezer at a time.
Unwrap each ball quickly and save the plastic wrap.
Turn each ball over so that the smooth, round end of each ball is facing up.
Slice each ball in half and make a tiny well in the center of each half that is the size of half a cherry. Quickly press a cherry into the center of one of the ice cream halves, and then top with an ice cream half of the other flavor so that the final balls are half vanilla and half chocolate.
Wrap each ball in the original plastic wrap again and place them back into the freezer container.
Repeat the last 5 steps until all 8 ice cream balls have been used.
Freeze overnight.
If desired, you can form each ball into a more smooth circle after it has frozen again while the ball is in the plastic wrap.
Make the Chocolate Coating
**A note about baking chocolates: I like to use 1/2 bittersweet chocolate and 1/2 semisweet chocolate for children; you can use all dark chocolate if you like. Unsweetened chocolate is not recommended. Make sure to use good quality baking chocolate, whatever your choice.
On the third day, after the combined ice cream balls have completely frozen through, they are ready to coat with chocolate.
Microwave the chocolate and the canola oil in a small glass bowl (best) or glass measuring cup for about 2 minutes on medium heat (50%). Stir, and if all chocolate dissolves, set aside. Or microwave 30 seconds more, check and repeat as needed, until all chocolate is melted.
After the chocolate has melted, let it cool slightly. This is a crucial step, because if the chocolate is too hot, it will melt the chocolate balls; if the chocolate cools too much, it will start to harden. A glass bowl is best for coating the ice cream balls because it can be put into the microwave to melt the chocolate again if it starts to harden before you are finished working with it.
One at a time, take out an ice cream ball from the freezer, remove plastic wrap from the ice cream ball, and immediately place each ball into the chocolate, rolling the ball over once with a large spoon to coat the top and bottom of the ball.
Immediately set each chocolate-covered ball onto a cookie sheet or small tray covered in aluminum foil and place back into the freezer.
Repeat the last two steps until all ice cream balls have been coated with the chocolate. There will be just enough chocolate to coat 8 balls, so work quickly and reheat the chocolate as necessary, scraping down the sides of the bowl to use all the melted chocolate efficiently.
Freeze all chocolate balls uncovered at least 2 hours.
If you are not serving the tartufi right away, cover them lightly in aluminum foil or place them back into covered containers and store in the freezer.
When ready to serve, cut each tartufo in half with a serrated knife and place on a small plate.
Or place each tartufo ball as is in the center of a large fancy ice cream cup and watch everyone crack open the chocolate shell, dig in, and enjoy their summer treat!
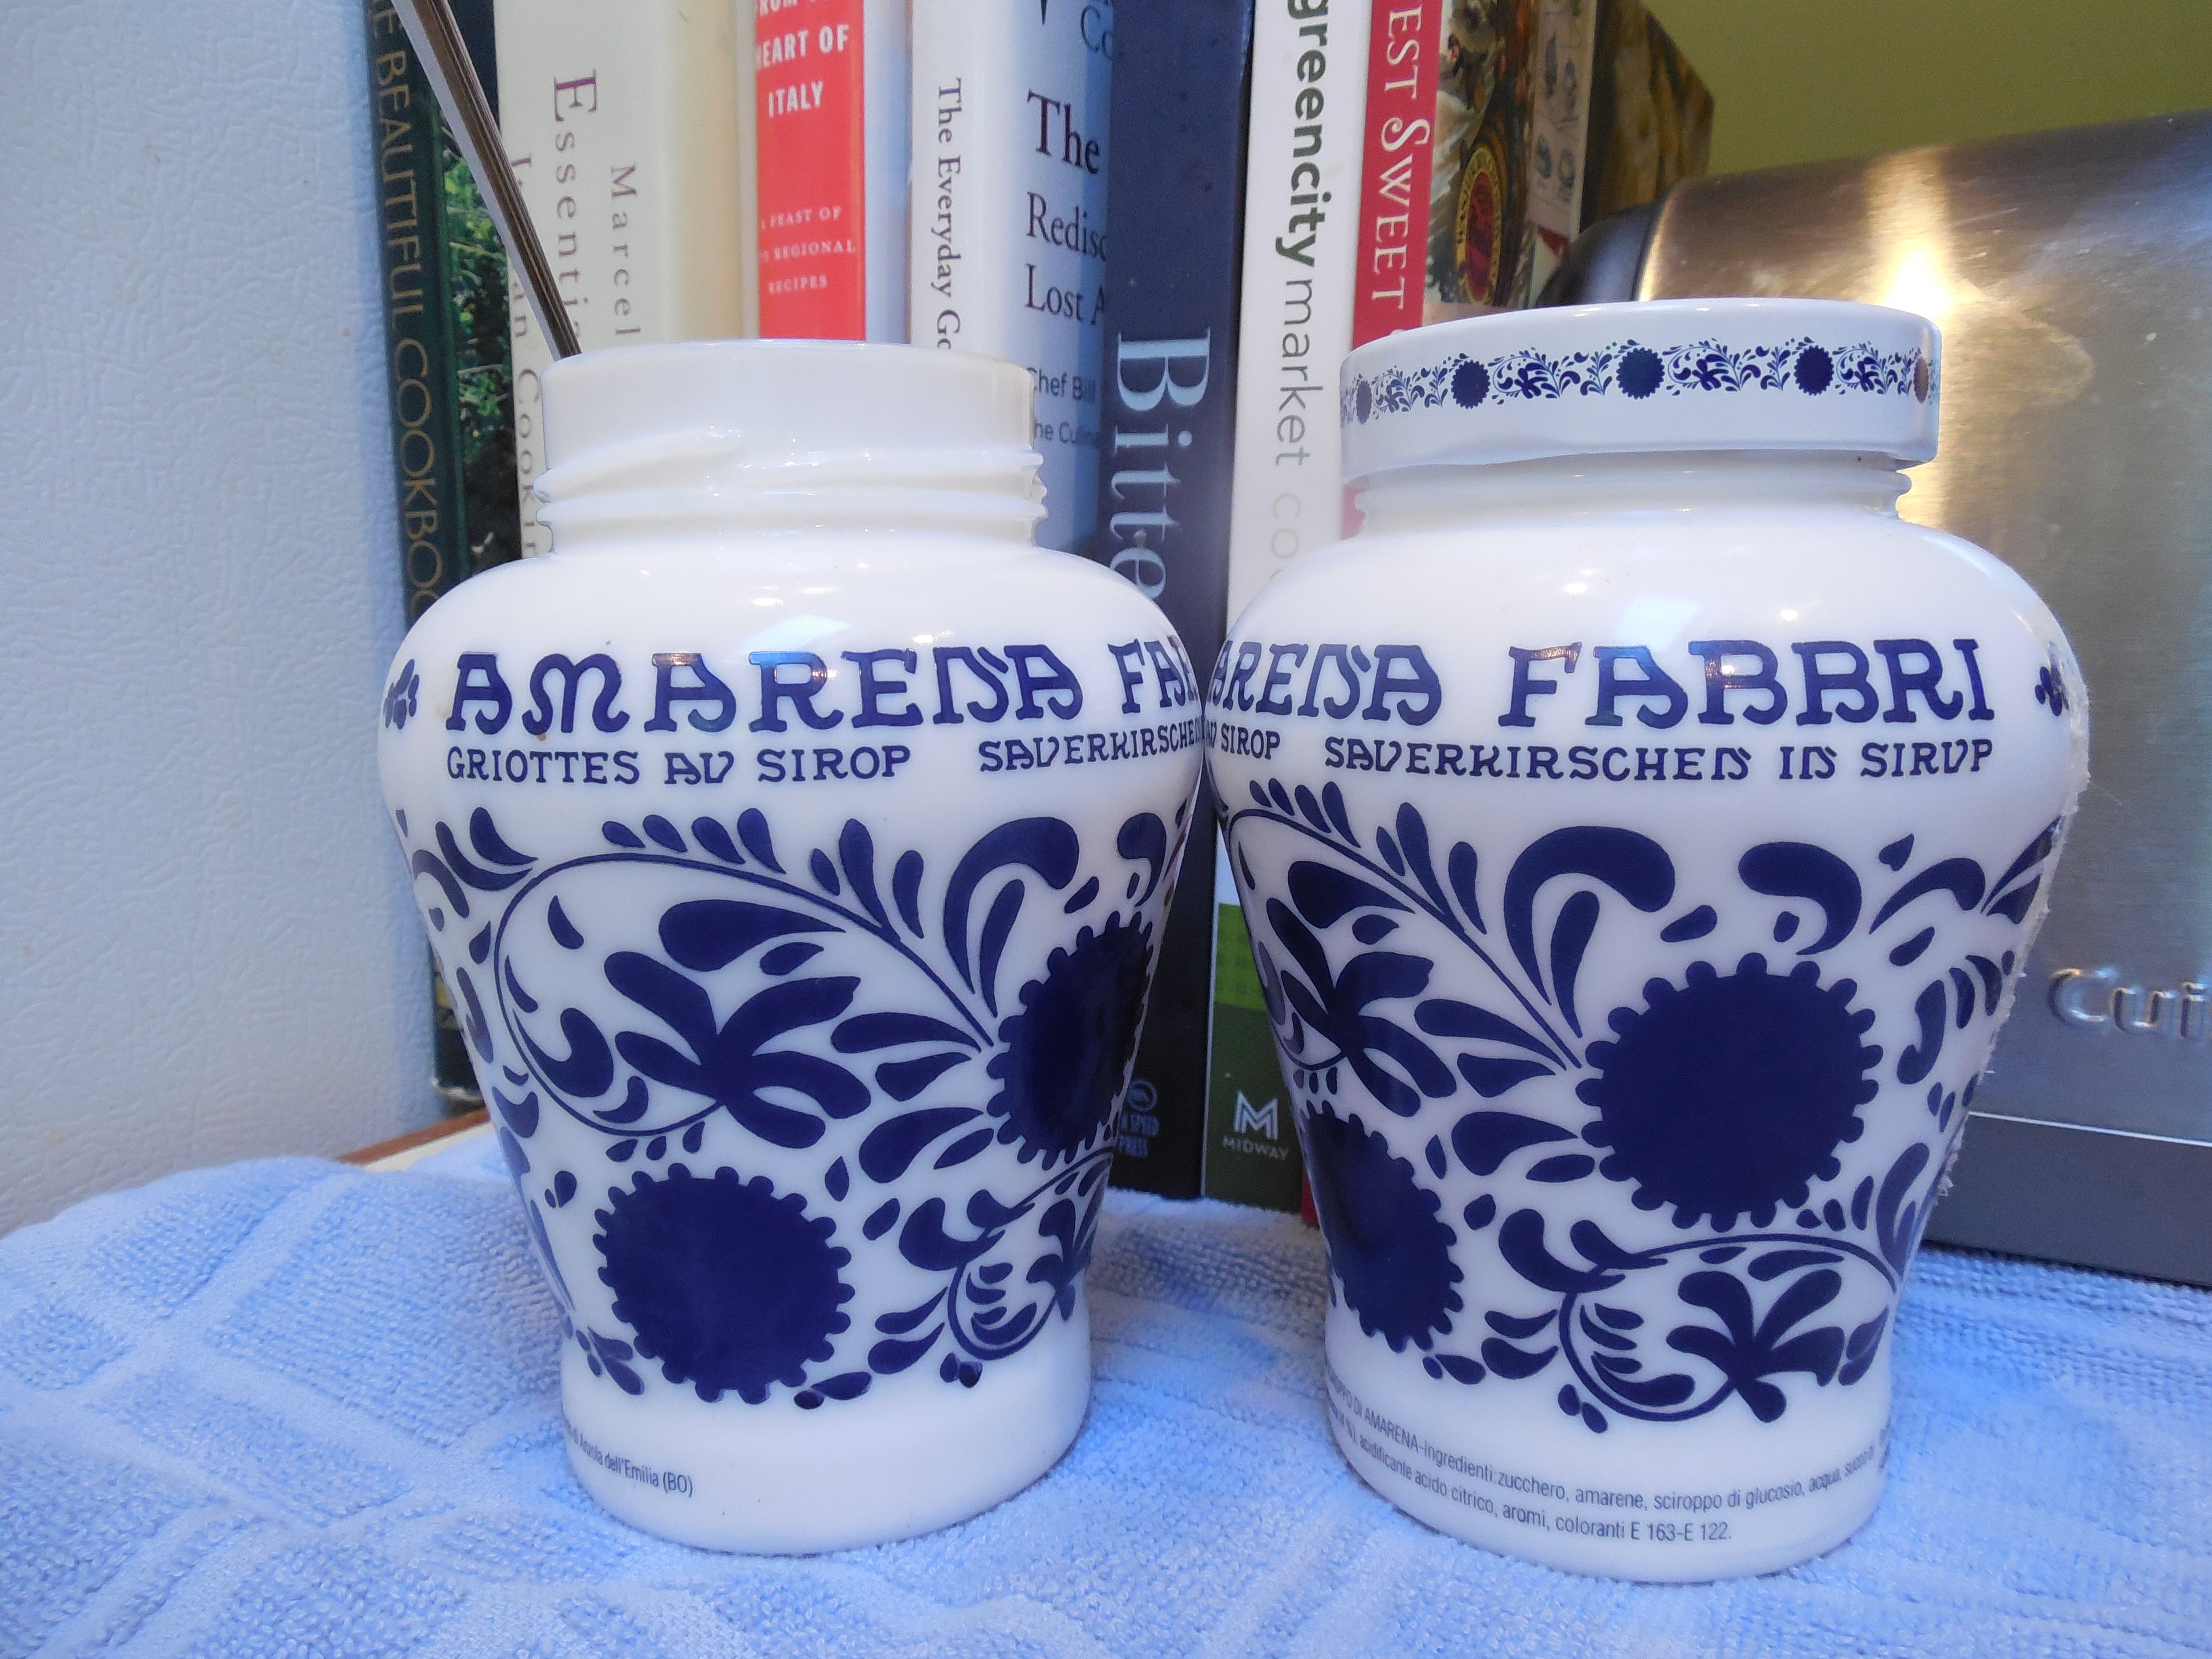
*To find Amarena cherries if you do not have an Italian specialty shop in your neighborhood, simply search online. Look for the Fabbri brand pictured here.
Amarena cherries
The cherries, in heavy syrup, come in a beautiful white-and-blue decorated jar. Save the jar when you have used all the cherries and use it as a lovely decorative glass piece to give your kitchen a true Italian flair.
—Adapted from a cooking class given for the Italian-American Society of Peoria, by Kathryn Occhipinti
Conversational Italian for Travelers Just the Important Phrases (with Restaurant Vocabulary and Idiomatic Expressions) is YOUR traveling companion in Italy! All the Italian phrases you need to know to enjoy your trip to Italy are right here and fit right into your pocket or purse.
Kathryn Occhipinti, MD, is the author of the Conversational Italian for Travelersseries of books and a teacher of Italian for travelers to Italy in the Peoria and Chicago area. “Everything you need to know to enjoy your visit to Italy!”
Visitlearntravelitalian.com/download.html to purchase/download Conversational Italian for Travelers and find more interesting facts and helpful hints about getting around Italy!Learn how to buy train tickets online, how to make international and local telephone calls, and how to decipher Italian coffee names and restaurant menus, all while gaining the basic understanding of Italian that you will need to know to communicate easily and effectively while in Italy. —From the staff at Stella Lucente, LLC
Tiramisu: “Pick-Me-Up” Dessert Recipe from Italy is a partial reprint from a blog originally posted on October 10, 2018, titled: “Dessert Recipe from Italy: Make Our Famous Tiramisù.”
I’ve added a few more tips about how to make the custard filling in this blog. I’ve also included a sponge cake recipe just in case Lady Fingers are not available. (Or, just in case you just like this layered custard dessert combination with sponge cake!)
– Special thanks to Rudy Litwin of the Italian-American Society of Peoria for the sponge cake recipe.
Also…
I’ve since added Instagram to my social media, and have added a video from Instagram to this post so you can see me cooking in real-time! I hope you like it!
For more recipes like these, as well as French recipes, follow me on my Instagram posts at Conversationalitalian.french.
This famous Italian layered dessert, which literally means “Pick-me-up!” (Tiramisù!)was said to have originated when Italian ladies wanted a snack to get them through a long night of entertaining. Try our version, and we think you will agree that a piece of this Tiramisu dessert will add sparkle to any get-together or special celebration, whether for lunch, dinner, or the wee hours of the evening… Just follow our step-by-step instructions on how to make each component of the dessert, and assemble it all into the delicious layers that will form a kind of cake when refrigerated overnight. —Kathryn Occhipinti
Make the zabaglione* custard: *Italian custard made with Marsala wine 6 egg yolks
¼ cup sugar
¼ cup Marsala wine
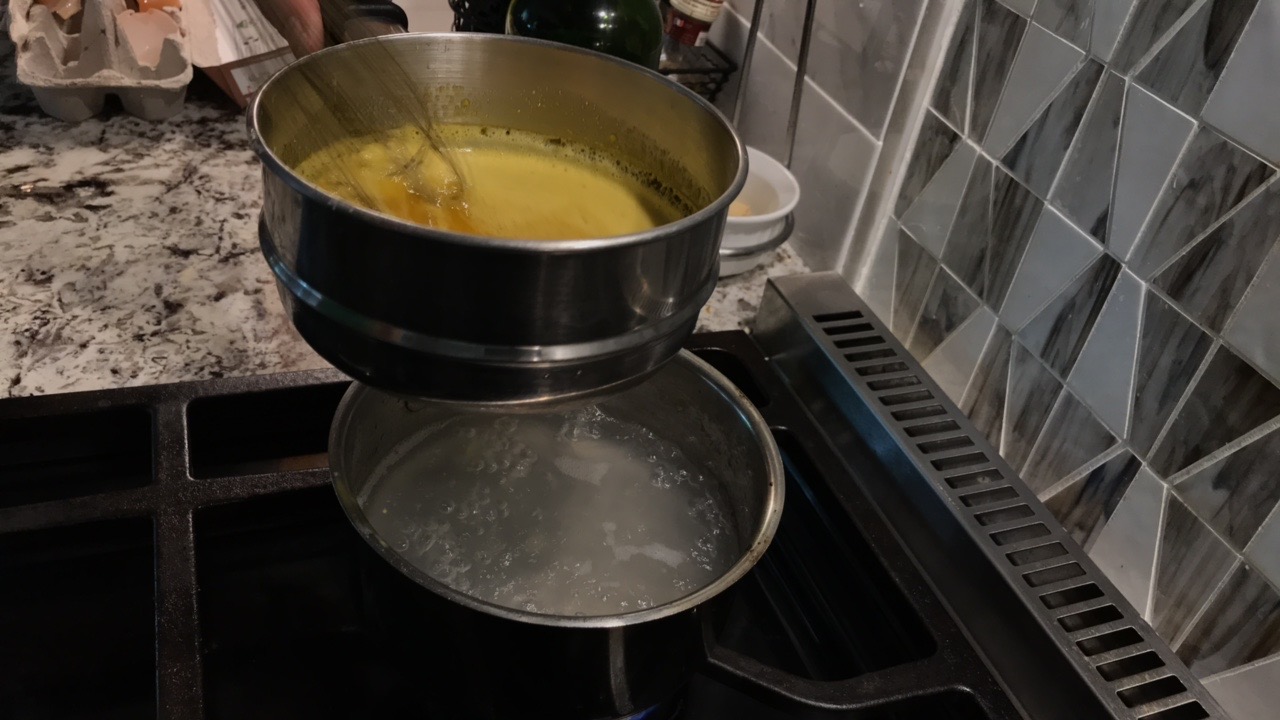
Double boiler assembly with zabaglione custard thickening off heat
Off heat, beat the egg yolks and sugar on the top pot of a double boiler with a whisk gently
until combined and the yolks become pale yellow. Do not beat too hard and do not form foam when doing this.
(Tip: When you think the sugar has been well mixed into the egg yolks, test the consistency by lifting your whisk up with a bit of the mixture on it. The egg/sugar mixture should fall off the whisk slowly. This is called “forming the ribbon.” When this happens, the eggs and sugar have been mixed well enough.)
Fill the bottom pot 1/2 of the way up with water and heat to a simmer on the stove. (Small bubbles form around the edges of the water when it is at a simmer.)
Place the pot with the egg yolk mixture over the pot with the simmering water.
Stir the beaten egg yolks constantly with a whisk while slowly pouring in the Marsala wine.
Continue to stir for about 5 to 6 minutes. At the same time, check the bottom pot of water for how how rapidly the water is boiling and control the heat to keep the water boiling at a simmer for this amount of time. Then, raise heat if necessary to thicken the custard as in tip below.
(Tip: The custard needs to heat up slowly, or you will end up with scrambled eggs. But, if you need to, increase the heat until the water is brought to a full boil. Put the pot down for a few seconds until the custard starts to thicken. At this point, small balls of custard will start to form. Immediately take off heat and keep beating as the custard thickens. Lower heat back to simmer and continue to beat until smooth.)
When the mixture has thickened, transfer to a bowl and chill for 30 minutes.
Make the cream filling: 1 cup whipping cream (cold)
4 Tbsp sugar
2 (8 oz.) containers of Mascarpone cheese, softened room temperature
(can substitute American cream cheese)
chilled zabaglione custard made as above
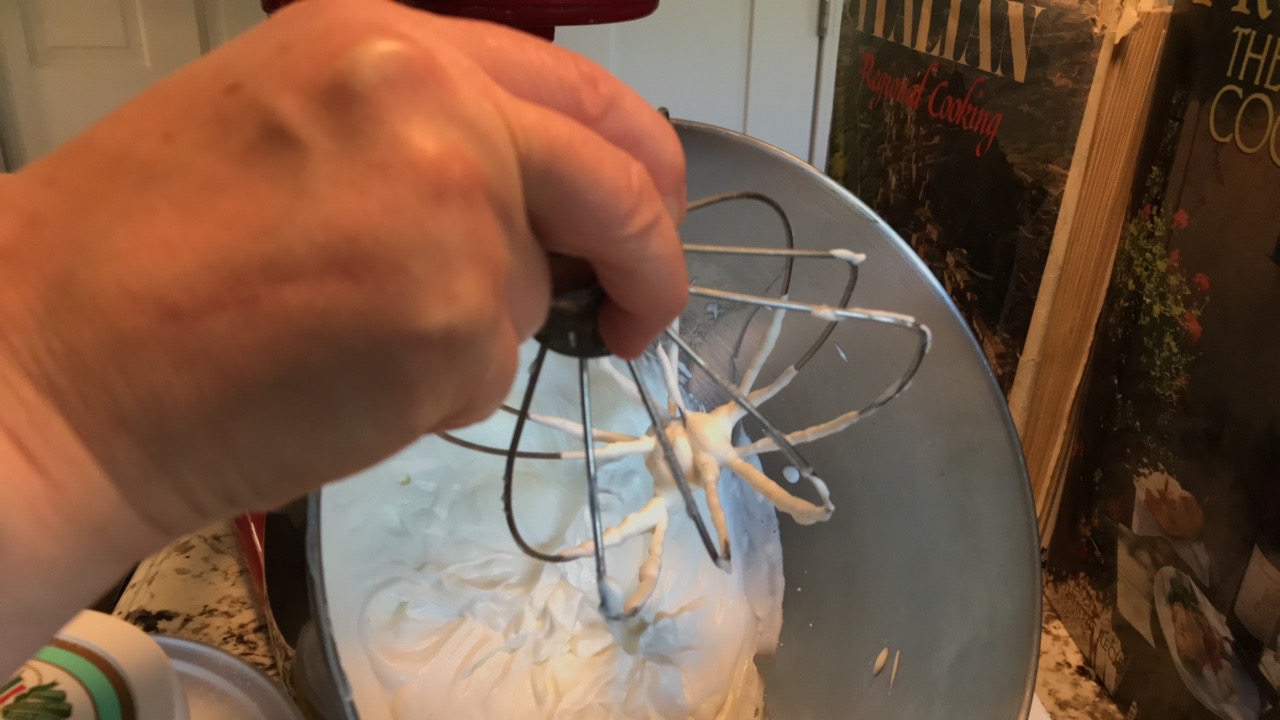
Whipped cream forming peaks when the whisk is lifted
Beat the whipping cream and sugar together in a large bowl with a standing mixer and a whipping attachment or an electric mixer until firm peaks form. Start off beating slowly, then gradually increase speed of mixer to high. At the end, beat more slowly so you can watch carefully to get the desired consistency. (Too much beating and you may make butter!)
(Tip: When peaks start to form, you will see ridges in the whipped cream. To check the consistency, take up a bit of the whipped cream on the beater and hold up. You will see peaks standing up in the whipped cream in the bowl and also on the beaters.)
Lighten up the mascarpone cheese by beating with a mixer if desired.
Add half of the mascarpone cheese into the whipped cream in teaspoon amounts. Fold the mascarpone cheese into the whipped cream until well blended. Add the rest of the mascarpone cheese in teaspoon amounts and blend in.
Then fold in the chilled zabaglione custard into the whipped cream/Mascarpone cheese mixture until well blended.
Make the coffee syrup mixture: 2 cups espresso coffee (cooled)
1/4 cup Marsala wine
1 tsp vanilla
Combine the espresso coffee, Marsala wine, and vanilla in a measuring cup.
Refrigerate until cool.
Assemble the tiramisu (have the following ready):
Custard filling
Coffee syrup
Savoiardi lady finger cookies, 2 (7.05 oz.) packages
Cocoa powder for dusting
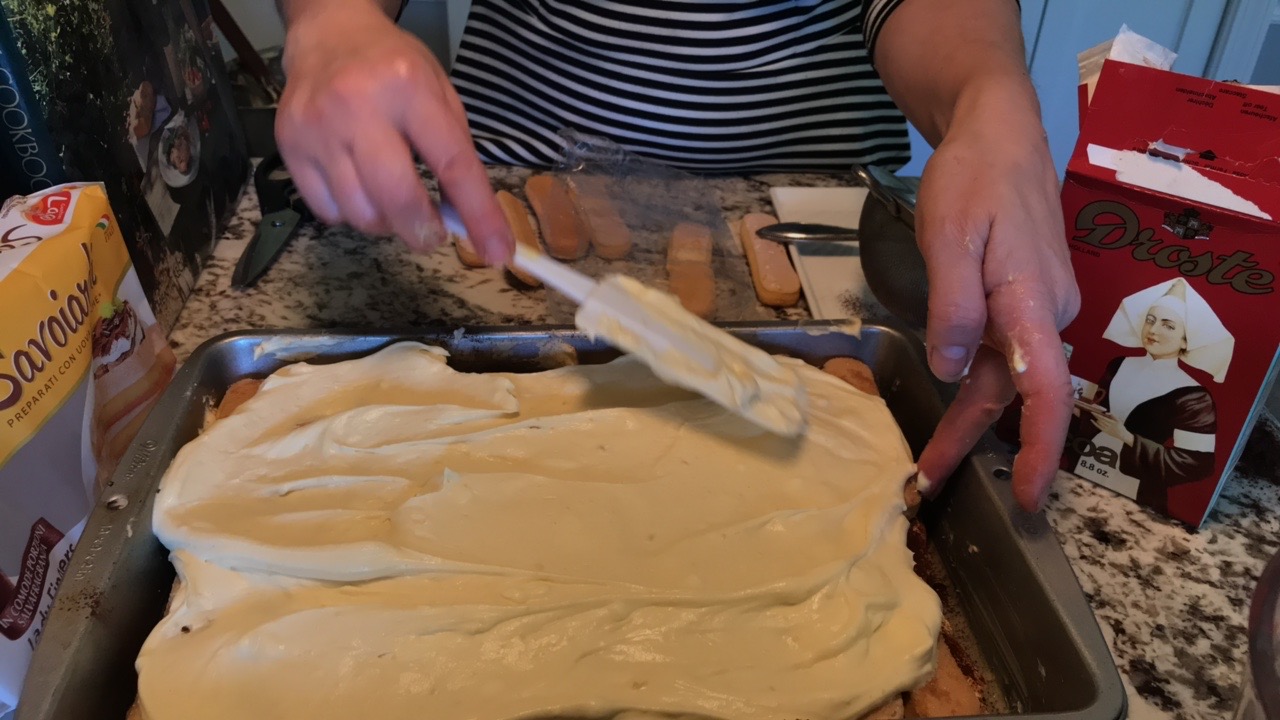
Note: Two packages of lady fingers are used in this recipe to make two layers in a rectangular pan approximately 9″ X 13.” Custard is enough to cover the 2 layers of ladyfingers. If you like a thicker custard layer, use a smaller pan and less ladyfinger cookies!
Butter the bottom of the pan you will use.
Arrange a single layer of lady finger cookies in your pan, with the sugar-coated side facing up.
First layer of ladyfinger cookies lined up in the pan
Using a tablespoon, sprinkle about 1 tablespoon of coffee syrup on each cookie. Use up about one cup of the coffee syrup in total on the first layer of cookies.
Sprinkling coffee over ladyfinger cookies for Tiramisu
Spread 1/2 of the custard filling mixture over the cookies.
Spreading custard over ladyfinger cookies for Tiramisu
Dust with the cocoa powder until top of custard is well covered. (Tip: Use a strainer, tapping the side to make a smooth layer of cocoa. The strainer will also remove lumps of cocoa powder.)
Tiramisu dusted with cocoa powder
Repeat cookie layer, 1 cup of coffee syrup, custard filling, and cocoa powder.
Cover the pan loosely with aluminum foil and refrigerate at least 5 hours or overnight to allow the cookies to absorb the coffee syrup and become moist.
Cut into squares to serve. Enjoy with a cup of espresso coffee!
Optional: Sponge cake for Tiramisu : 6 large eggs separated, yolks and whites reserved room temp.
2/3 cup powdered sugar
1 tsp vanilla extract
2/3 cup cake flower
Preheat oven to 375° and coat a 13″ X 9″ pan with oil. Sprinkle with flour and shake off excess.
Beat egg yolks with a whisk until foamy and set aside.
Use a large bowl and a standing mixer or an electric mixer to whip the egg whites and powdered sugar until still peaks form.
Gradually fold in egg yolks.
Fold in cake flour until blended.
Pour batter into the pan.
Bake 12 minutes, or until a toothpick inserted into the center comes out clean. (An oven that heats evenly is essential, or the center of your cake may form a peak as it heats unevenly.)
Cool 5 minutes and then loosen cake and invert on a rack to cool.
To assemble the tiramisu, cut the cake in half into two equal pieces. One will fit as the bottom piece on an 8″ or 9″ baking dish (ungreased).
Spoon over espresso coffee syrup as given above with the addition of 2 tsp of sugar, then custard mixture, then cocoa.
Add next layer of cake and repeat.
Cover loosely with aluminum foil and refrigerate at least 5 hours or overnight to allow the cake to absorb the coffee syrup and become moist.
Cut into squares to serve. Enjoy with a cup of espresso coffee!
—Adapted from the cooking classes given by the Italian-American Society of Peoria. Thanks to Rudy Litwin, IAS President in 2012, for contributing the sponge cake to this recipe!
Conversational Italian for Travelers Just the Important Phrases (with Restaurant Vocabulary and Idiomatic Expressions) is YOUR traveling companion in Italy! All the Italian phrases you need to know to enjoy your trip to Italy are right here and fit right into your pocket or purse.
Kathryn Occhipinti, MD, is the author of the Conversational Italian for Travelersseries of books and a teacher of Italian for travelers to Italy in the Peoria and Chicago area. “Everything you need to know to enjoy your visit to Italy!”
Visitlearntravelitalian.com/download.html to purchase/download Conversational Italian for Travelers and find more interesting facts and helpful hints about getting around Italy!Learn how to buy train tickets online, how to make international and local telephone calls, and how to decipher Italian coffee names and restaurant menus, all while gaining the basic understanding of Italian that you will need to know to communicate easily and effectively while in Italy. —From the staff at Stella Lucente, LLC
Italian Meatballs: A tribute to our Italian Mothers is a reprint from a blog originally posted on October 10, 2018, titled: “Mom’s Best Italian Meatballs.”
I’ve since learned a about vegetarian meatballs from the blog post “Polpette di Melanzana (Eggplant Balls)” by Luca Marchiori, who mentions in his blog that it is traditional to make meatballs from eggplant in Puglia. He also notes that in Italy, “meat is only one of many ingredients Italians use to make polpette. In Rome, for example, there is a restaurant called Polpetta which serves them made from a variety of ingredients, many of them vegetarian. In fact their menu is topped by the hashtag #tuttoèpolpettabile (#youcanmakepolpettefromanything).”
Also…
I’ve since added Instagram to my social media, and have added a video from Instagram to this post so you can see me cooking in real-time! I hope you like it!
For more recipes like these, as well as French recipes, follow me on my Instagram posts at Conversationalitalian.french.
And now… the original story!
The blog title, “Mom’s Best Italian Meatballs,” came about during an event I attended with the Chicagoland Italian American Professionals (CIAP) this fall. The executive director, Salvatore Sciacca and his group feature Italian-American “cooking competition” events several times a year, and I have to say, they are always a delicious and entertaining way to spend a Sunday afternoon with my family.
So, when I was invited to be one of the home cooks for this fall’s event, The First Annual Meatball Fest, I quickly checked my calendar, noted I was available, and signed up for another Sunday afternoon of Italian-American food and fun.
I had learned my family recipe for Italian meatballs from my Sicilian-American mother and grandmother long ago, and have been preparing meatballs for my own family for Italian Sunday dinners for about 20 years now. I was happy to share my family’s recipe with other families at the event, and also looking forward to tasting what the other home cooks had to offer.
Growing up in an Italian-American household as I did, I really did not have to do anything special to prepare for the Italian meatball event held by the CIAP group – at least, I thought I didn’t have to do anything special !
As it turned out, though, after hearing the other home cooks talk about their method for making meatballs, I came home curious about the origins of this very common Italian-American dish and ended up doing a bit of research after the event!
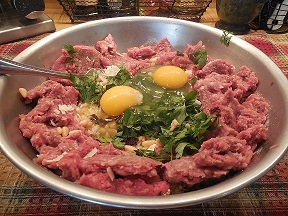
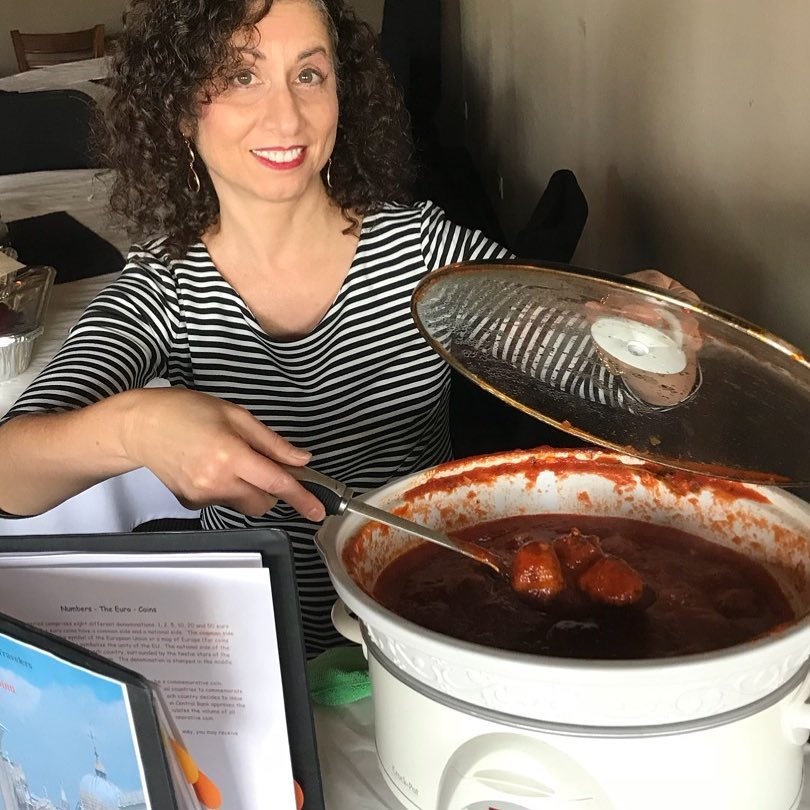
The morning of the CIAP event, I rummaged around the basement to find my trusty crock pot, rinsed it off, and set a pot of tomato sauce to cook on the stove. I set a large bowl on the counter and followed the same routine as I have done many times before for my family: put ground beef and all other ingredients into the large bowl, mix gently, and roll into balls.
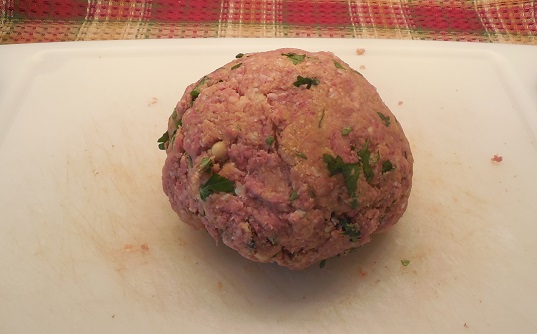
Italian meatball ingredients ready to mixOne Italian meatball ready to fry!
I am from the “Italian Mom’s Cooking School” that fries, rather than bakes meatballs to brown them. ( Sorry, I hope I haven’t offended anyone – I know there is a BIG debate about this in the Italian-American community, but I think browning dries out the meatballs and is better left to restaurants making large batches of meatballs at one time.)
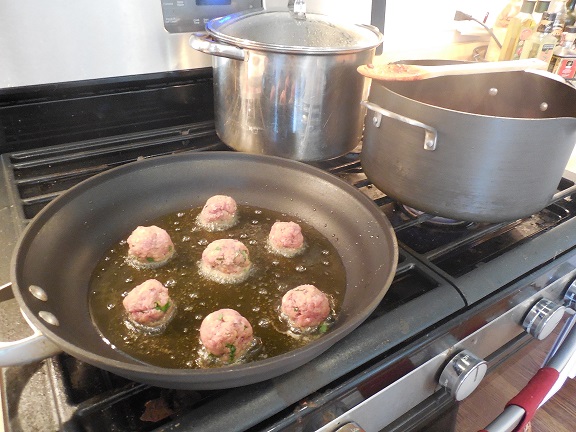
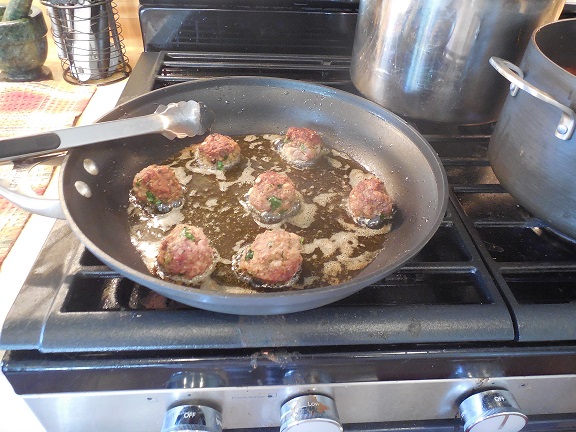
I browned my meatballs in olive oil carefully, turning each with tongs to get them browned on all sides.
Italian meatballs frying in olive oilTurn Italian meatballs gently to brown all sides evenly.
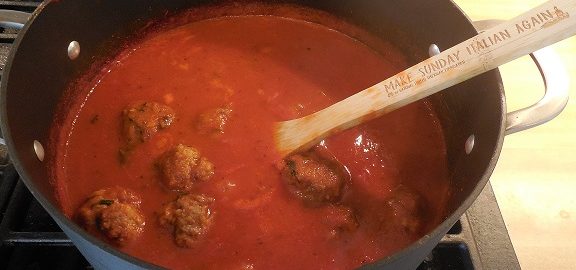
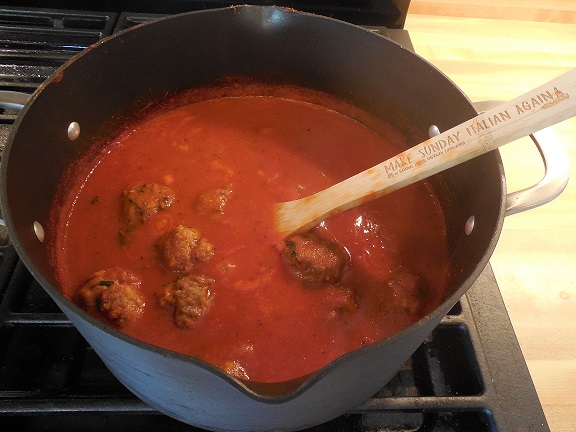
After the meatballs had browned, I added them gently to the simmering pot of tomato sauce on the stove to finish cooking.
I was taught to always stir my tomato sauce with a wooden spoon, and have a small collection of wooden spoons – some with long handles, some with short handles; some I save just for sauteing onions and garlic, others for “non-onion” savory or sweet dishes – but recently have been using my favorite wooden spoon for my tomato sauce, which I bought as a part of a fundraiser for the National Italian American Foundation.
The NIAF recently started a “Make Sunday Italian Again” campaign, which I love, as it not only promotes Sunday time together with family, but also raises money for their scholarship program by selling these “Nonna spoons” that have the slogan “Make Sunday Italian Again” engraved on the wooden handle. Check out the NIAF website, if you like, after you finish reading this blog, of course!
Italian meatballs cooking in tomato sauce
After about 30 minutes, the meatballs had finished cooking and the sauce had a nice, meaty taste. I adjusted the salt and pepper, put all into the crock pot and left to join the event.
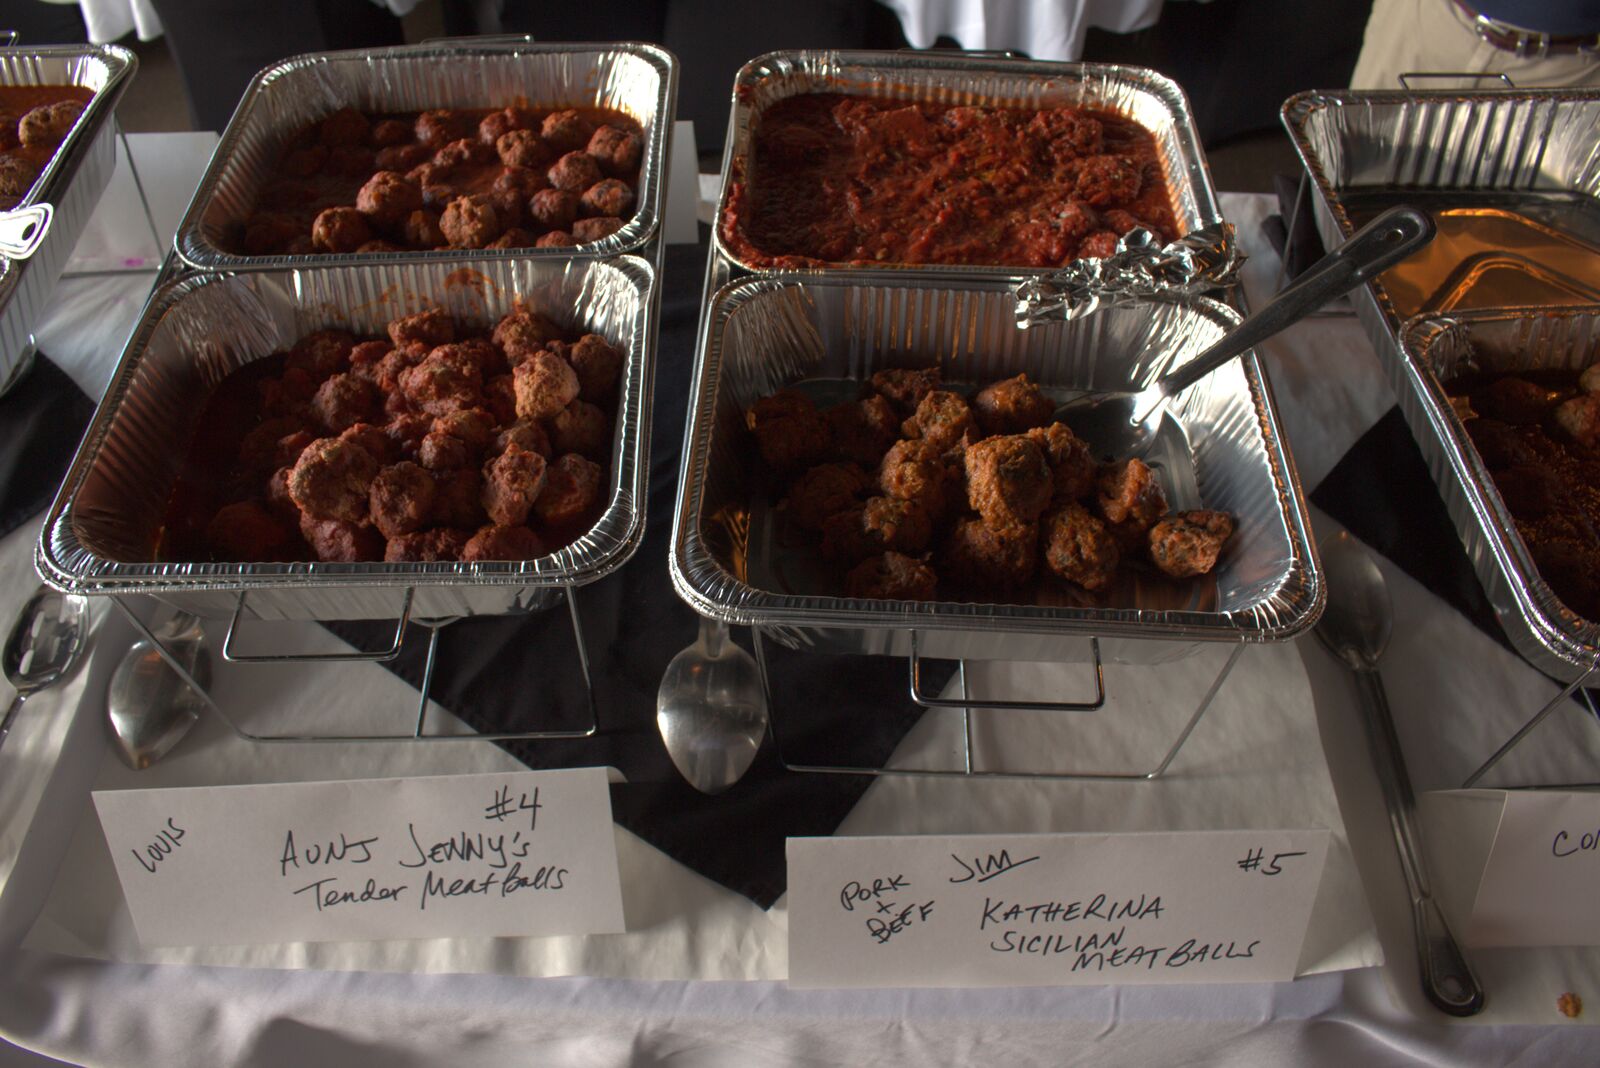
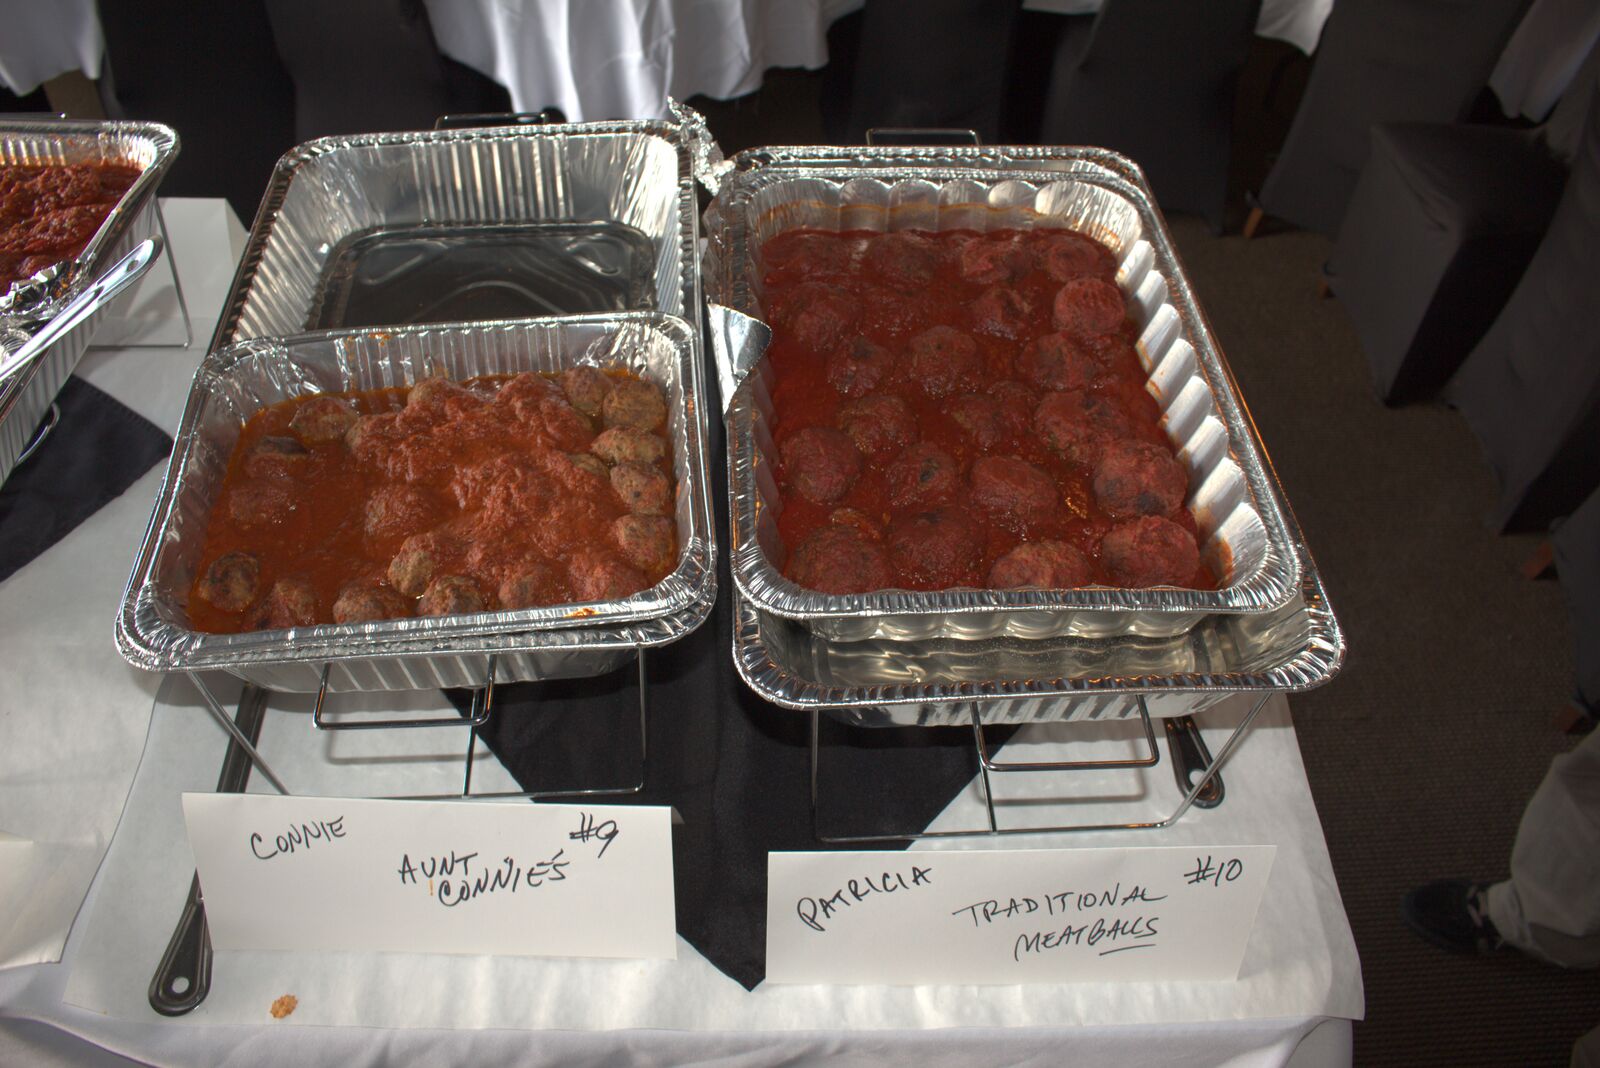
When I arrived at the event, with my tried and true “Mom’s Best Italian Meatballs”, I learned that I was one of 10 different contributors to the dinner! I named my meatballs “Mom’s Best”, because it seems to me that everyItalian mother’s meatballs are loved and considered the best by her family!
Author/Blogger Kathryn Occhipinti at the CIAP 1st Annual Meatball Fest, September 2018
I was happy to see Italian-American home cooks of all ages, and both men and women contributed their meatballs for the event. There were two long tables of meatballs and a long line formed as everyone tried to taste them all.
Enjoying Italian meatballs at the CIAP 1st Annual Meatball Fest
At first, I had thought this would be a competition, but as it turned out, just as I had suspected, although all the meatballs were made with different ingredients, EVERYONE’s meatballs were delicious, and in the end, no vote was taken!
Italian Meatballs to sampleMore Italian Meatballs
Even more Italian meatballs!
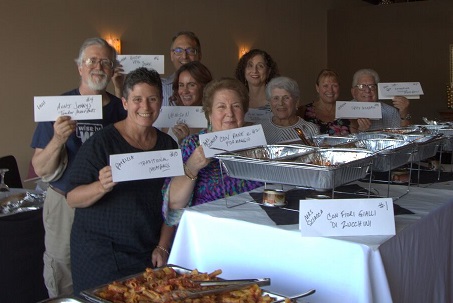
Below is a picture of those who participated, holding signs with the names of the type of meatballs they contributed. (I am in the back row and the Executive Director, Salvatore Sciacca, is just to my left.)
Italian home cooks holding signs of the names of their meatballs at CIAP’s 1st Italian Meatball Fest
Read on for the recipe that I used to make my “Mom’s Best Italian Meatballs”. Additional tips I learned from reading about meatballs are given in green italic lettering. As a bonus, I am including my family’s recipe for basic Italian tomato sauce. For tips on making Italian tomato sauce, please visit my blog Braciole – Italian Beef Rolls for Sunday Dinner. Of course, your own favorite tomato sauce will be fine as well!
But don’t stop after reading the first recipe, because when I went home I did a bit of research in Ada Boni’s cook book and discovered more tips on making “the best” meatballs in different styles that you may want to try yourself!
1 medium onion, chopped finely 1 clove garlic, chopped
2 Tablespoons olive oil +more for frying
1 lb. ground beef (80% lean best)
1 egg
3/4 cup Progresso brand Italian bread crumbs
1/4 cup freshly grated Parmesan cheese
1/4 cup fresh parsley, chopped finely
Salt and Pepper to taste.
This recipe will serve 4 people; it can easily be doubled or tripled for a crowd!
Coat a small frying pan lightly with some olive oil and add the chopped onion and garlic and a pinch of salt. Saute gently, stirring with a wooden spoon, until the onions and garlic have softened and given their flavor to the olive oil.
(I find that sauteing the onions and garlic gives both a nice mellow taste, and I would recommend not skipping this step. In fact, when my daughter was young, she insisted that she didn’t like onions, so I would remove the onions after competing this step and she never caught on to my trick!)
Put the sauteed onions and garlic, with the olive oil, into a large bowl.
Add the rest of the ingredients: 2 additional tablespoons of olive oil, ground beef, egg, breadcrumbs and parsley.
Sprinkle with salt and a grind of fresh pepper to taste (some people like more pepper, others less).
Mix gently with your hands, careful not to work the meat too much or this may make the meatballs tough!
Adjust amount of breadcrumbs as needed – more if you more, less to make a more “meaty” meatball. If too dry, add a few drops more of olive oil.
(What I learned from researching meatballs – moisten the breadcrumbs in a bit of milk to make for a more tender meatball. The milk should be heated gently on the stove before adding the bread. When all milk is absorbed, mash into a pulp with a fork.)
When the meatball mixture consistency is to your liking, pull a bit of the meat mixture off and roll into a ball to make a meatball. Size of the meatballs is to taste, but of course the larger meatballs will need to finish cooking longer in the tomato sauce.
Set a frying pan coated with olive oil over medium-high heat.
Place the newly rolled meatballs gently into the frying pan. Fry on medium high heat (adjusting as necessary during the frying time), turning each with tongs so all sides become browned.
(What I learned from researching meatballs – roll each in a bit of flour or plain bread crumbs to aid browning and help the meatballs hold together during frying.)
After the meatballs have browned, immediately remove them with tongs and gently place into a pot of simmering tomato sauce (recipe below) to finish cooking.
Serve with spaghetti for the Italian-American presentation, or continue on to the following Italian recipes for other serving ideas.
1 medium onion, chopped finely 1 clove garlic, chopped
2 Tablespoons olive oil
1 can (28 oz.) Contadina brand tomato puree or chopped tomatoes
1 can Contadina brand tomato paste
1/4 cup dried parsley or chopped fresh parsley leaves
1 Tablespoon dried basil or 2 Tablespoons torn fresh basil
1 Tablespoon of salt or to taste
Heat the olive oil in a large pot and saute the onions and garlic with a wooden spoon until softened.
Add the tomato puree, tomato paste, parsley, and basil to the same pot.
Add 2 cups of water.
Cover, bring the sauce to a boil, and then reduce heat to medium-low.
Simmer on medium-low heat with the lid partially covering the pot, stirring occasionally with a wooden spoon for at least 1 hour, so the sauce does not stick to the bottom of the pot and burn.
Cook for at least 1 hour; at least 1.5 hours if adding meat to the sauce. (Brown any meat in a separate skillet before adding it.)
Add additional water if the sauce becomes too thick, or cook for additional time with the lid of the pot off if the sauce becomes too thin.
****************************************
How to Make Italian Meatballs – My research…
****************************************
Ada Boni, (1881 – 1973) the author of one of my favorite Italian cook books, Italian Regional Cooking, was a well-loved Italian author and food writer. According to the back flap of the edition of my book, Ada Boni is known throughout Italy as the author of the classic bestselling cook book, Il Talismano della Felicità.
Boni worked as a magazine editor in Italy. This book is a collection of the series of food articles about regional Italian cooking that was originally written for the Italian monthly magazine “Arianna”. The magazine articles cataloged in depth recipes for the entire range of food served in the 14 major regions of Italy, long before the importance of regional cooking was understood here in America. Boni was and still is well-known for the authenticity and variety of her recipes.
The book Italian Regional Cooking is beautifully illustrated, with a spectacular photo montage of each Italian region to be covered at the beginning of each chapter that provides a backdrop for Italian tables laden with dishes from appetizer to dessert that evoke a special family gathering. (There are no images for each individual recipe, however). Although I have an edition from 1969 translated into English, the book is still listed on Amazon today. I found this book about 30 years ago in a book store in California and my cover is tattered by now!
The book cover from “Italian Regional Cooking” by Ada Boni
When I wanted to research Italian meatballs, I searched this cook book in particular for a couple of reasons. First, I wanted to discover if the way Italian-Americans now make meatballs differs significantly from how an Italian in southern Italy makes meatballs. Second, I wanted to see if I could figure out the origins of the meatballs I make today.
****************************************
The Ingredients in Sicilian Meatballs
****************************************
In answer to my first question – do we make meatballs differently over here than they do in Italy, I searched the chapter in Italian Regional Cookingthat lists the recipes for Sicily. I was pretty certain when I started my search that my family’s recipe was authentic, as it has been handed down from my grandmother, who spent her first 22 years in Sicily, and as the oldest child had been helping her mother with the household cooking since she was a young girl.
It turns out that the ingredients in Ada Boni’s Sicilian“Polpette di Maiale con Pitaggio” are almost identical to my family’s meatballs. “Polpette”* is the Italian word for what we call “meatballs” in America, but the translation given is, “Pork Rissoles with Vegetables.”
**********
The meat used for the meatball recipe from Sicily is pork, rather than beef, which of course would be more easy to come by in Sicily. If I have ground pork or ground turkey on hand, I occasionally will use this meat to “lighten up” the meatballs. The CIAP cooks used a variety of different meats (see about Neapolitan meatballs below). The meatballs were rolled in a bit of flour before frying, which is an idea I will use from now on.
Instead of breadcrumbs, the recommendation is to soften the “pith of a small roll” with milk and “squeeze it dry.” Several of the home cooks at the CIAP event mentioned using this method instead of bread crumbs, and I will have to try this on my next attempt at making meatballs. And, of course, the Progresso brand of breadcrumbs is an American invention, so here is how we changed the meatball over in America for sure!
Other than that, the ingredients listed for Sicilian Polpette were about the same as the meatballs I had learned to make.The onion my family puts into meatballs was left out, but included were garlic, fresh parsley, grated Parmesan or Pecorino cheese, eggs, salt, pepper, and a bit of flour to coat the meatballs before frying. The flour is another good tip! Most of the CIAP cooks included these ingredients.
How to serve Sicilian meatballs: Suggested serving was with sauteed artichokes (with chokes removed), green peas and fava beans in the same oil used for frying the meatballs.
I have not seen meatballs served this way, but plan on trying this suggestion, which sounds good since true Italian meatballs (I am told, but am not quite convinced) should served with Italian bread, rather than pasta.
***************************************
The Ingredients in Neapolitan Meatballs
****************************************
When I searched the chapter in Italian Regional Cooking that lists the recipes for Napes-Capagna, I discovered “Polpette di Carne”, translated into “Meatballs in Tomato Sauce Neapolitan Style.”
**********
The meat used for the meatball recipe from the Naples region is beef, which is probably the most common meat used in America today, although the CIAP cooks used ground pork and a mixture of been and pork as well. One cook even made vegetarian meatballs of her own invention using zucchini flowers (Salvatore’s mother) and I have to say, they were delicious. Again, the meatballs were rolled in a bit of flour before frying.
Breadcrumbs were used in the Neapolitan recipe, of course grated from stale Italian bread, and first moistened with a little milk. This seems like a good idea to me, and I am going to include this tip from now on when I make meatballs.
The remaining ingredients listed for Neapolitan Polpette differed significantly from the meatballs we see most frequently in America today in that they called for yellow raisins, pine nuts, and a bit of lard. Onions were again left out. The remaining ingredients of garlic, parsley, eggs, and Parmesan cheese were the same basic ingredients given in the Sicilian recipe.
I tried the Neapolitan style meatballs one night for dinner (you might notice some pine nuts in the images of my mixing bowl from the first section of the blog!), warning my family that they would taste sweeter than our usual meatball. I have to say the addition of milk and a bit of lard made them the most tender meatballs I have ever had!
But it seems like Americans have lost their taste for a “sweet” meatball, however, and it was a consensus at the CIAP dinner that “no one” here in America used raisins anymore.
How to serve Neapolitan meatballs: Suggested serving was with tomato sauce, and a recipe for simple tomato sauce was provided, as noted in the title for the recipe.
****************************************
How to Make Italian Meatballs – My conclusions…
****************************************
It seems to me that there are as many ways to make and serve Italian meatballs as there are home cooks to make them! I do find it interesting, though, that here in America we have retained the idea of cooking meatballs in tomato sauce, whether the idea is from Sicily or Naples, and meatballs are paired with spaghetti is indeed an “American classic”.
**********
* A final tidbit of interesting information: when I looked up the word “polpette” in the dictionary, which means “meatballs,” I discovered that the Italian singular “polpetta” for the singular meatball, has several negative connotations. “Polpetta” can refer to “poisoned bait,” possibly because the reference is to little pieces of meat that are poisoned. “Polpetta” can also be used in a figurative sense, to mean that a person is a “dud” or a “drag.”
—Kathryn Occhipinti
Kathryn Occhipinti, MD, is the author of the Conversational Italian for Travelersseries of books and a teacher of Italian for travelers to Italy in the Peoria and Chicago area. “Everything you need to know to enjoy your visit to Italy!”
Visitlearntravelitalian.com/download.html to purchase/download Conversational Italian for Travelers and find more interesting facts and helpful hints about getting around Italy!Learn how to buy train tickets online, how to make international and local telephone calls, and how to decipher Italian coffee names and restaurant menus, all while gaining the basic understanding of Italian that you will need to know to communicate easily and effectively while in Italy. —From the staff at Stella Lucente, LLC
Italian Meatballs: A Tribute to our Italian Mothers
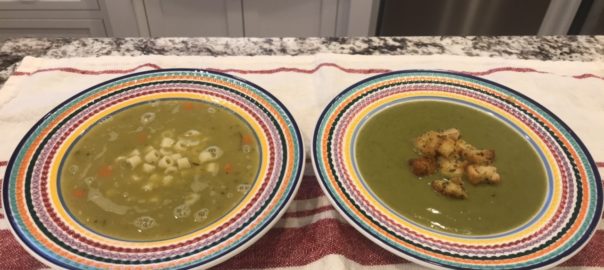
Split pea soup is as comforting as it is delicious. Make it French topped with homemade Provence herbcroutons or make it Italian with ditalini pasta. But make it tonight!
Split pea soup is a classic, hearty soup made for generations in the winter and spring, when fresh, green vegetables are scarce. Peas can be dried after harvest and “split peas” will keep easily for 1 year or longer in the cupboard, waiting to satisfy that yearning for a hearty soup until fresh peas become available in the springtime.
Since my family did not make split-pea soup when I was growing up, I researched a bit to discover that this soup is popular in both Italy and France. The split peas are cooked in essentially the same way, but the soups are finished differently.
In both versions, some type of ham product is commonly used to flavor the peas, although this can be left out to make a vegetarian soup. I’ve chosen pancetta, or Italian bacon, for the ham product in my soup. Chopped onions and carrots are a mainstay, as is the herb thyme.
In Italy, split pea soup is cooked until the peas fall apart by themselves in the soup, and the soup is left a little bit chunky. The soup is then finished by adding in cooked Ditalini pasta or a potato cut into small cubes. In France, the soup is pureed, and finished with a topping of canned peas or croutons.
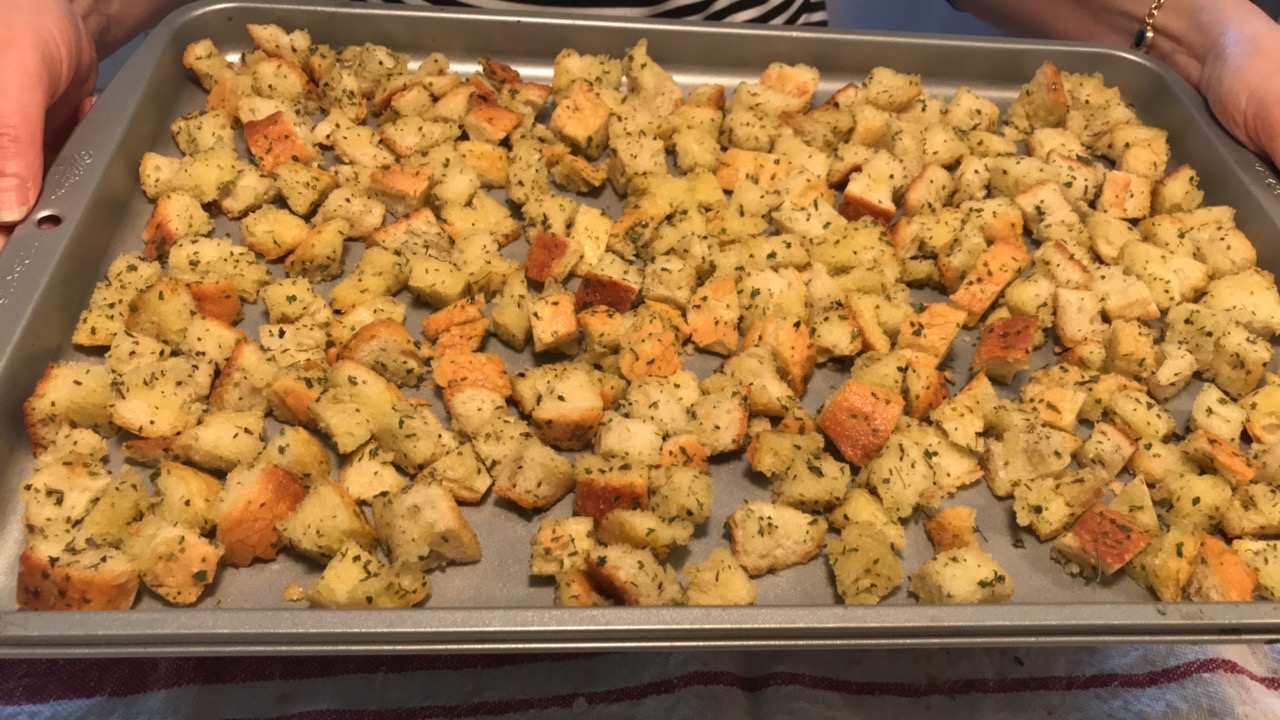
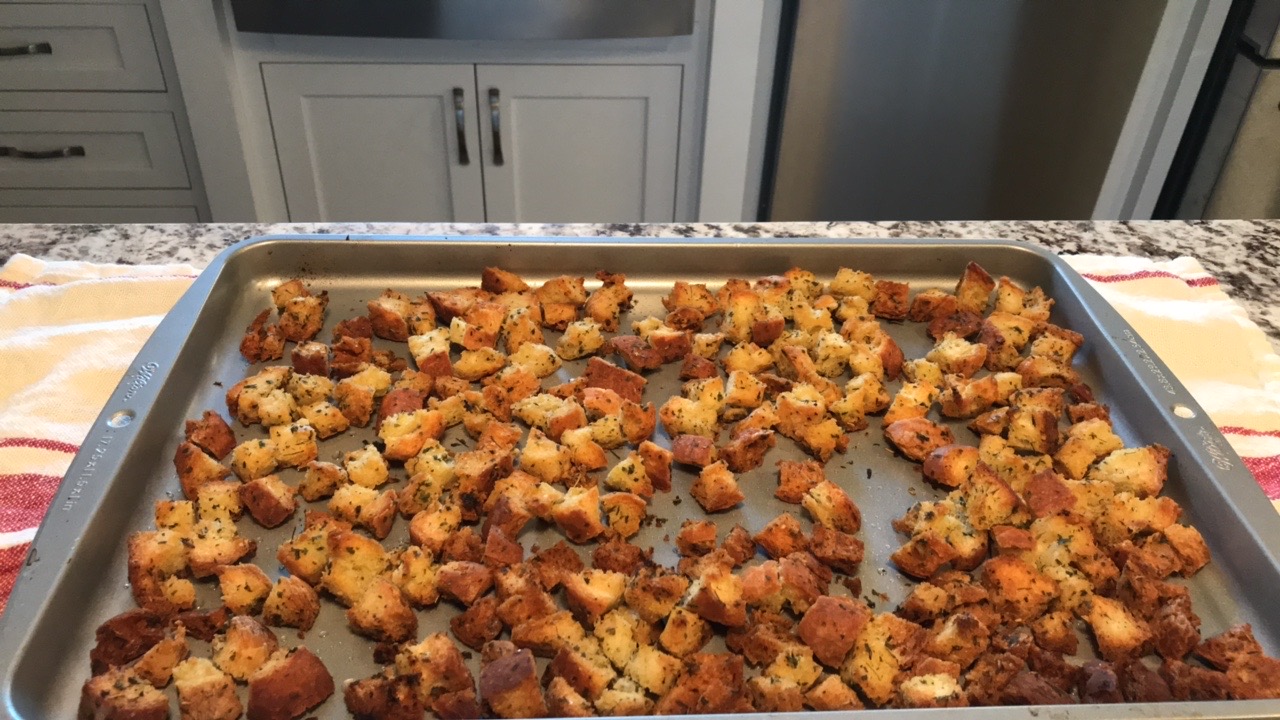
I’ve included a method to make homemade croutons using herbs of Provence as the French garnish for my split-pea soup. But I’m sure you’ll enjoy making these croutons for many more dishes once you realize how simple it is to make croutons yourself.
Whatever version you choose, this soup is sure to please your family! —Kathryn Occhipinti
Recipe is listed below. Check out my latest Instagram video from Conversationalitalilan.french and watch me make split pea soup and croutons if you like!
Split Pea Soup with Homemade Croutons and Ditalini Pasta
Ingredients
for the Soup:
1 bag (26 oz.) split peas, soaked in water to make 3-4 cups
2 Tb butter
1/4 cup pancetta or ham, diced into small cubes
1 yellow onion, chopped finely
1 carrot, peeled and chopped finely
Fresh sprig or 1 tsp of dried parsley
Fresh sprig or 1/8 tsp of dried thyme
1 bay leaf
Italian style: 1 cup ditalini pasta, cooked
Ingredients
for the Croutons
(French style):
1 loaf French bread, cubed
1/2 cup olive oil,
1/2 -1 tsp crushed garlic (from jar)
pinch salt
dried parsley flakes
dried herbs of Provence.
Method
Put the 3-4 cups of soaked peas in large pot with 7 cups water.
Add 1/2 tsp salt and 1/8 tsp baking soda .(If you have “hard water” the baking soda will counteract the calcium salts in the hard water so the split peas can soften properly.*)
Bring the pot of water with split peas to the boil slowly, taking about 45 min. This will allow the peas to absorb the water properly and soften properly.* Skim foam off periodically as it comes to the surface.
While the split peas are coming to a boil, saute the finely chopped pancetta (or ham), onion and carrot in 2 Tb of butter and a pinch of salt until the vegetables soften. Do not brown.
After a rolling boil is reached, skim foam from the pot again and add the sauteed vegetables and ham.
Then add the herbs to taste. If fresh, the herbs should be added in a “bouquet garni,” wrapped in cheesecloth so they can be removed. Dried herbs will soften and fall apart as the soup cooks. Suggested herbs: chopped fresh or dried parsley, sprig or pinch of dried thyme and a small bay leaf.
Simmer an additional 2 -2 1/2 hours, until split peas fall apart and thicken the soup.
Remove bay leaf (and bouquet garni if used) when done!
Reduce peas to puree while cooking to desired thickness for Italian version (leave a little chunky). Or puree in food processor for French version.
Italian version: Cook 1/2 cup Ditalini pasta separately, add to soup and and enjoy.
French version: After pureeing, place back on the stove and add 2 Tb butter, blending into the soup as it melts. Top with canned peas to serve or homemade croutons.
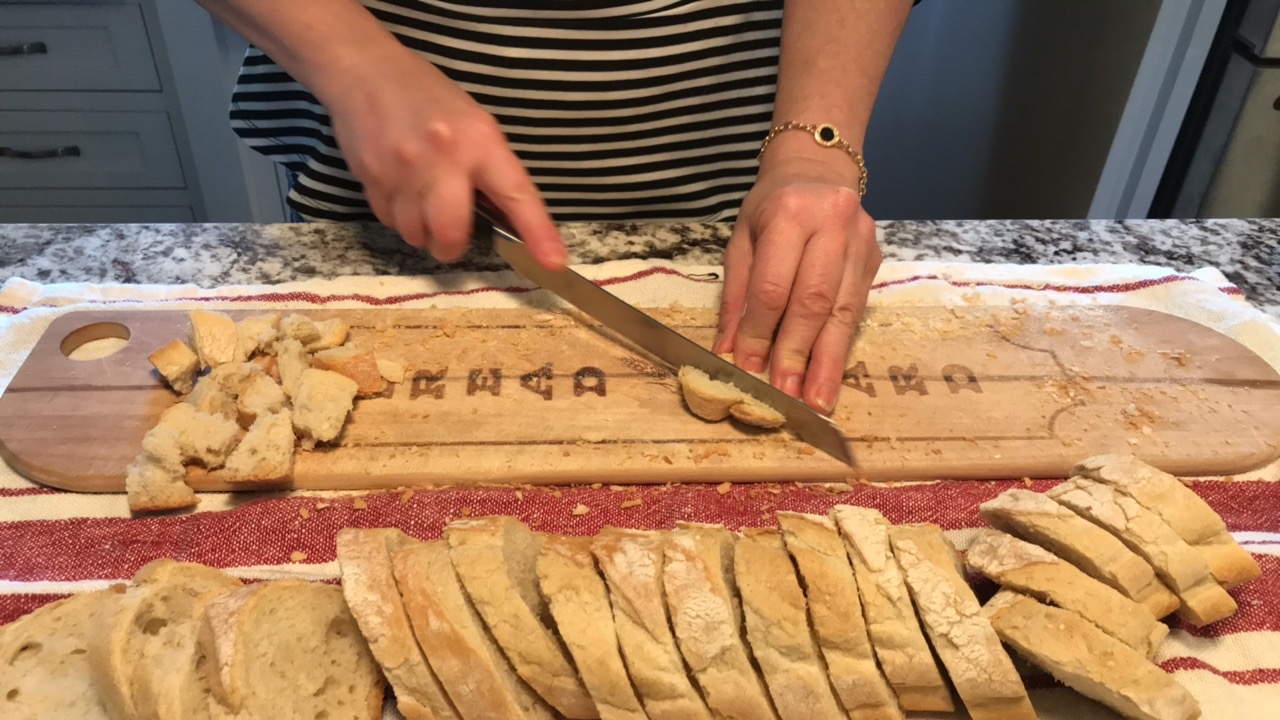
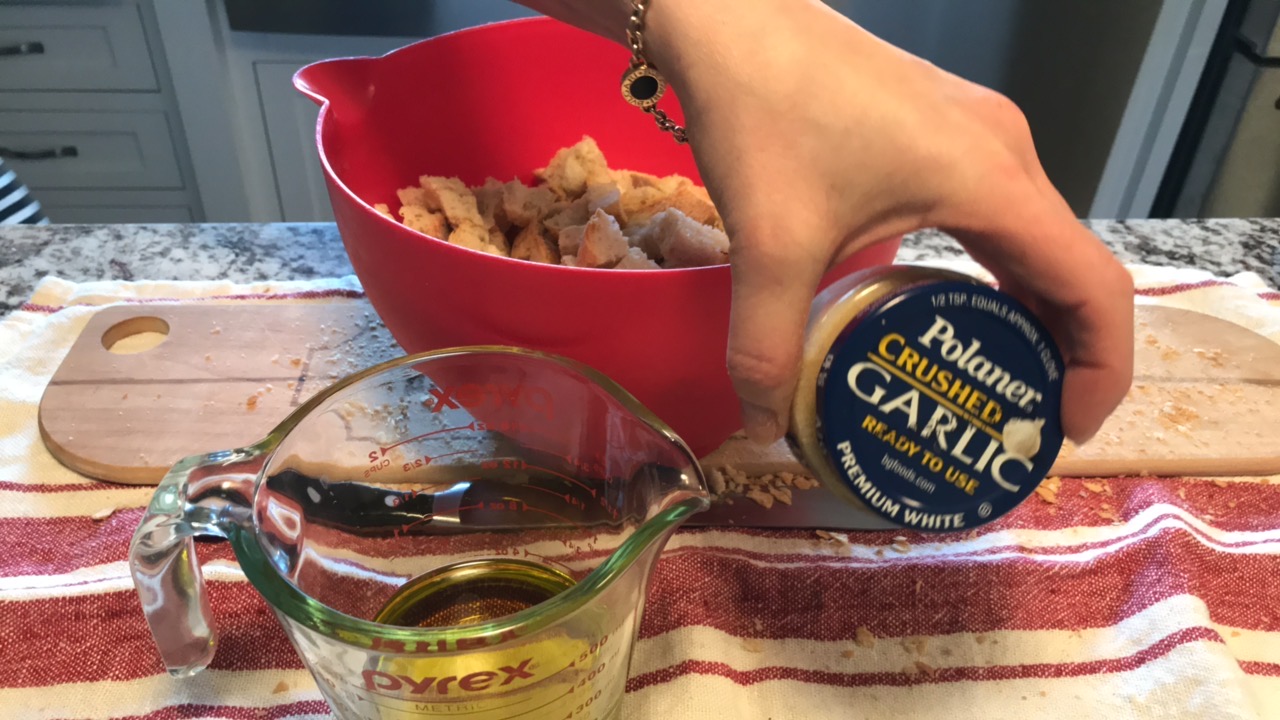
For the homemade croutons: 1 loaf French bread, cubed,1/2 cup olive oil, 1/2 -1 tsp crushed garlic (add to olive oil and mix to coat evenly), pinch salt, dried parsley flakes, dried herbs of Provence. Mix, spread out on a baking sheet and bake at 400° until golden brown. Viola! —Kathryn Occhipinti
French bread cut for croutonsCroutons in bowl with olive oil and crushed garlic to add
Croutons ready to go into the oven.Croutons coated with olive oil, garlic and herbs ready to bake
*I learned these tips from the French cook book, La Bonne Cuisine de Madame E. Saint-Ange, first published in French in 1920, first translated into English as of 1995, and with a second edition in 2005. As the forward states, “it is today recognized by many French home and restaurant cooks… as the most articulate and popular home cookbook available in bookstores, from the time of its first publication… in the late 1920s to these first years of the 20th century.” This cook book is filled with so many details about buying, prepping and cooking French food of every type that I am sure cooks of all levels will benefit from the knowledge imparted by Madame into the 21st century and beyond.
Kathryn Occhipinti, MD, is the author of the Conversational Italian for Travelersseries of books and a teacher of Italian for travelers to Italy in the Peoria and Chicago area. “Everything you need to know to enjoy your visit to Italy!”
Visitlearntravelitalian.com/download.html to purchase/download Conversational Italian for Travelers and find more interesting facts and helpful hints about getting around Italy!Learn how to buy train tickets online, how to make international and local telephone calls, and how to decipher Italian coffee names and restaurant menus, all while gaining the basic understanding of Italian that you will need to know to communicate easily and effectively while in Italy. —From the staff at Stella Lucente, LLC
Italian Recipe: Split Pea Soup with Homemade Croutons
Italian Recipe: One-Pot Chicken in Marsala Wine is a reprint from a blog originally posted on February 26, 2017. I’ve since added Instagram to my social media, and have added a video from Instagram to this post so you can see me cooking in real-time! I hope you like it!
For more recipes like these, as well as French recipes, follow me on my Instagram posts at Conversationalitalian.french.
The recipe title, “One-Pot Italian Chicken in Marsala Wine” sounds rich… and it is! But it is also so easy to make! I am told that for many years in Italy, only relatively wealthy families had ovens (in the day of my great grandparents). As a result, many wonderful Italian meals were developed that could be made entirely on the stove top. This actually fits perfectly with the lifestyle we live today.
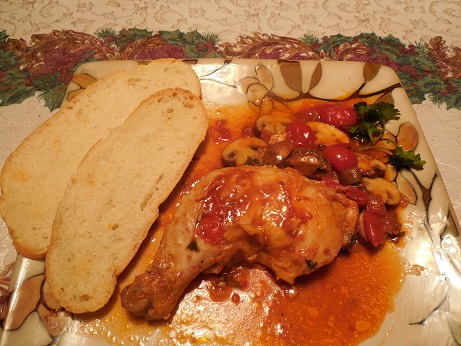
In this chicken in Marsala wine recipe, a whole cut chicken is cooked in one large skillet along with the wine and few other ingredients until a silky gravy forms. This hearty and fulfilling dish can be made during the week or served when friends are over on the weekend. Hearty, crusty Italian bread makes a perfect accompaniment. Add a salad or vegetable side dish (contorno) if you like.
So get out the largest skillet you have, and try our chicken in Marsala wine dish for your family tonight. I’m sure you won’t be disappointed! —Kathryn Occhipinti
Recipe is listed below. Check out my latest Instagram video from Conversationalitalilan.french and watch me make the dish if you like!
1 frying chicken, cut into 2 breasts, 2 thighs/legs, 2 wings
(any chicken with breasts and thighs of similar size)
up to 1/4 cup olive oil, as needed
1 small onion, minced
1 clove garlic, crushed
2 strips guanciale (bacon from cheek of pig) or 2 strips prosciutto, chopped
3/4 cup Marsala wine
8 oz. cremini mushrooms
1 (15 oz.) can chopped tomatoes or canned or fresh cherry tomatoes
2 sprigs of Italian flat-leaf parsley, chopped coarsely
Method
Rinse the frying chicken inside and out, pat dry, and cut into pieces. Reserve the back for chicken soup to be made at a later date!
Sprinkle chicken lightly with salt and pepper.
Use a large, shallow pot, Dutch oven, or skillet to cook all ingredients over medium high heat as follows:
Pour olive oil into your pot or skillet to coat the entire bottom of the pot with a thin layer of oil, using about 1/4 cup of olive oil. Heat oil over medium high heat (do not let the oil smoke or flavor will be lost).
Add chicken to the pan skin side down, keeping each piece separate from the other and cook without moving the chicken for a few minutes, until the skin has browned and some of the fat from under the skin has been rendered.
Turn chicken pieces once and cook about 5 minutes more.
Remove chicken pieces to a platter and cover with foil to keep warm.
Pour out excess oil/fat from the skillet. Add fresh olive oil if necessary to coat the bottom lightly again.
Into the skillet, add the chopped onion, crushed garlic clove, and guanciale or prosciutto. Cook until the onion has softened.
Add Marsala wine and turn the heat up to high briefly to boil off alcohol while scraping the bottom of the pan with a wooden spoon to release chicken bits that will help flavor the sauce. Lower heat and continue to boil off alcohol until about 50% of the Marsala wine remains in the pot.
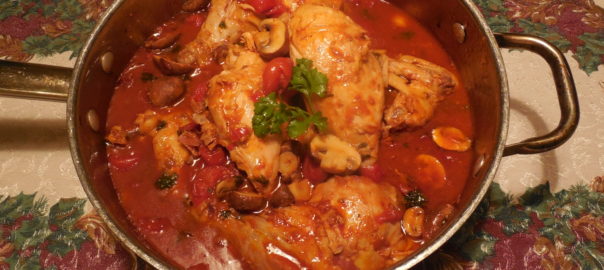
Put the chicken back into the skillet and add tomatoes (with the juices in the can), mushrooms, and parsley. Add enough water, so the chicken and vegetables are almost completely covered.
Browned chicken with vegetables and Marsala wine on the stove top
Cover the skillet and cook on medium high heat until the chicken is cooked through, adding more water as needed, about 15 to 30 minutes (this will depend on how cooked the chicken was initially, of course).
Italian chicken in Marsala wine with tomatoes added, cooking on the stove top
If the sauce is too watery at the end of cooking time, remove the lid and boil off some liquid gently. The sauce should be fairly thick.*
Taste, and adjust salt and pepper before serving.
Place the chicken pieces on a large platter or on individual plates. Pour on the sauce and serve with rustic Italian bread.
Italian chicken Marsala served with a side of bread
*This method is a fricassee of chicken (a method of cooking meat in which it is cut up, sautéed and braised, and served with its sauce), so the sauce will be a little fatty. If you want to decrease the amount of fat, the same method can be followed with skinless, bone-in chicken cooked for a shorter time initially.
—Kathryn Occhipinti
Kathryn Occhipinti, MD, is the author of the Conversational Italian for Travelersseries of books and a teacher of Italian for travelers to Italy in the Peoria and Chicago area. “Everything you need to know to enjoy your visit to Italy!”
Visitlearntravelitalian.com/download.html to purchase/download Conversational Italian for Travelers and find more interesting facts and helpful hints about getting around Italy!Learn how to buy train tickets online, how to make international and local telephone calls, and how to decipher Italian coffee names and restaurant menus, all while gaining the basic understanding of Italian that you will need to know to communicate easily and effectively while in Italy. —From the staff at Stella Lucente, LLC
Italian Recipe: One-Pot Italian Chicken in Marsala Wine
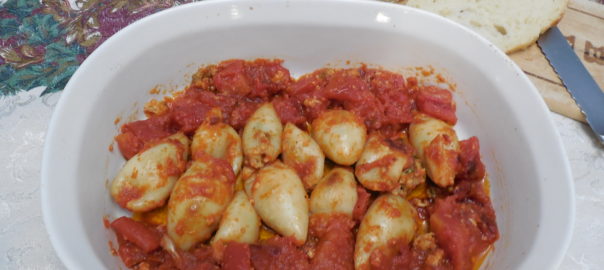
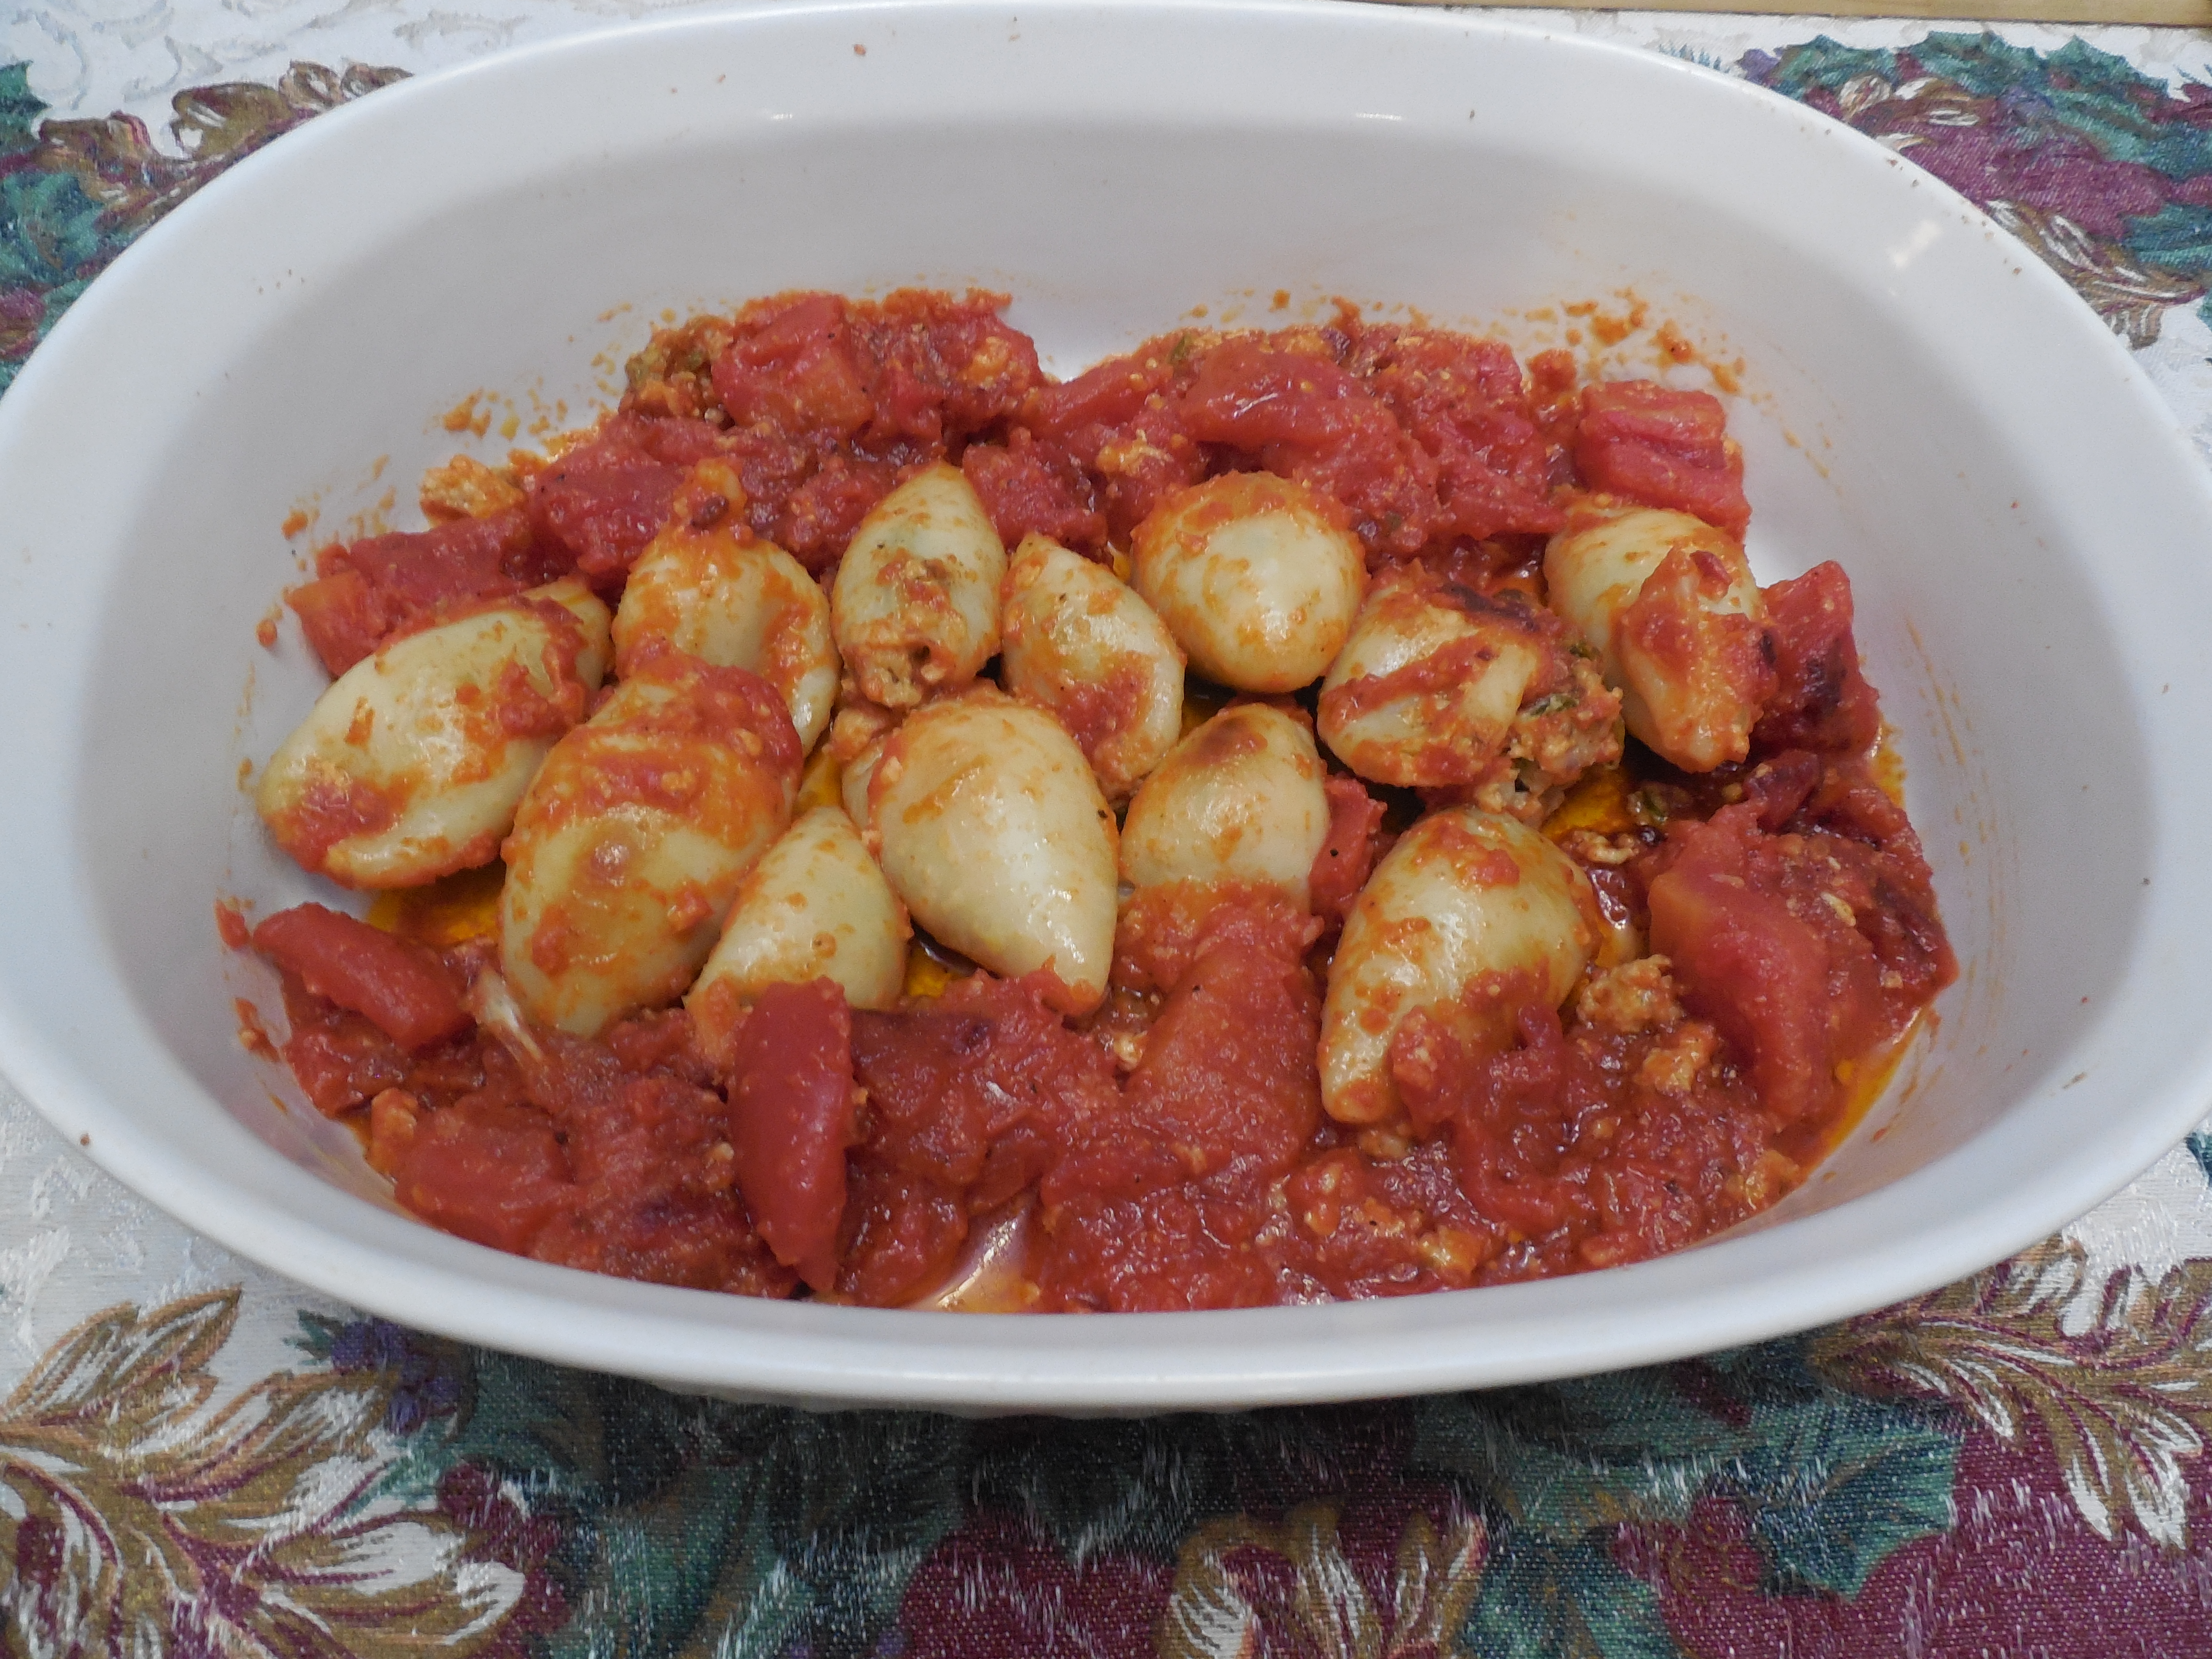
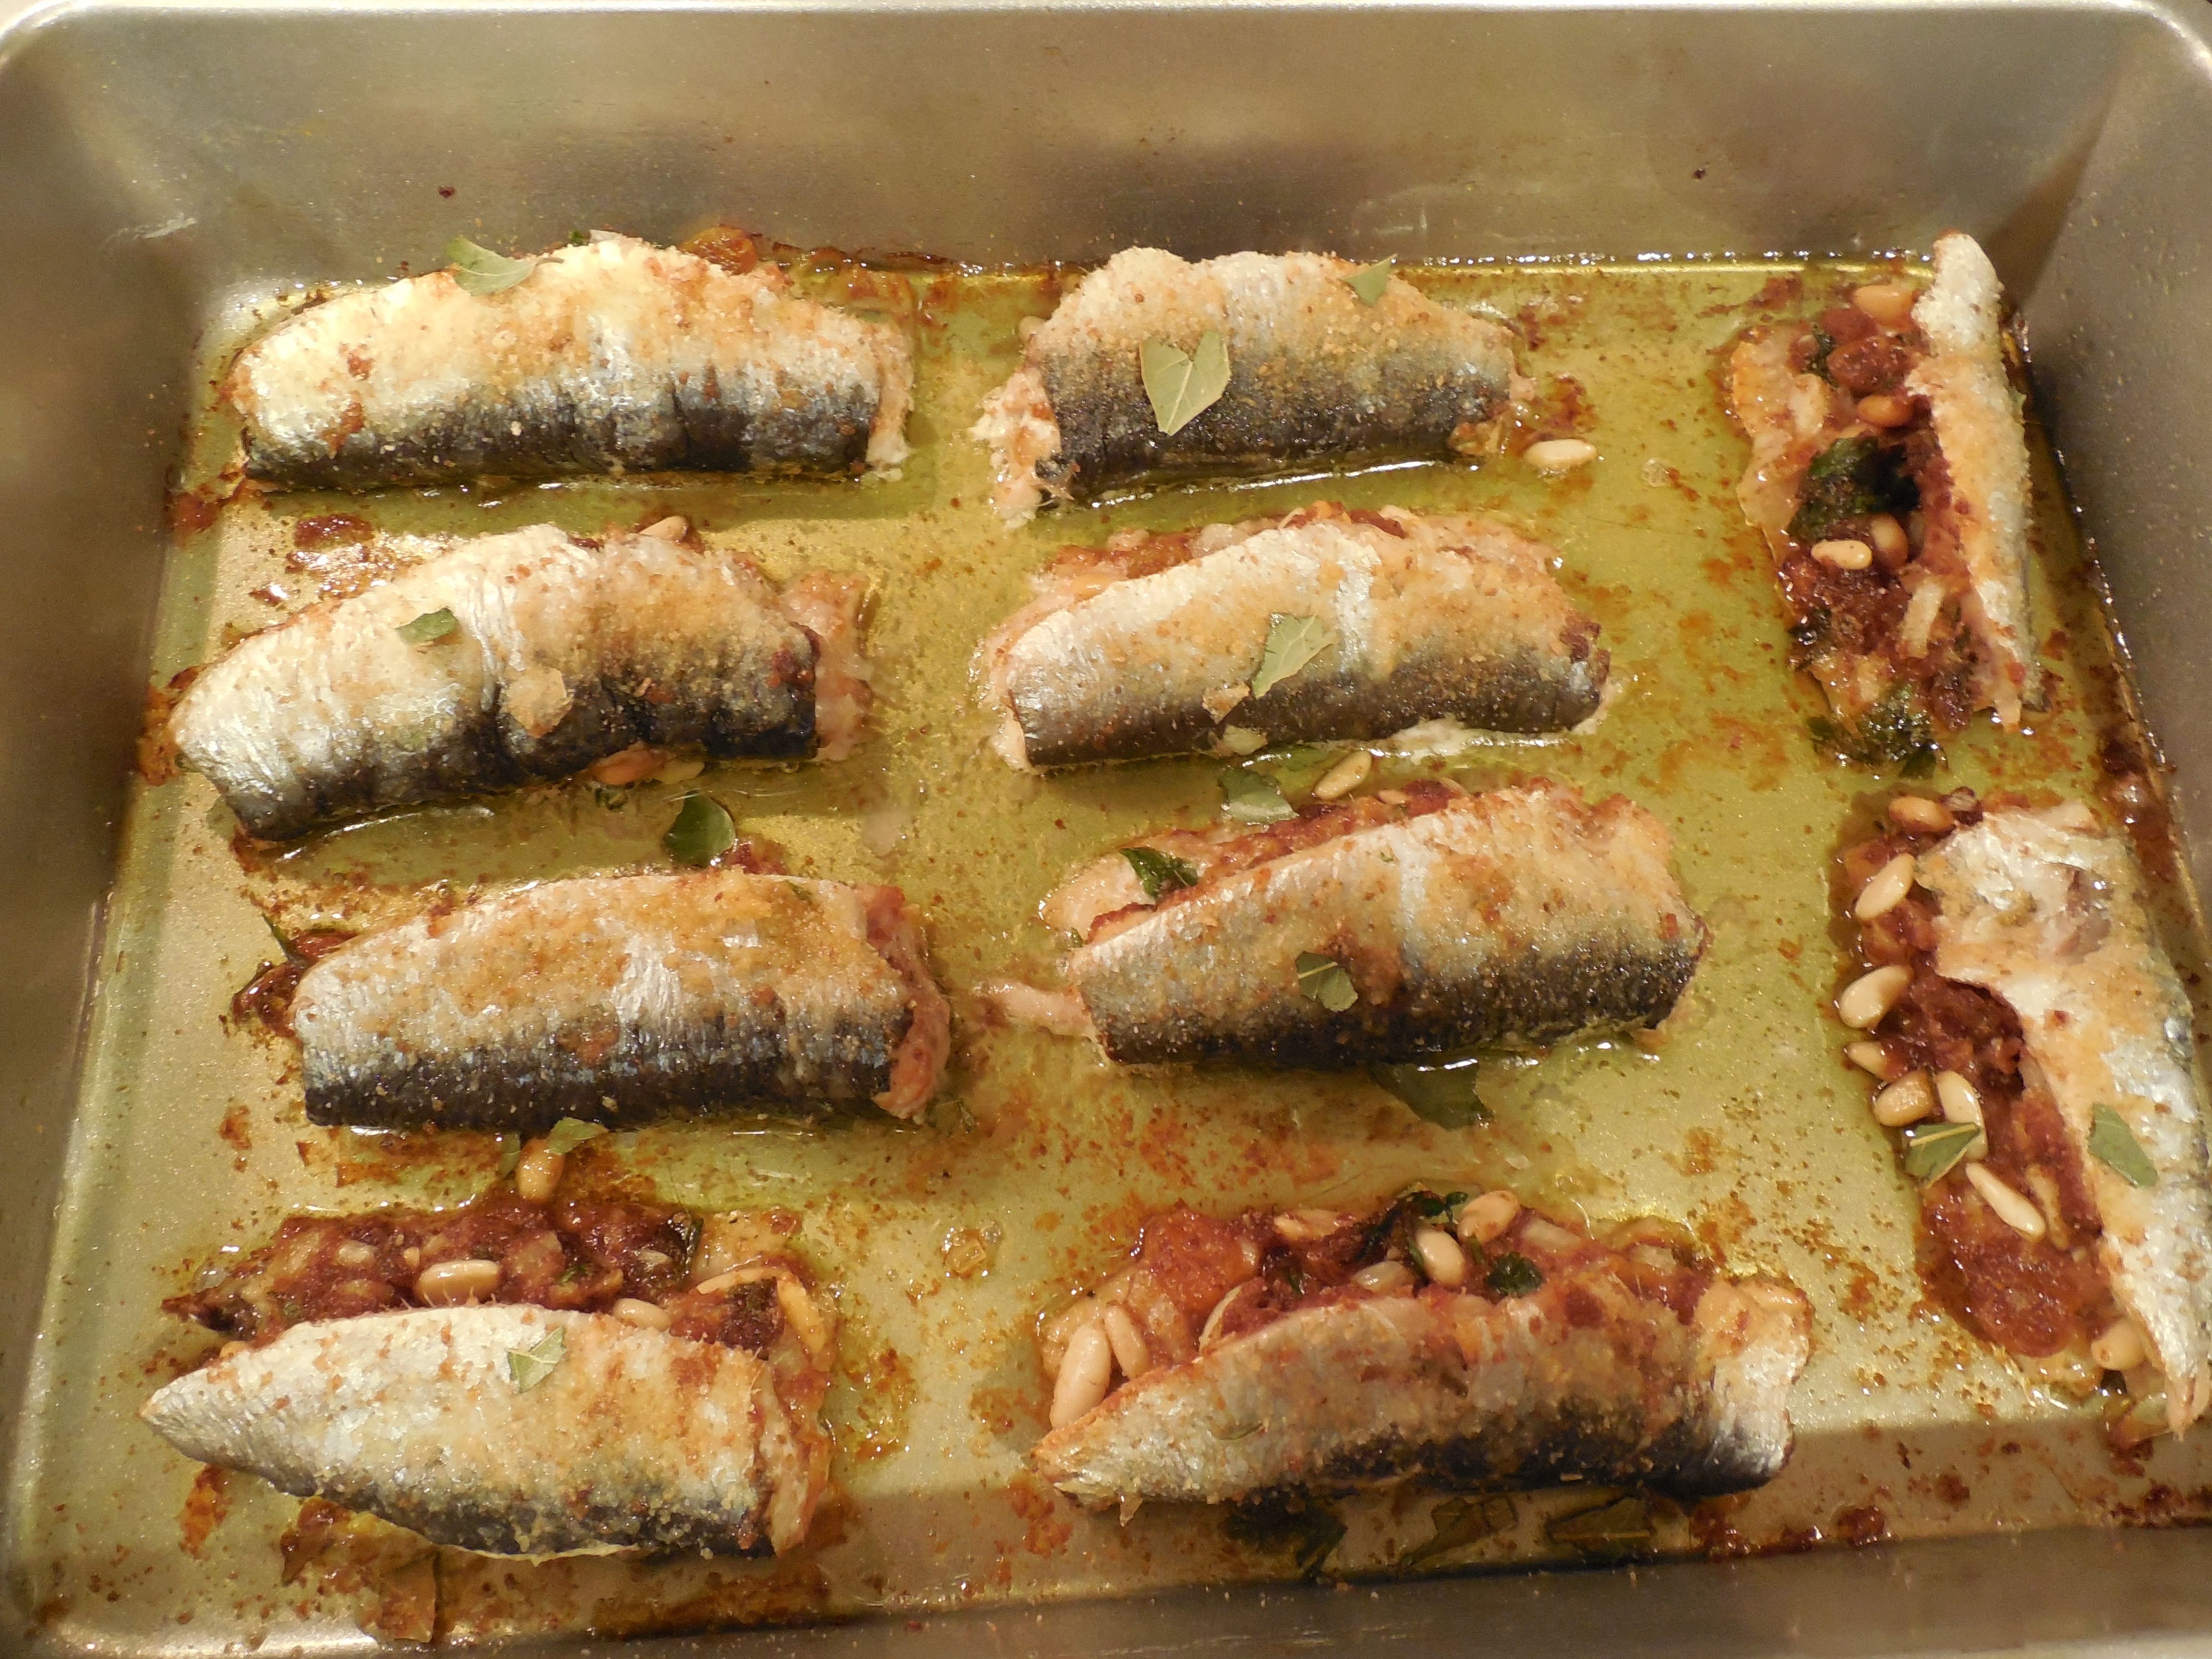
It is an Italian tradition to serve fish for Christmas Eve, in observance of the Catholic holiday. In some towns in Italy and in many Italian-American families, this tradition has turned into a feast that features fish and shellfish for antipasto, primo and secondo courses — fish is served fried, stuffed, with pasta, stewed, and baked. Some families serve seven different types of fish, although I’m not sure if anyone really knows where the number seven originated from.
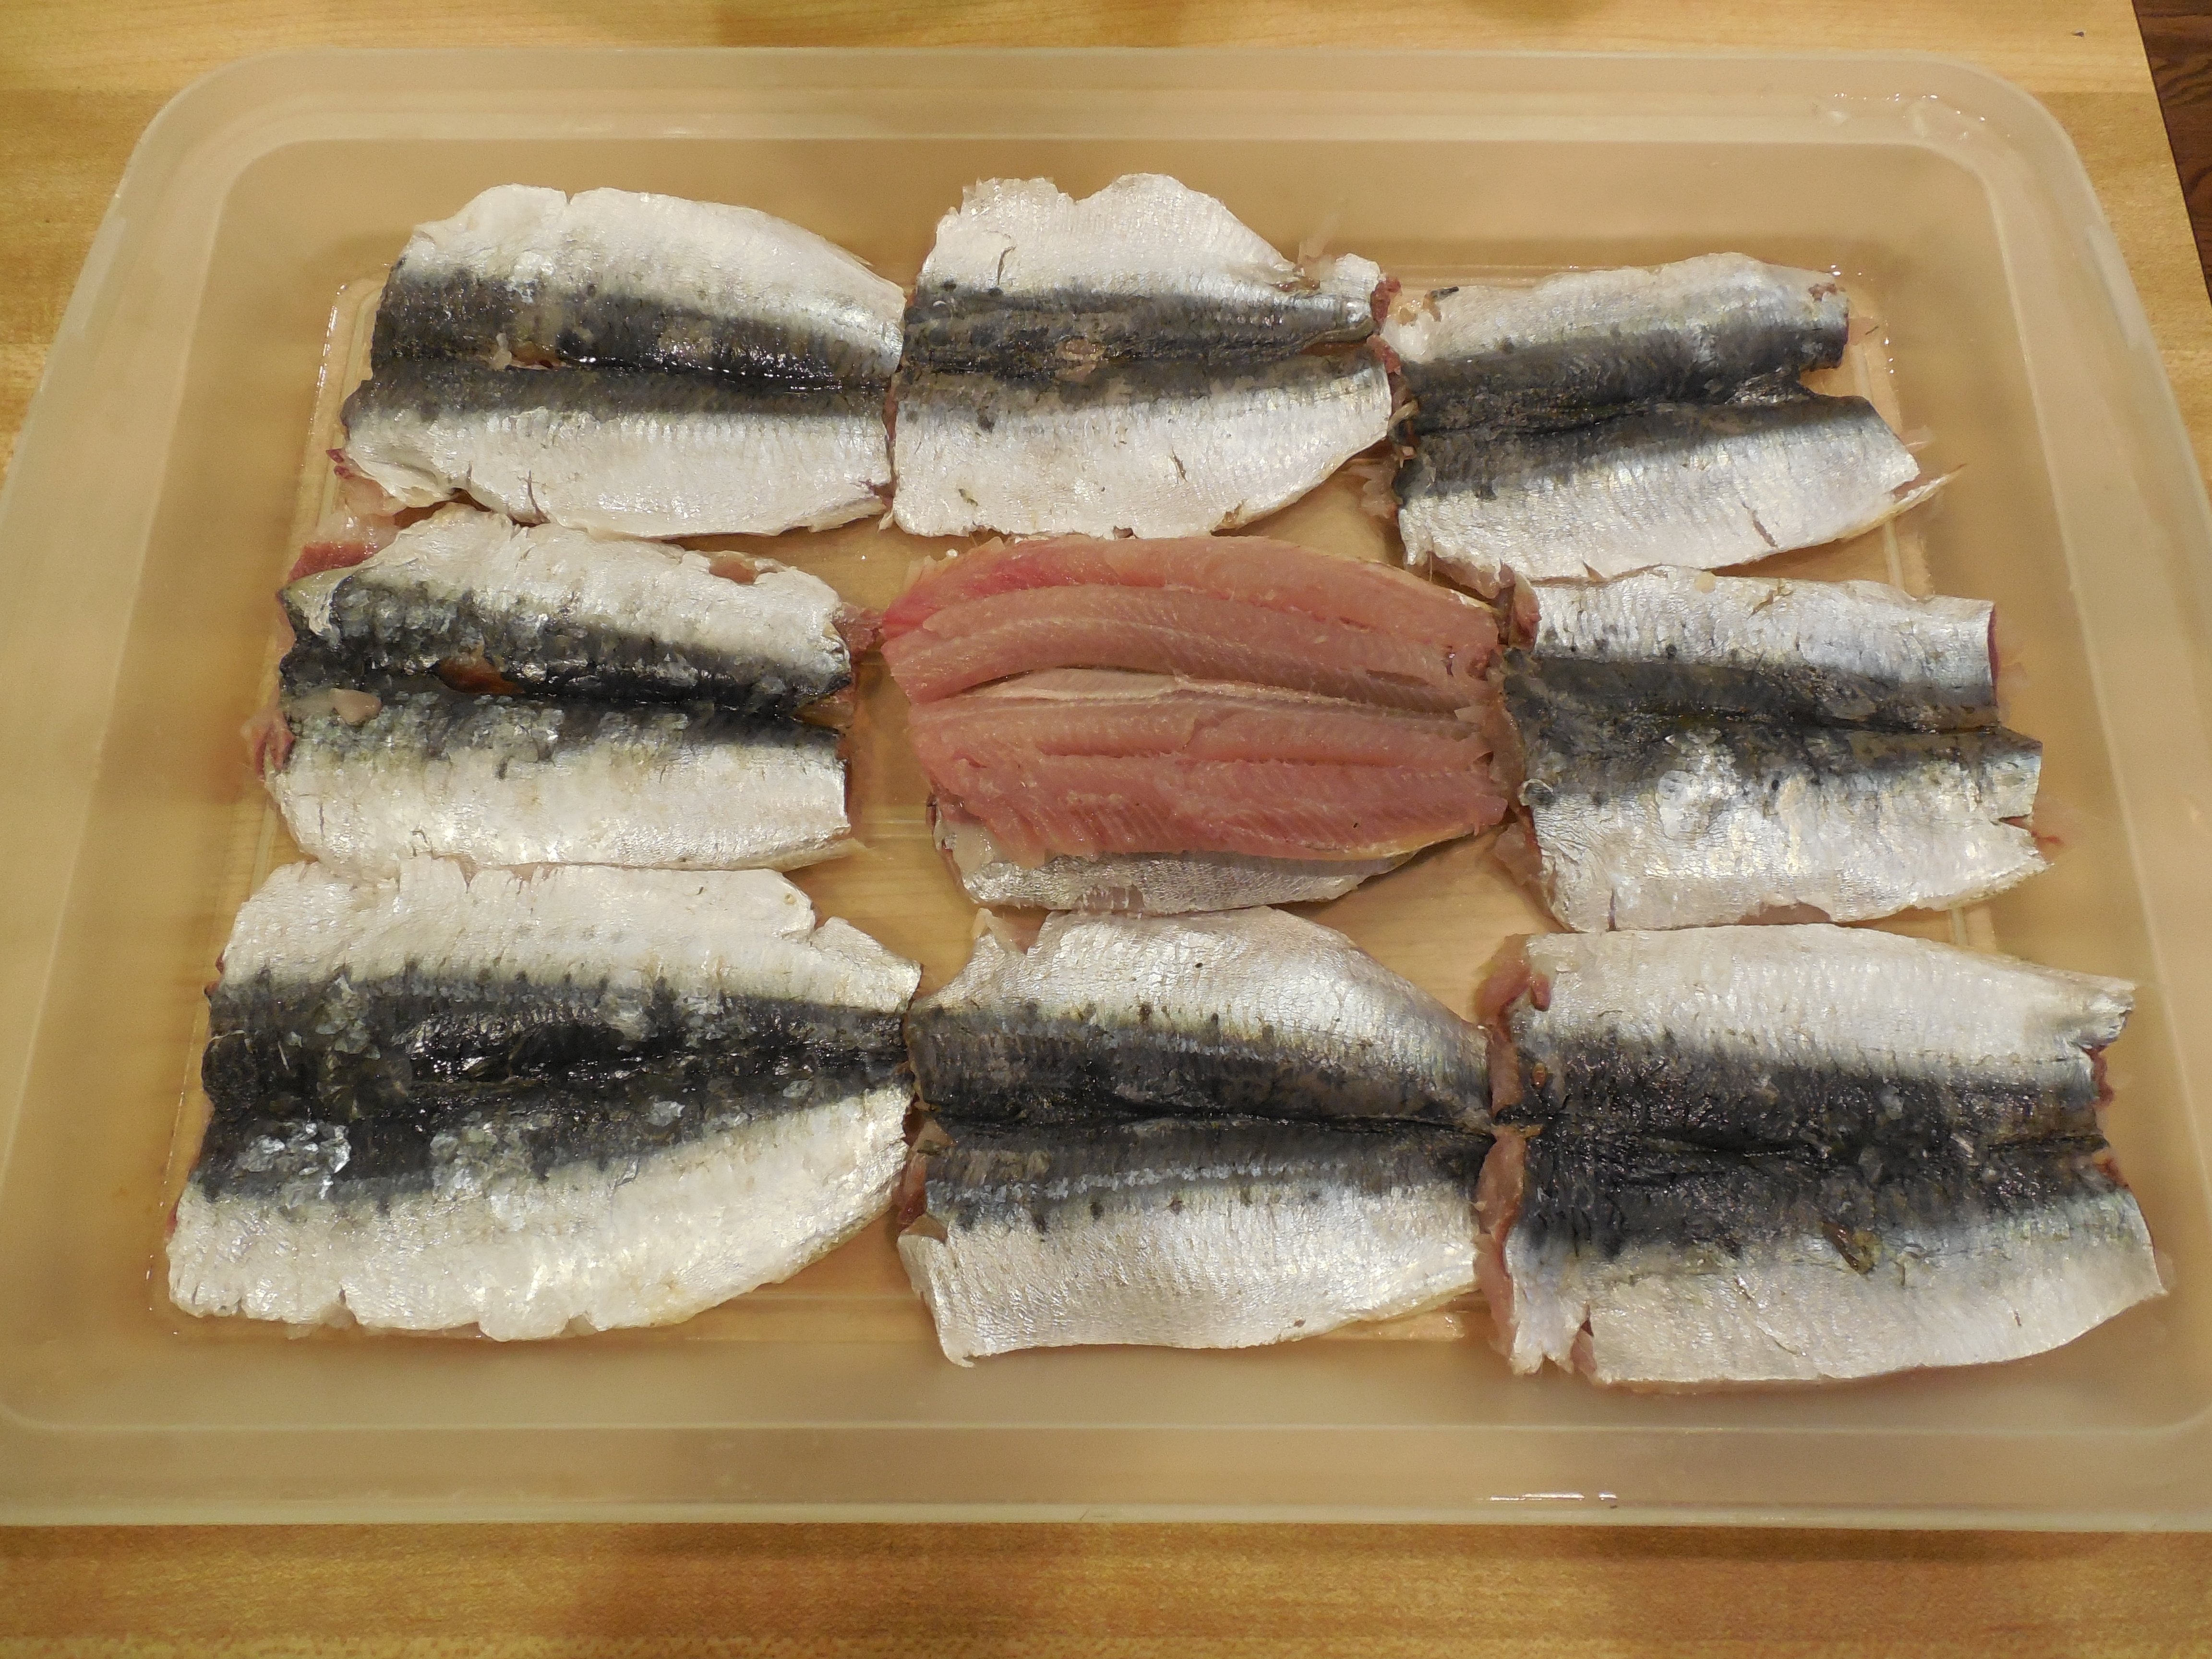
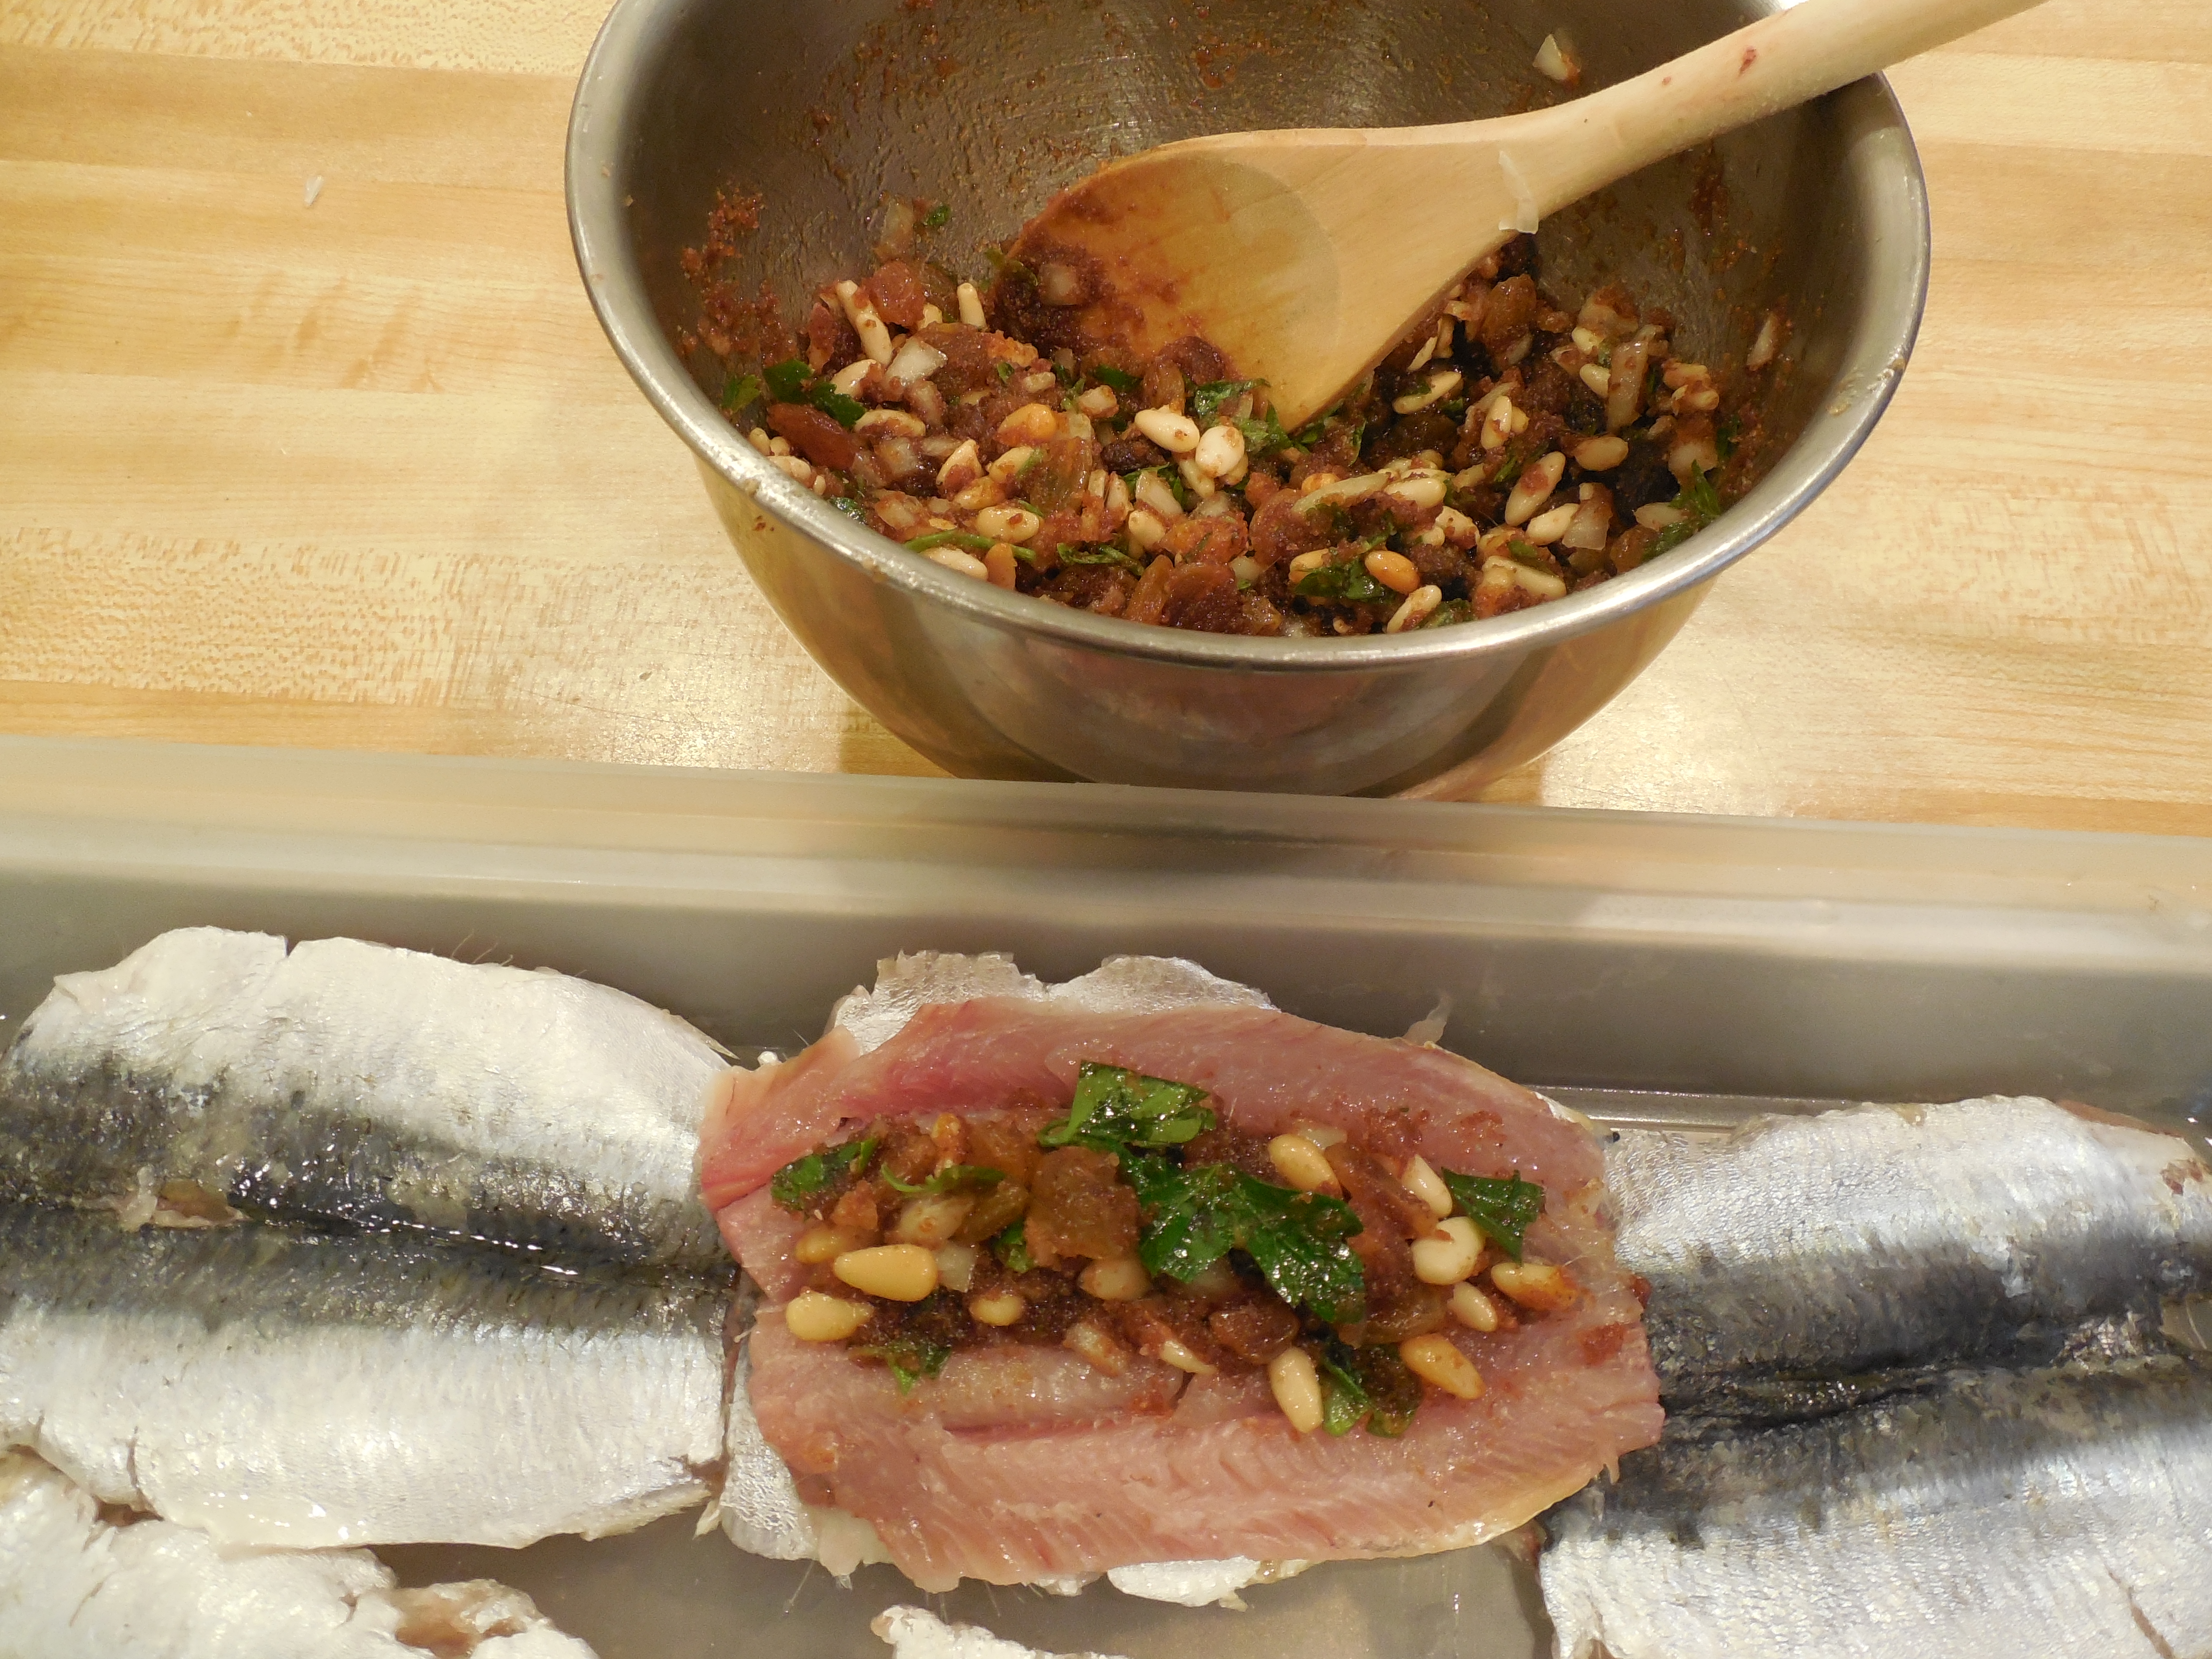
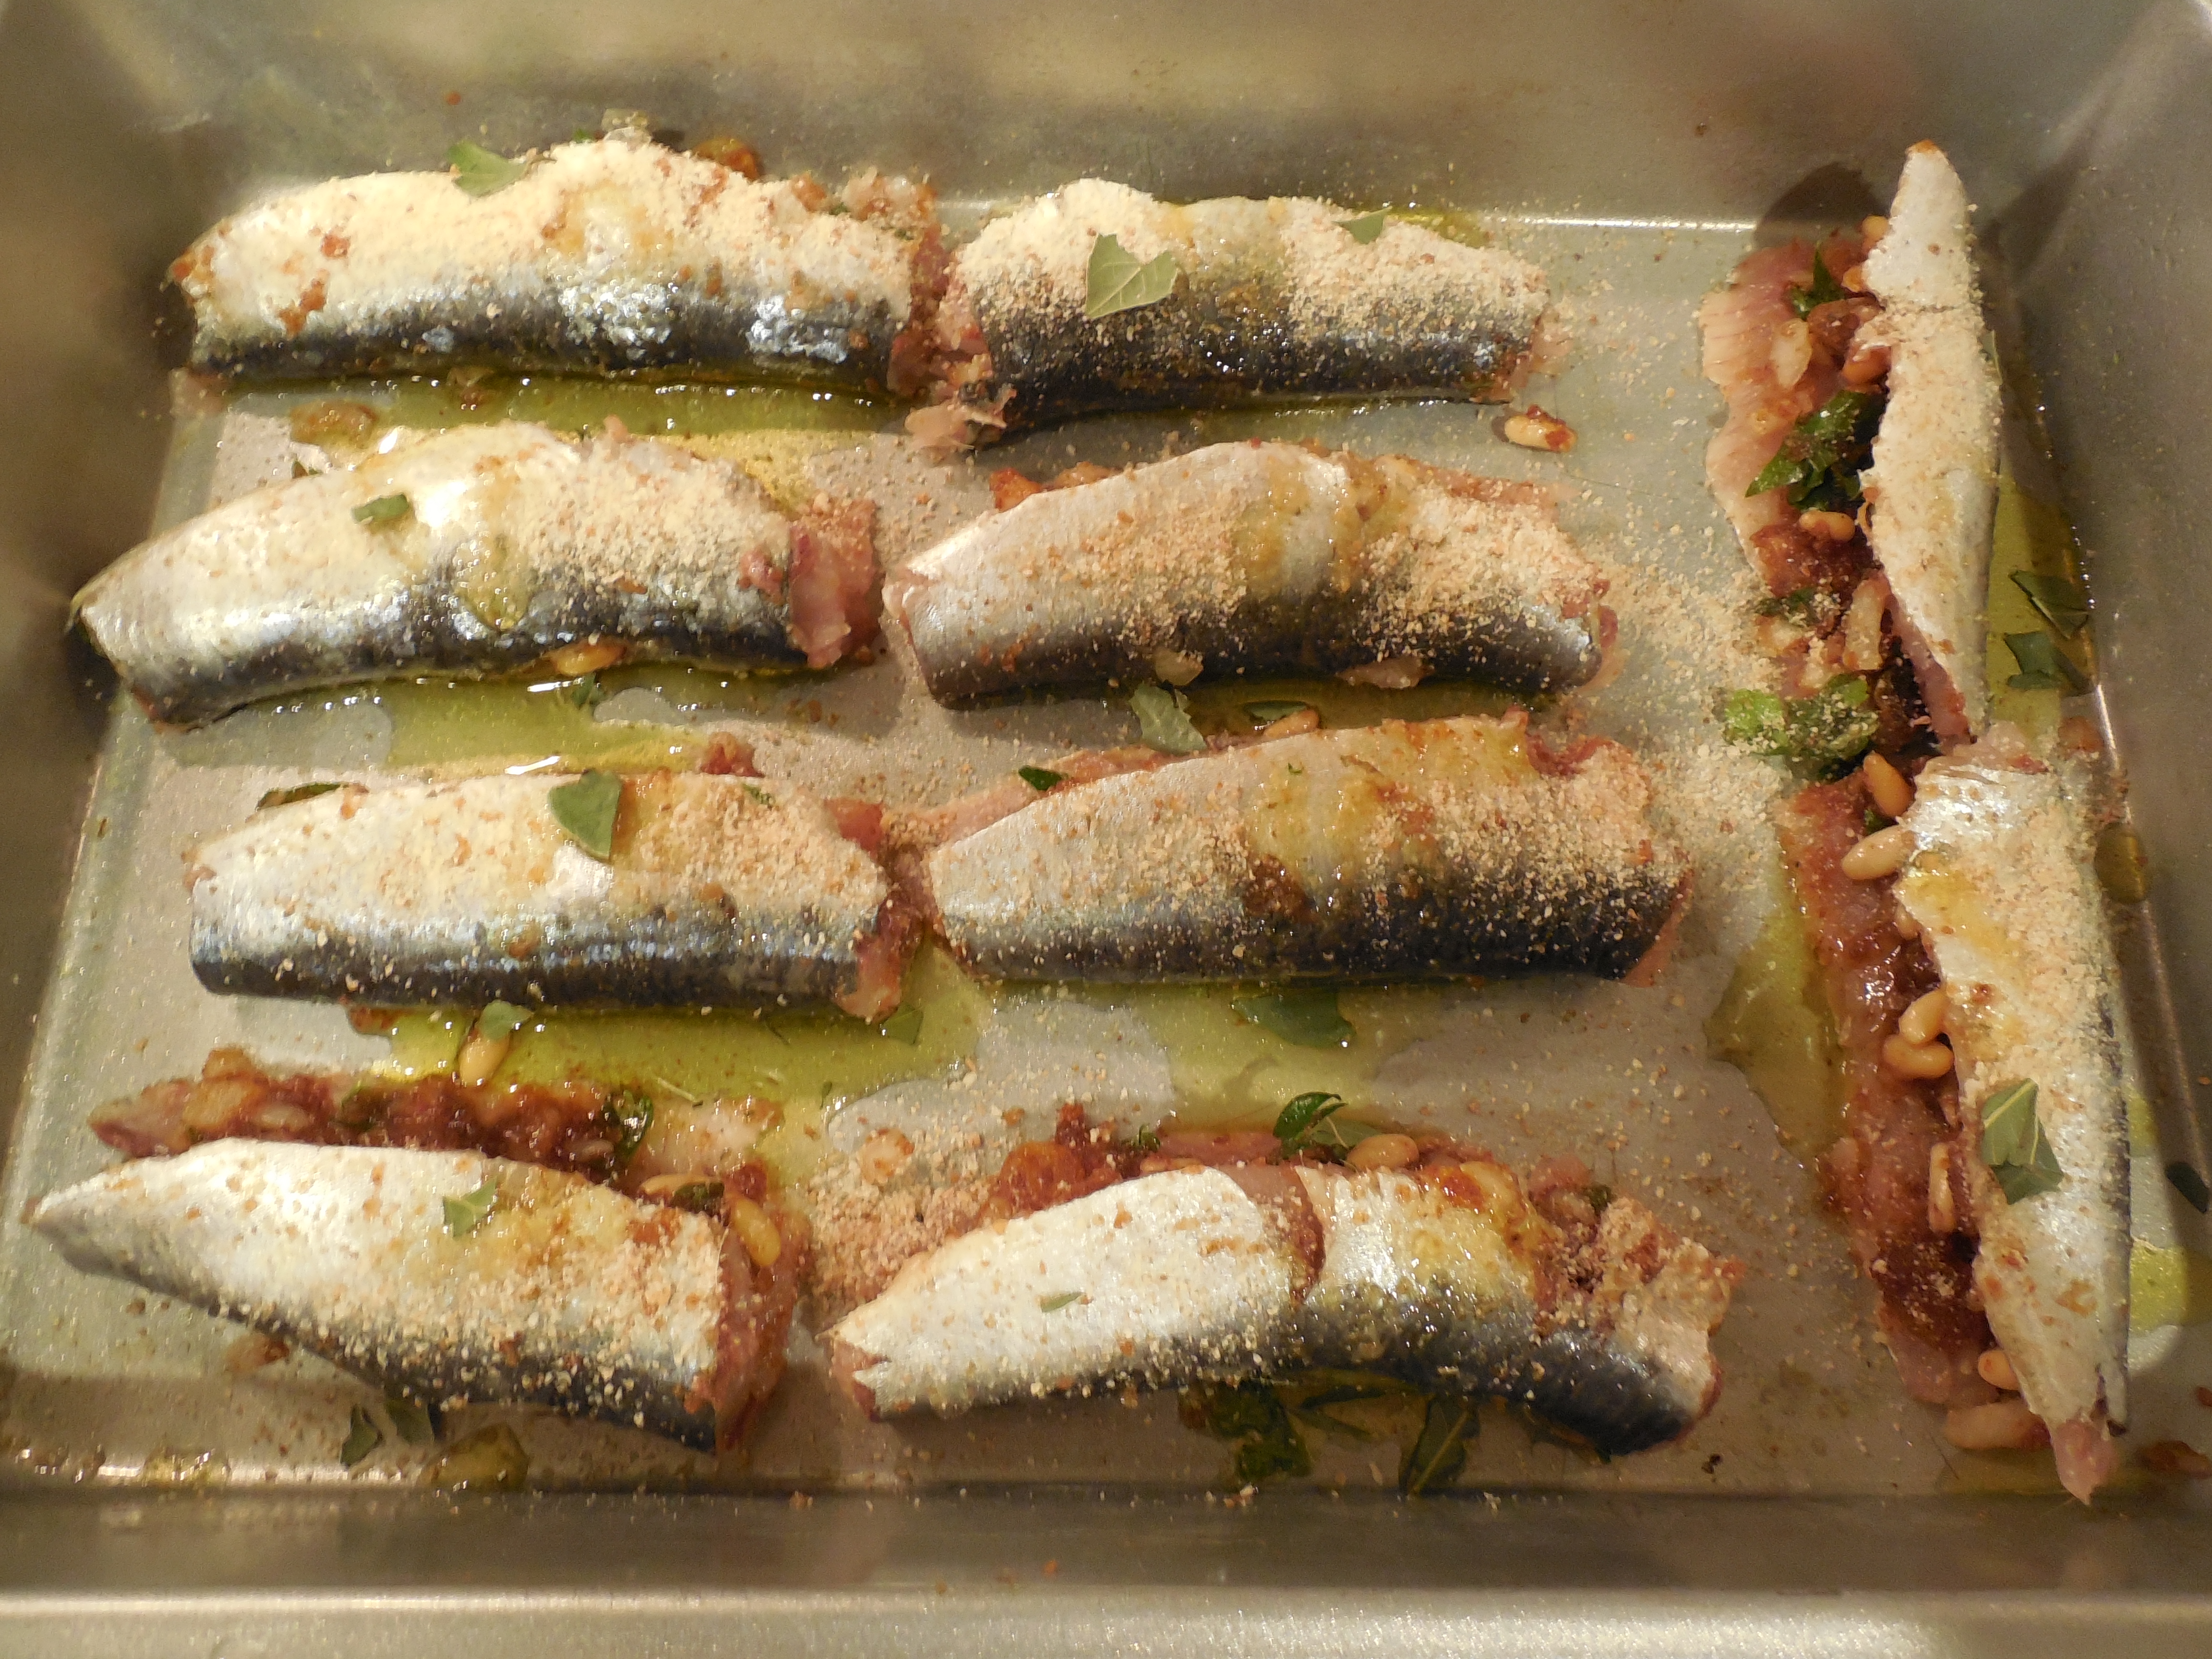
Each year, I plan my “feast of the 7 fishes” with some tried and true dishes — my shrimp scampi, for instance, is always a big hit for the primo course and easy to make. Last year I had fun with the antipasto course, and cooked up Sicilian and Sardinian-style stuffed calamari and stuffed fresh sardines — which, by the way, do not smell or taste “fishy” at all if you buy them fresh. They were both a hit with young and old alike, so I present them here for your family to try. I’ve also included a simple method for fresh fried calamari, complete with an Instagram video, as a well-known and well-loved family starter to any Italian-American meal.
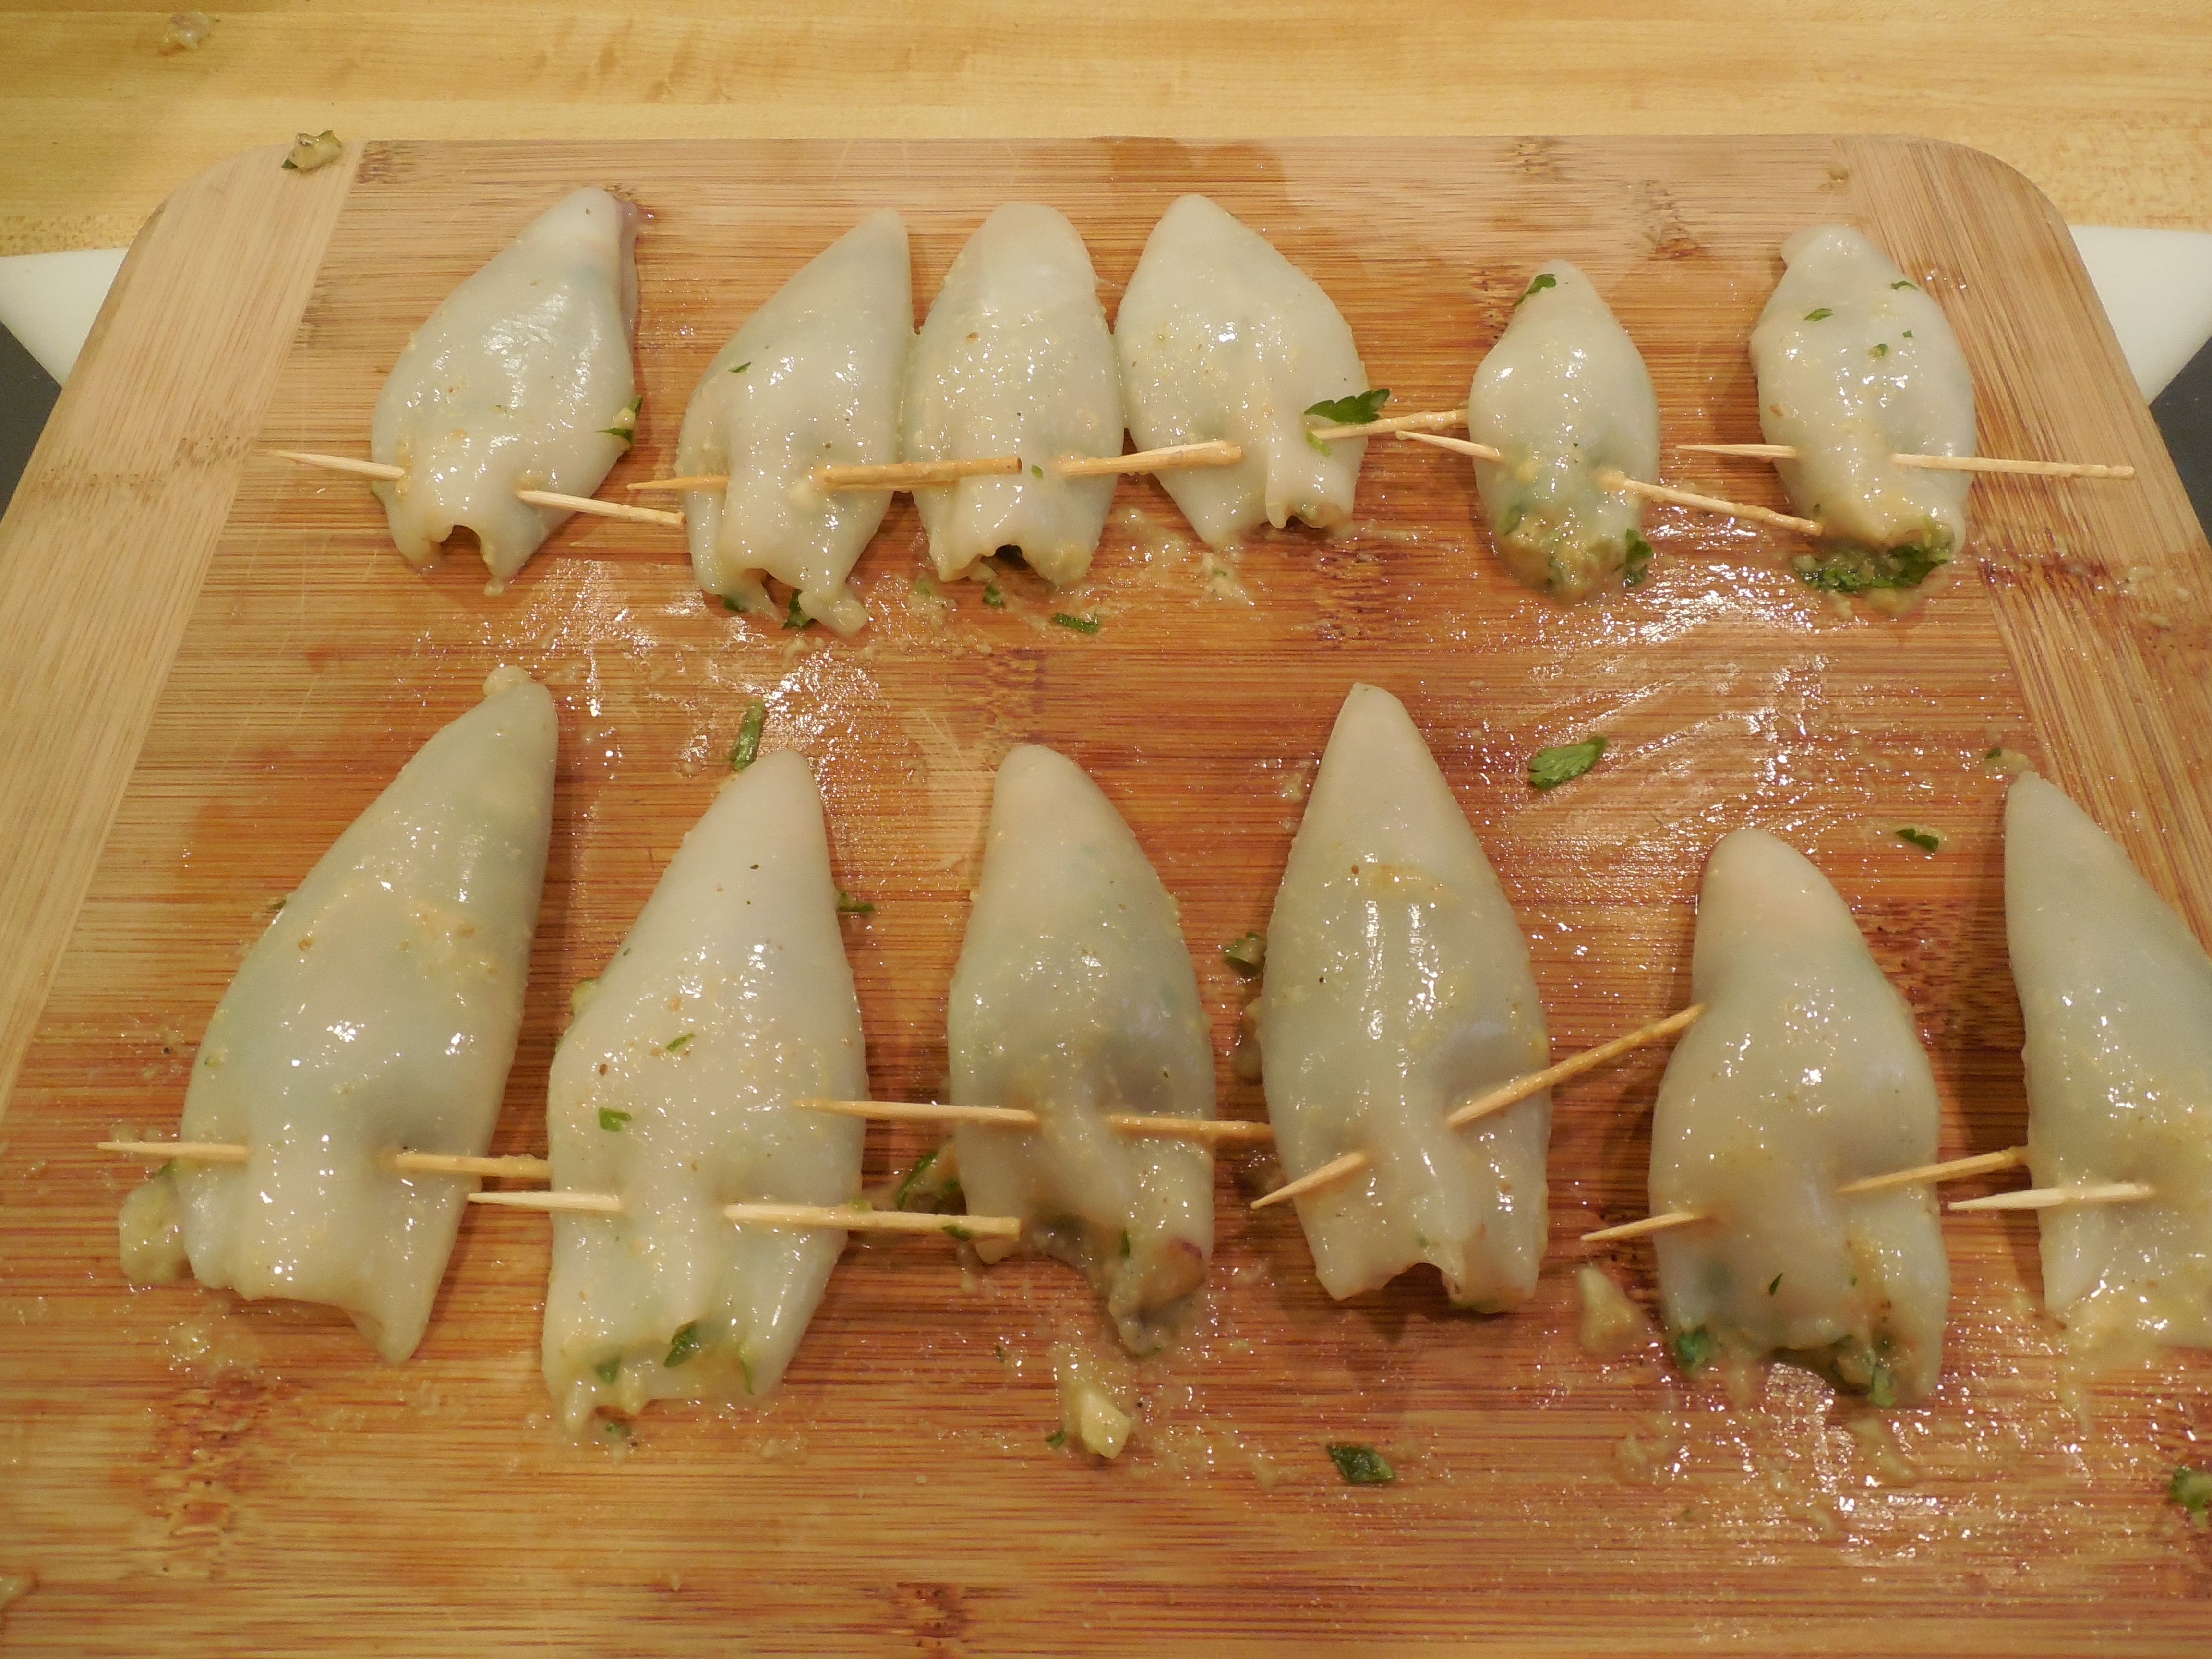
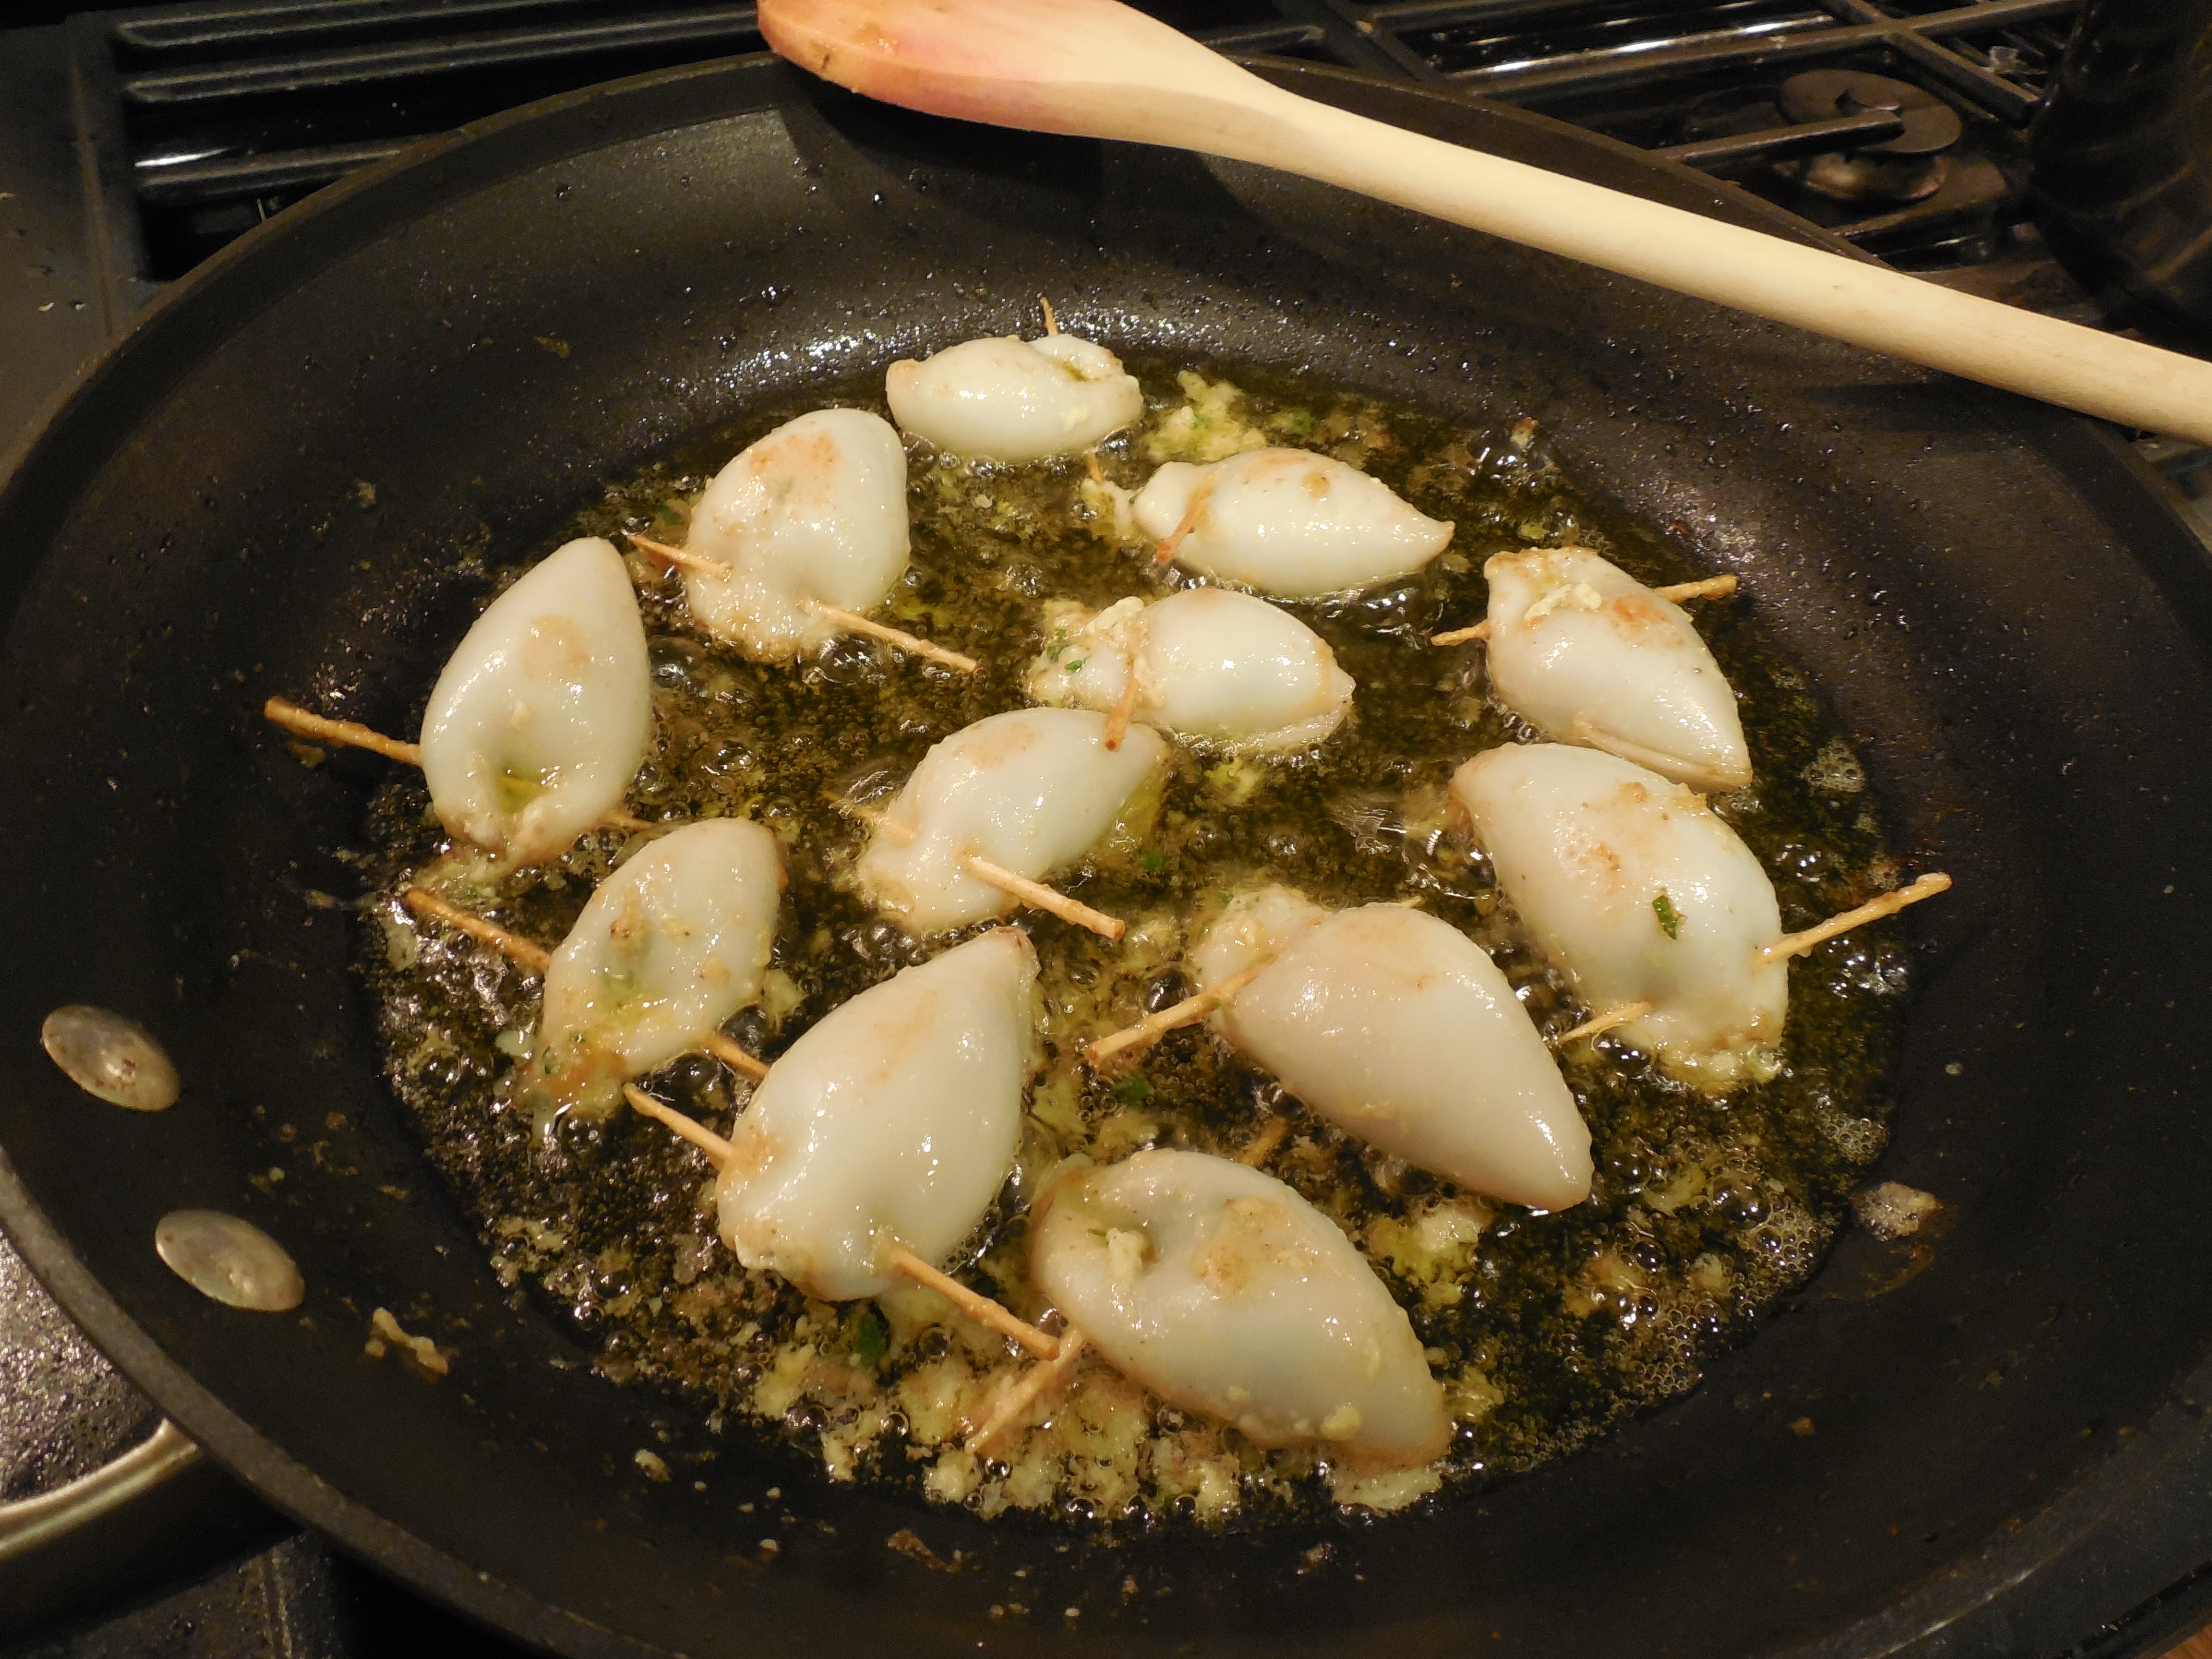
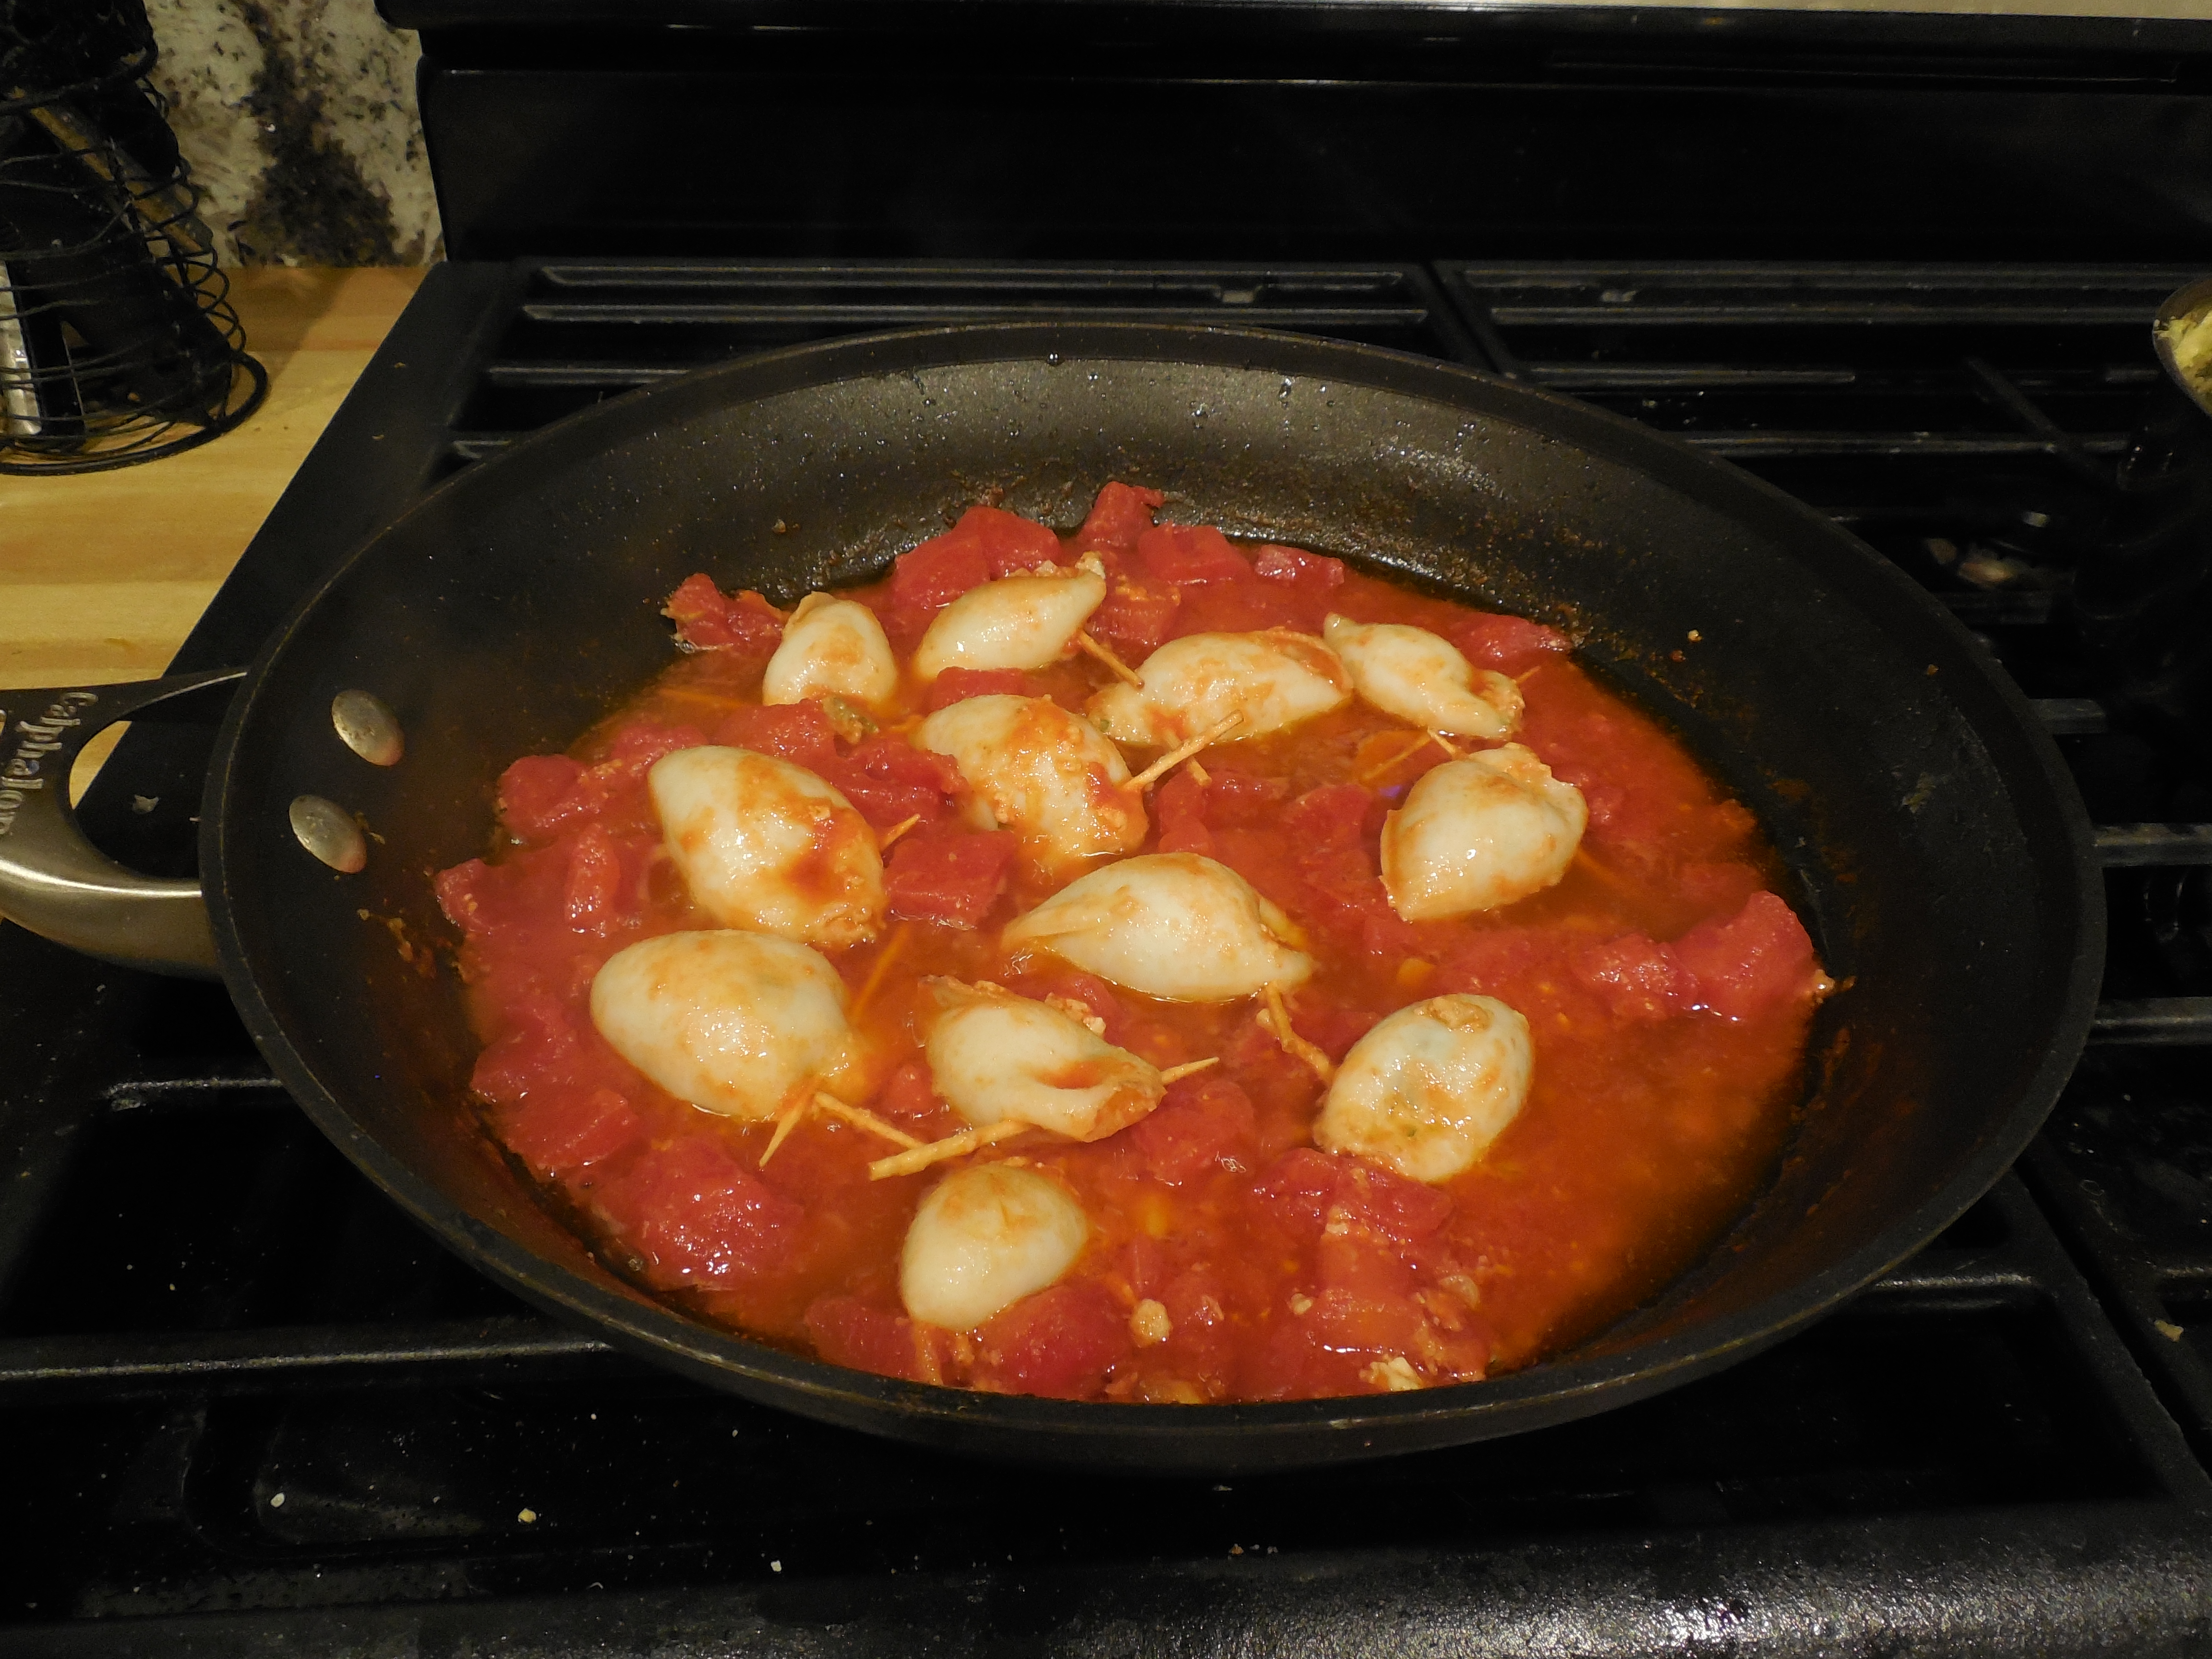
Ingredients
(Makes about 12 stuffed calamari (squid)
12 squid with about 3″ sacs
Stuffing: Tentacles from 6 squid, finely chopped
1 egg
1/4 cup fresh parsley, finely chopped
1 clove garlic, finely chopped
2 anchovy fillets, boned and preserved in olive oil
1 Tb and 1 tsp breadcrumbs (or more as desired)
salt and pepper
olive oil
Sauce: olive oil
4 whole cloves of garlic, peeled
1 can ( 8 oz.) Italian chopped Italian tomatoes
1/4 cup dry white wine
Prepare the calamari:
Buy calamari already cut and cleaned. Frozen calamari is fine. (For whole calamari: rinse, cut tentacles from body and remove the hard beak along the outside and the hard spine on the inside of the body. Then continue as below.)
Rinse again, take out any hard spine left in body and cut off outer fins.
Separate the body and tentacles into two bowls. Rinse again if needed. Drain any excess water, and pat dry.
Make the stuffing and stuff the calamari:
Put all the stuffing ingredients into a bowl and mix lightly until all are blended.
Add a little olive oil if too dry or a little more breadcrumbs, as needed. The mixture should be soft and hold together when picked up with the hand.
Spoon the stuffing into the calamari bodies, filling about 3/4 of each sac. Close with a toothpick.
Stuffed calamari, closed with toothpicks.
Cook the calamari in tomato sauce:
Use a large frying pan that can fit al the calamari.
Pour in enough olive oil to coat the pan and come slightly up the sides and heat to medium high. Add the garlic cloves and cook until they are a golden brown and then remove.
Put in the stuffed squid and brown both sides.
Stuffed calamari frying in olive oil on the stovetop.
Add chopped tomatoes and any juice from the can and the white wine. Cook at slow boil to boil off the alcohol in the white wine, then reduce heat to a simmer.
Cook at a slow simmer until calamari are cooked through, an additional 30 – 45 minutes or more. The cooking time with vary with the size of the calamari, so cut into the calamari to make sure it is cooked through and cook longer if needed.
Stuffed calamari cooking with tomatoes on the stove top.
When the calamari have finished cooking, remove the toothpicks and place each on a separate platter, covered with the sauce.
Serve very hot, with crusty Italian bread to mop up the sauce!
Stuffed calamari in tomato sauce, cooked and ready to serve.
Ingredients Calamari (Squid), frozen or fresh
flour
olive oil
salt
Buy calamari already cut and cleaned. Frozen calamari is fine. (For whole calamari: rinse, cut tentacles from body and remove the hard beak along the outside and the hard spine on the inside of the body. Then continue as below.)
Rinse again, take out any hard spine left in body and cut off outer fins.
Separate the body and tentacles into two bowls. Rinse again if needed. Drain any excess water, but no need to pat dry.
Cut each calamari body into rings, dredge in flour and shake off excess flour. The flour alone will cling to the damp calamari and make a very light, batter-type coating when fried in olive oil.
Heat oil about an inch deep in a large frying pan over medium heat. Do not let olive oil get too hot or smoke. Test olive oil by dropping one lightly floured calamari ring into the oil. The oil is hot enough when the calamari sizzles. Maintain olive oil at medium heat throughout the frying process, turning burner heat up or down as needed.
To fry the calamari, drop lightly floured calamari rings into the olive oil. Fry in batches and do not crowd the pan. Turn as needed to brown evenly. Fry the calamari rings first, and then the tentacles.
When the calamari are a golden yellow color, remove the calamari from the oil with a slotted spoon.
Drain any excess oil from the fried calamari in a bowl lined with a paper towel, and then immediately transfer to the serving bowl and salt lightly. Mix.
Bring your fried calamari right to the table and enjoy hot! .
About 10 fresh sardines Stuffing:
1/2 cup olive oil
4 Tbsp soft breadcrumbs
1/4 cup seedless, white raisins, coarsely chopped
1/2 cup pine nuts, coarsely chopped
1/8 tsp sugar
3 salted anchovies, boned and preserved in olive oil
1/4 cup fresh parsley, finely chopped
1/2 small onion, chopped finely
pepper Top with 2-3 bay leaves (fresh if possible), torn into pieces
Make the filling for the sardines:
Heat 1/2 cup olive oil over moderate heat in a large frying pan and then add the breadcrumbs. Stir, cooking until breadcrumbs are lightly browned.
Put the breadcrumbs into a large bowl and allow to cool a bit.
Add the yellow raisins, pine nuts, and sugar.
Rinse the anchovies until most of the salt has been removed. Pat dry. Chop into small pieces and then add to the filling in the bowl.
Add 2 -3 grinds of freshly ground pepper, parsley and onion.
Mix all ingredients together with a spoon. Pick up with your hand and see if mixture will hold together. Add a few drops of olive oil if needed and mix with your hands until mixture holds together enough to be pressed into the sardines.
Clean, stuff, and cook the sardines:
Process the fresh sardines as follows: Rinse well. Cut off the heads. Rinse again. Slit open the belly of each sardine lengthwise and pull out the intestines and rinse again. Pull out the backbone. Rinse in salted water and wipe dry. Split open and lay flat.
Fresh sardines cleaned, split open and ready to stuff.
Sardine with stuffing prior to closing.
Place a little bit of the stuffing into each sardine, then close and place into a shallow cooking pan coated with a bit of olive oil.
Stuffed sardines ready to cook.
Tear the bay leaves into several pieces and sprinkle them over the sardines .
Bake in the oven at 375°until sardines are cooked through and filling has browned, about 30 minutes.
When the sardines have finished cooking, sprinkle with freshly squeezed lemon juice and serve hot. Present them in their pan with the juices or transfer to a separate plate.
Stuffed sardines, cooked and ready to serve.
— by Kathryn Occhipinti
Kathryn Occhipinti, MD, is the author of the Conversational Italian for Travelersseries of books and a teacher of Italian for travelers to Italy in the Peoria and Chicago area. “Everything you need to know to enjoy your visit to Italy!”
Visitlearntravelitalian.com/download.html to purchase/download Conversational Italian for Travelers and find more interesting facts and helpful hints about getting around Italy!Learn how to buy train tickets online, how to make international and local telephone calls, and how to decipher Italian coffee names and restaurant menus, all while gaining the basic understanding of Italian that you will need to know to communicate easily and effectively while in Italy. —From the staff at Stella Lucente, LLC
Italian Chicken Broth: Make Egg Drop Soup or Make it with Pastina Stars

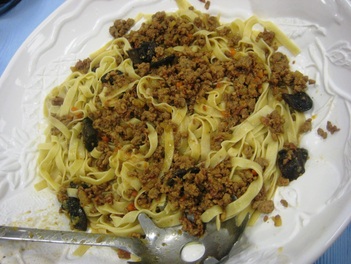
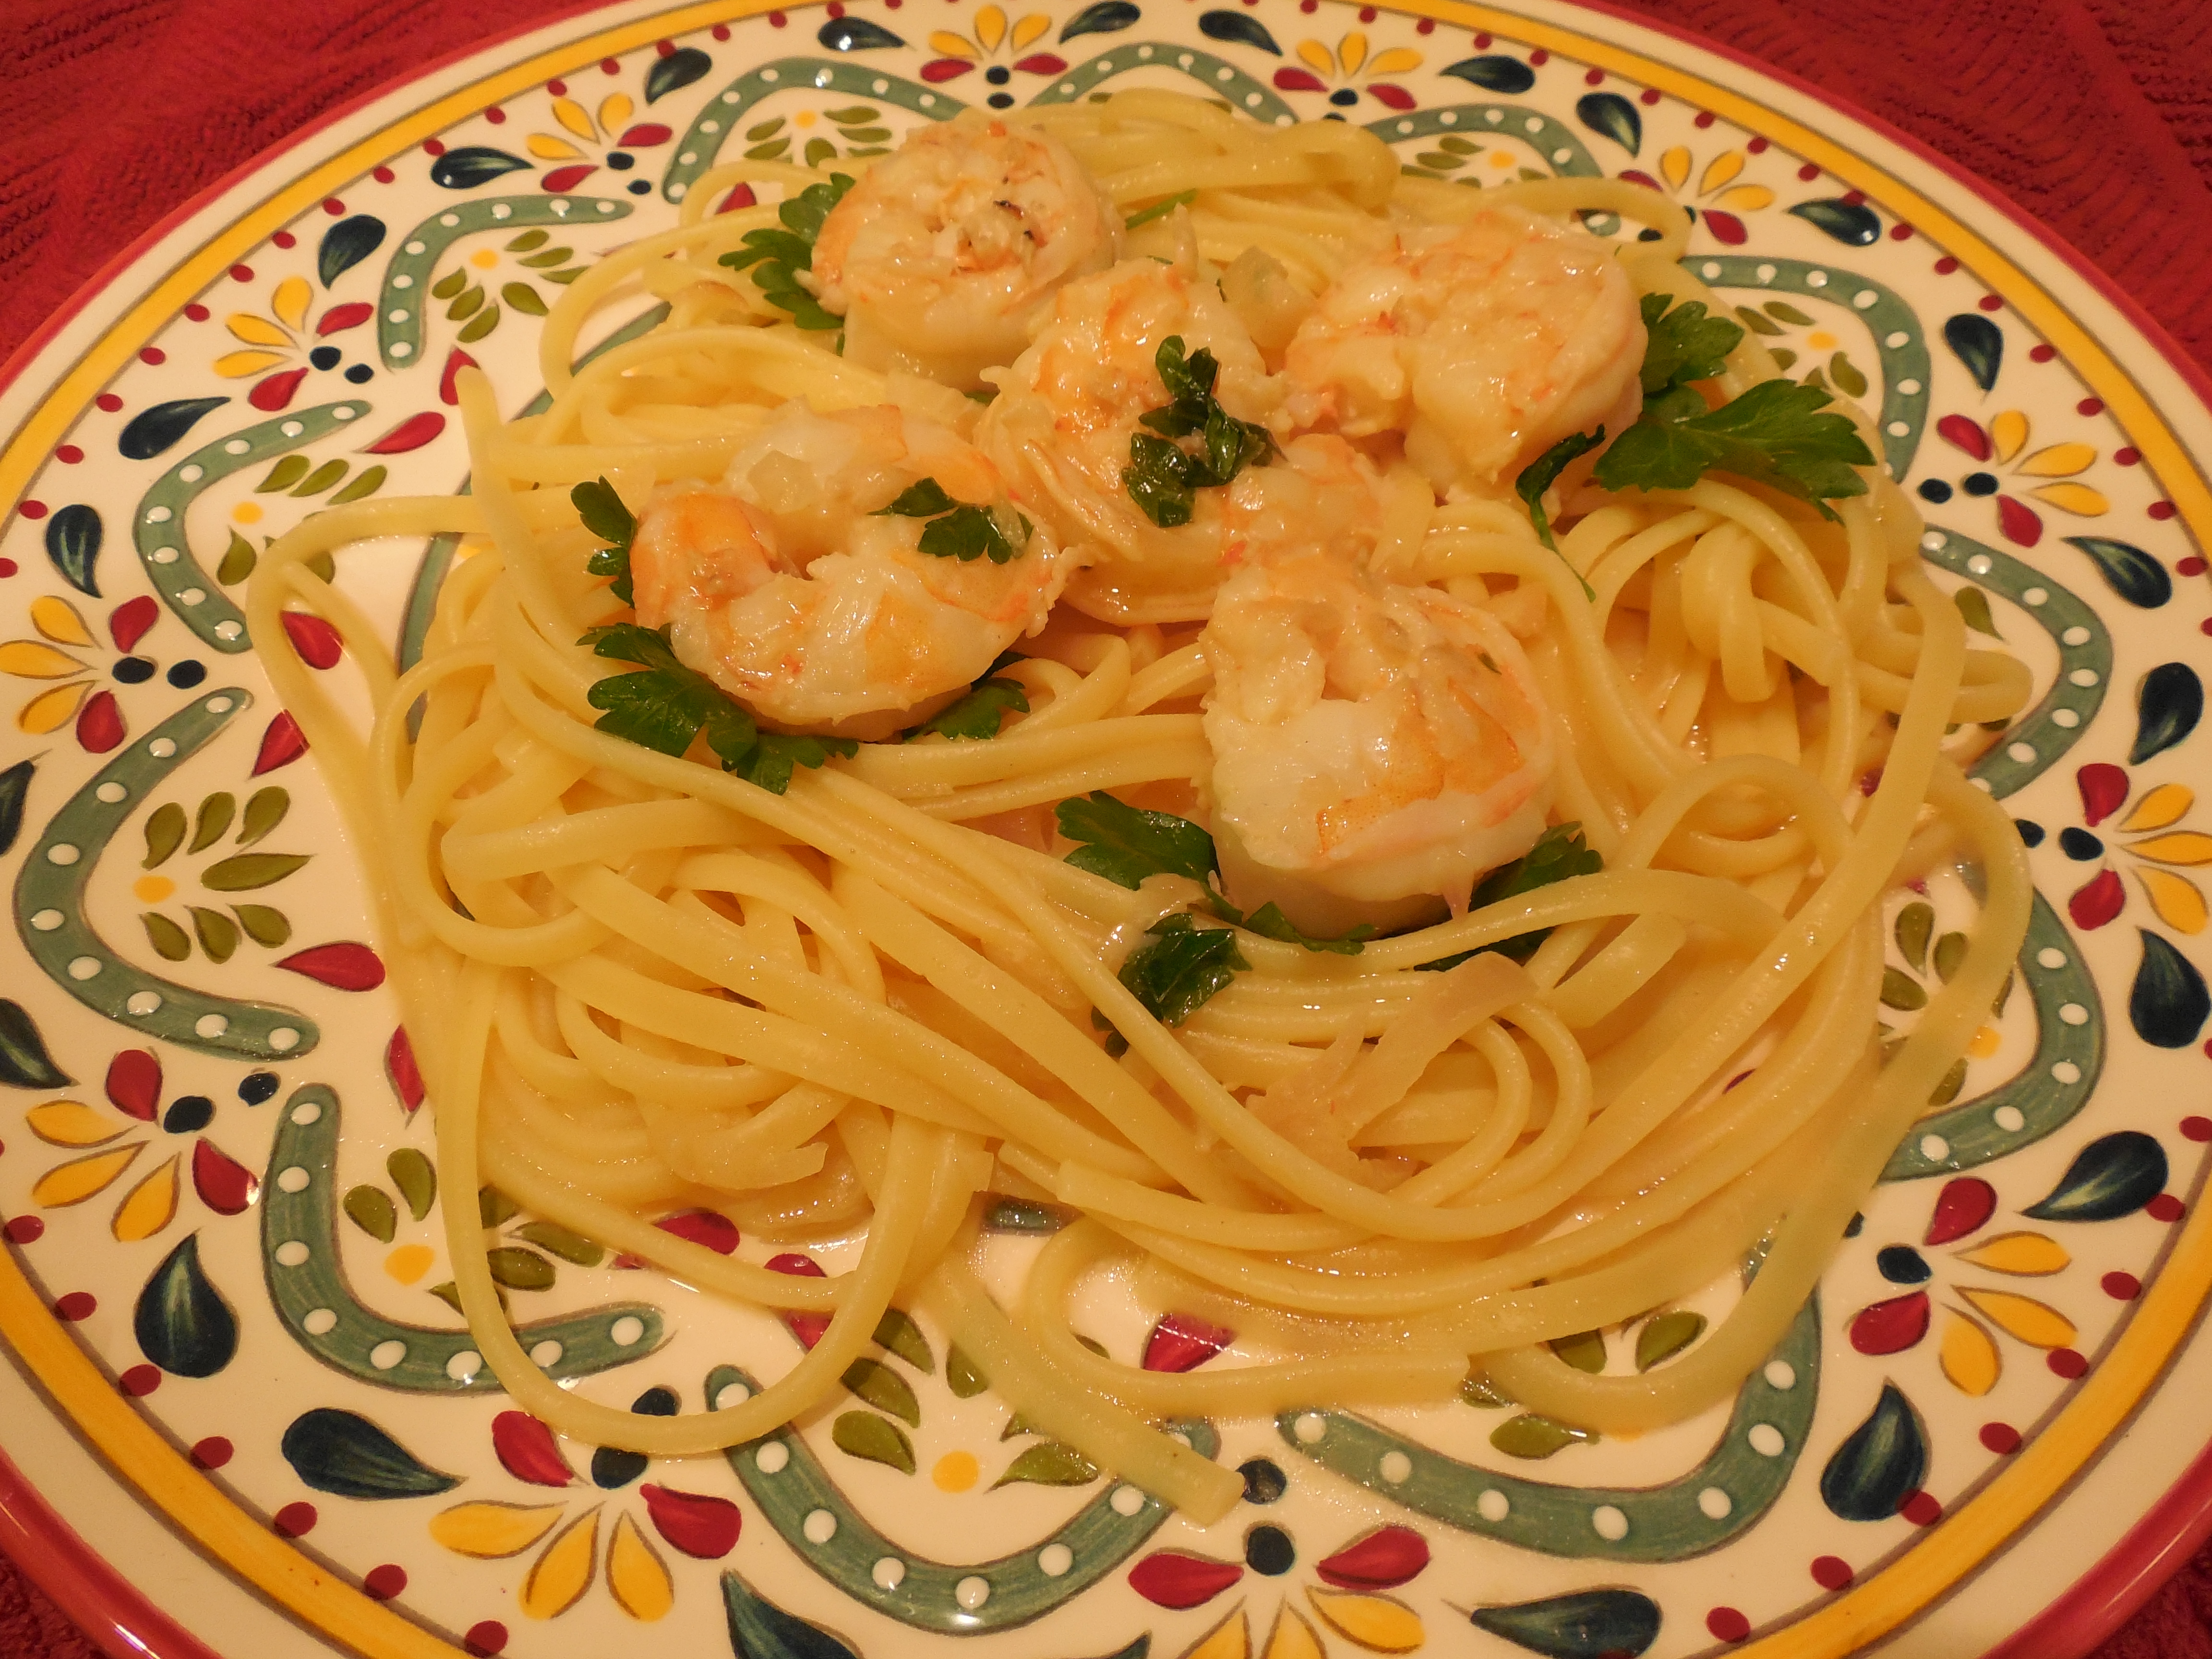

Lentil Soup brings a Buon Anno Nuovo! Called Zuppa di Lenticchie in Italian, it brings a Happy New Year!